To hang drywall from sheets to the first coat, start by preparing a clean, staged workspace and marking studs, boxes, and openings. Choose the right fasteners and tools, then lift each sheet and align it with joists, keeping panels square and seams staggered. Fasten with proper screws, countersinking without tearing paper. After all sheets are mounted, trim edges as needed and fit joints tightly. Finally, apply a thin seam layer and tape centered over joints, setting you up for the next steps. More details wait ahead.
Prepare the Space for Drywall Hangs

Before you hang drywall, clear the workspace and protect floors and furniture. You’ll optimize safety and efficiency by organizing materials, tools, and room layout before any sheet goes up.
Inspect walls and framing, verify plumb and level lines, and correct obvious defects without delaying the install.
Establish clean, dry conditions; control dust and debris with barriers and containment as needed.
For drywall installation, set up a staging area with sheets stacked flat, and pre-cut where practical to minimize handling.
Label panels by room and orientation to speed installation.
Mark electrical boxes and plumbing penetrations on walls to avoid interruptions.
Ensure electrical outlets and HVAC components won’t obstruct placement.
Plan for space preparation that reduces cuts and repositioning, improving overall alignment and finish quality.
Choose Fasteners and Tools for Your Project
Once you’ve prepared the space, the next step is selecting fasteners and the right tools for your drywall install. You’ll choose fasteners that suit your material and environment: self-drilling screws for steel studs, fine-thread for wood, and corrosion-resistant fasteners where moisture is a concern.
Consider the length so screws penetrate both drywall and framing by 5/16 to 3/8 inch. For tools, rely on power tools that deliver consistent torque and minimal wobble: a variable-speed drill, a drywall screw gun, and a sturdy hammer for pilot holes.
Have a utility knife, tape measure, and straightedge ready for cuts and alignment. Always keep spare bits, depth stops, and a magnetic tray.
Select types of fasteners and power tools that keep gaps tight and flush.
Hang Drywall: Layout, Lifts, and Fastening
Hang drywall: layout, lifts, and fastening requires precise planning and clean execution. You’ll start by outlining sheet placement to minimize seams and maximize panel efficiency. Mark reference lines for studs, ceilings, and openings, then verify room dimensions and square.
Choose lifts appropriate for wall and ceiling heights, and coordinate helpers to keep panels square as you raise them. Fasten with the recommended screws, ensuring countersinking without tearing paper. Maintain a clean workspace to prevent damage and misalignment.
When detailing, consider drywall insulation and moisture-control needs, ensuring insulation remains undisturbed and edges stay flush. For ceiling installation, align panels with joists, staggering joints between rows.
Maintain consistent fastener spacing, and avoid overdriving screws to preserve sheet integrity and flatness.
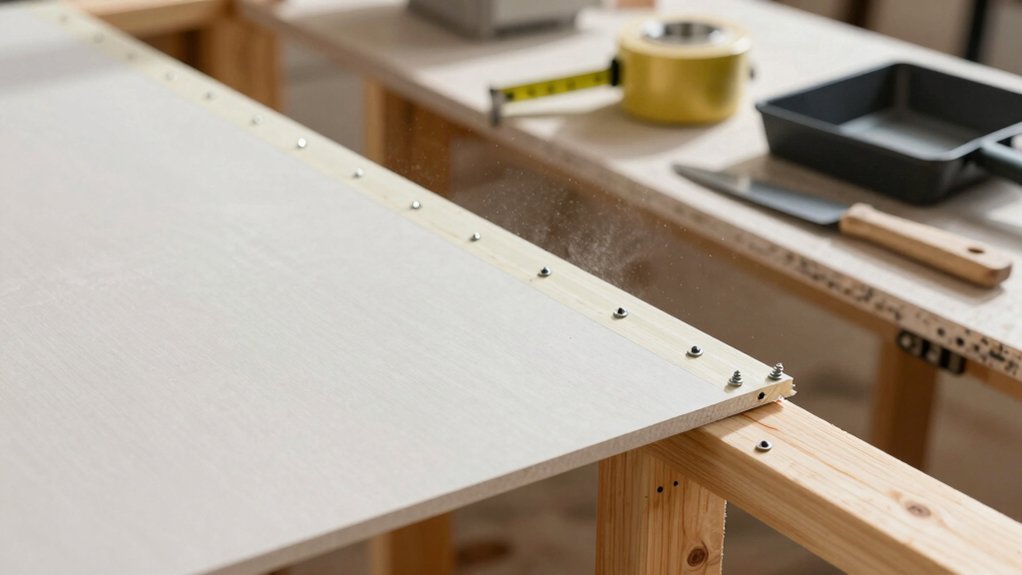
Cut, Fit, and Seam Drywall
Cutting drywall to fit and sealing seams must be deliberate and accurate. You measure twice, cut once, and verify that each panel sits flush against studs and against adjacent sheets. Use a sharp knife, straightedge, and required personal protection, then trim edges for clean contact and minimal gaps.
When you fasten, stagger joints and leave slight slack at corners to accommodate slight framing shifts. Drywall edges should sit tight against fasteners, with screws spaced per code; countersink just below the surface.
Seal seams with appropriate joint compound after dry fitting, ensuring panel lines disappear under a smooth layer. Plan your joints to minimize texture disruption, and consider drywall texture compatibility when finishing.
Precision here reduces sanding, repairs, and rework later.
Tape the First Coat: Mud, Technique, and Quick Tips
A fresh coat of mud starts the tape process, and applying it correctly sets you up for a smooth finish. You’ll lay down a thin layer of joint compound along seams, then align drywall tape centered over each joint. Press from the center outward to embed the tape and remove air bubbles. Squeeze excess mud to prevent ridges; you’re aiming for a flush surface with the drywall face.
Build a lightweight second coat once the first dries, feathering edges beyond the tape line. Use a wide, clean knife to blend joints, keeping strokes smooth and consistent. Avoid overworking; too much mud causes cracking. Maintain a steady pace, check for level, and ensure joints stay straight.
Drying time follows product directions; then sand lightly before the next coat.
Frequently Asked Questions
What’s the Best Order to Mud Multiple Coats for Beginners?
Start with lightweight mud for your first coat, then feather and dry; follow with a medium coat, then a thin finish coat. You’ll mud taping evenly, and joint curing will improve as you alternate sanding and curing times.
How Long Should Each Joint Compound Coat Cure Before Sanding?
“Patience is a virtue.” You should wait 24 hours per coat before sanding, ensuring drying times are complete and sanding readiness is achieved; if unsure, extended cure is safer, preventing dusting or cracking later.
Which Safety Gear Is Essential Beyond Basic Goggles and Mask?
Beyond goggles and a mask, you need respiratory protection rated for dust and silica, plus fall protection when working at heights. Make certain a respirator fit test, proper cartridges, and harness anchors are inspected, maintained, and used correctly at all times.
How to Handle Moisture-Prone Walls During Drying and Curing?
A 60% faster cure starts when you manage moisture early. You should prioritize moisture control and proper drying techniques, using dehumidifiers and good airflow; monitor walls daily, avoid over-drying, and seal edges to prevent steam intrusion.
What Are Common Refinishing Mistakes to Avoid After Taping?
Avoid common taping errors and finishing pitfalls by double-checking joints, applying uniform mud, and feathering edges. Don’t rush drying; sand lightly between coats, maintain clean tools, and inspect seams for cracks to guarantee a smooth, durable finish.
Conclusion
Now that you’ve hung the sheets and taped the first coat, you’re almost at the finish line. Keep joints clean, seams straight, and mud smooth to avoid crashing the texture. Let constraints guide your touch—each pass should build strength, not crowd the space. Think of drying as the final sprint: steady, controlled, efficient. Remember, practice makes precision, and your walls will speak for themselves once the tape fades and the surface shines.