
Turning an office space into a modern UK studio starts with a clear conversion goal and a feasibility check against budget, codes, and lease rules. Assess daylight, acoustics, and storage, then plan a flexible open layout with zoned living, kitchenette, and sleeping nooks. Prioritize modular furniture, built-ins, and layered lighting. Integrate smart home tech, energy-efficient finishes, and privacy-friendly acoustics. Phase your budget and milestones to pace works; finish with cohesive style cues that make the space feel like home—while staying compliant and adaptable. Continue to uncover practical steps.
Define Your Studio Conversion Goal
Begin by listing compartments and functions the studio must support, then translate each into quantitative targets: floor area utilization, natural light access, acoustic performance, and temperature stability.
Decide on occupancy, workflow, and storage thresholds to prevent clutter. Map integration needs for kitchen and bathroom facilities, plus essential connectivity for work and leisure.
Establish finishing quality, durability standards, and maintenance expectations. Consider decorative accents and color schemes as future refinements, not initial constraints.
Validate goals against building codes, budget, and project timeline, ensuring alignment with feasibility and risk mitigation.
Your documented goal becomes the benchmark guiding design decisions and approvals.
Assess the Space You’ll Reimagine
Document glazing, natural light patterns, and potential dark zones to inform layout choices.
Evaluate mechanical systems—HVAC runs, vent positions, electrical panels, and outlet density—to gauge retrofit needs.
Assess acoustics by identifying hard surfaces, noise sources, and reverberation risk; plan for future acoustic insulation where partitions or floors transmit sound.
Consider feng shui implications to align traffic flow, focal points, and corner energy with your preferred feel.
Identify constraints, such as service routes and access points, to avoid retrofits that complicate framing.
Compile findings into a concise briefing that guides zoning, storage, and egress decisions.
Know Your Planning Permissions and Lease Rules
Before moving ahead, you must confirm what planning permissions and lease terms apply to converting the office space into a modern UK studio apartment. You’ll assess local planning regulations, permitted changes, and potential need for a prior approval process.
Verify if your property’s lease imposes restrictions on subletting, alterations, or change of use, and identify any consent requirements from the landlord or management company.
Consult your local planning authority for use-class eligibility, potential householder or prior notification routes, and any conditions that could affect execution timelines.
Consider Building permits, timelines for approvals, and post-approval verification.
Review Lease restrictions in detail, noting any restoration obligations, compliance pendants, and renewal considerations to avoid disputes and ensure a legally sound conversion strategy.
Plan a Flexible Open-Plan Layout
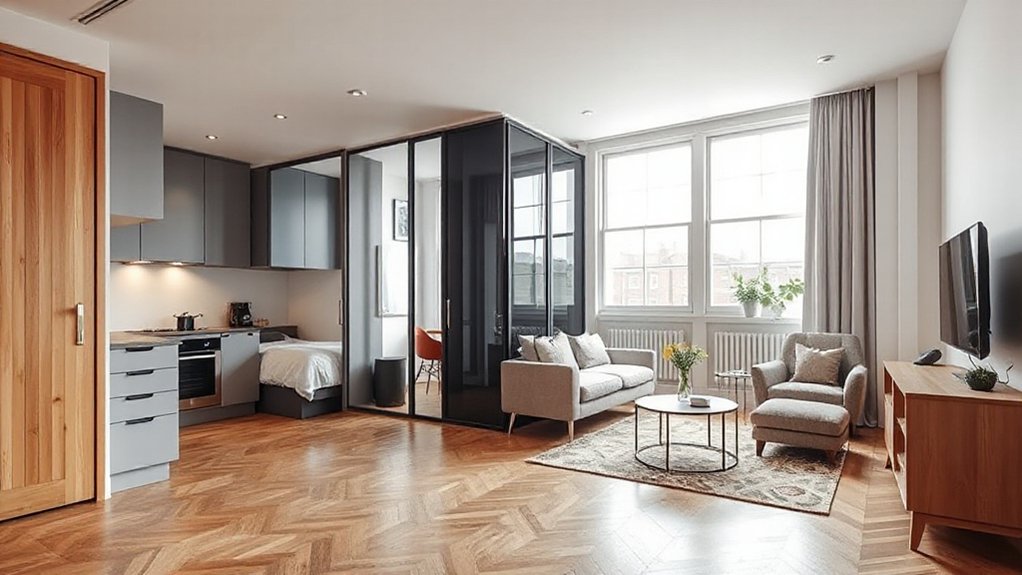
A flexible open-plan layout starts with defining zones that serve distinct functions while preserving flow and natural light. You map primary zones—living, kitchenette, work zone, and sleeping nooks—around core circulation, not rigid boxes.
Use modular furniture to reconfigure without heavy disruption, prioritizing seating pairs and desk access that maintain sightlines. Furniture arrangement should emphasize clear interaction rules: sofa faces the television or project area, a compact dining zone near the kitchen, and a work desk positioned for natural light without glare.
Implement zoning with subtle height contrasts and low-profile partitions that don’t isolate spaces. Lighting design integrates layered layers—ambient, task, and accent—so each zone maintains brightness appropriate to its function.
Choose finish consistency and acoustic cues to sustain coherence across the open-plan flow.
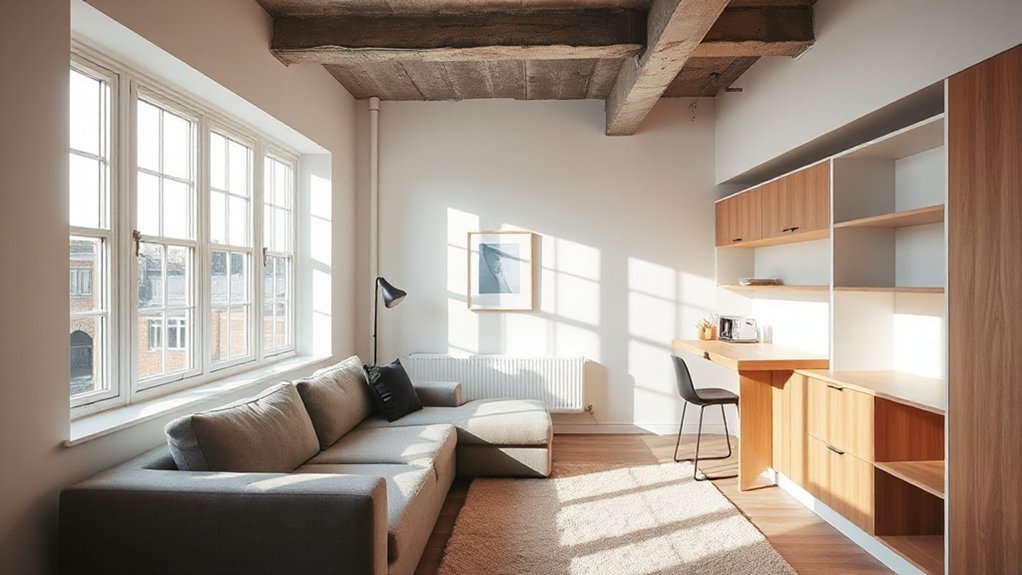
Maximize Natural Light With Smart Design
Maximizing natural light starts with strategic placement of openings and reflective surfaces that amplify daylight deep into the space. You’ll achieve this by prioritizing window orientation, maximizing glazing area, and using light shelves to bounce illumination from interior walls.
In smart design, consider dual-height glazing, unobstructed sightlines, and slim-trim frames to reduce visual bulk. Align furniture to prevent shadowing and preserve corridor brightness, while mirrored or high-reflectance finishes enhance perceived depth.
Incorporate skylights where feasible to supplement wall windows during mornings and late afternoons. Exterior shading should modulate glare without sacrificing ambient light, using treated frits, louvers, or perforated screens.
Finally, select neutral tones with cool undertones to maintain true color rendering, ensuring natural light remains authoritative in daily tasks and spatial perception.
Create Zones With Built-In Storage
As you repurpose the space, built-in storage should actively define zones without encroaching on openness. You achieve this by integrating vertical and horizontal elements that delineate living, work, and sleep areas while preserving flow.
Use built-in shelving to create visual boundaries—low, continuous shelves mark a seating zone, while taller units subtly separate the workspace.
Align cabinetry with window lines to maintain daylight, avoiding bulky blocks that trap sightlines.
Hidden compartments within cabinetry or within a bench provide concealed storage, reducing clutter and enhancing perceived space.
Plan for mechanical and electrical access behind panels that blend with finishes.
Prefer uniform materials and hardware for a cohesive, high‑end look.
This approach delivers clear zones with compact footprint and minimal visual disruption.
Choose Multi-Functional Furniture for Small Spaces
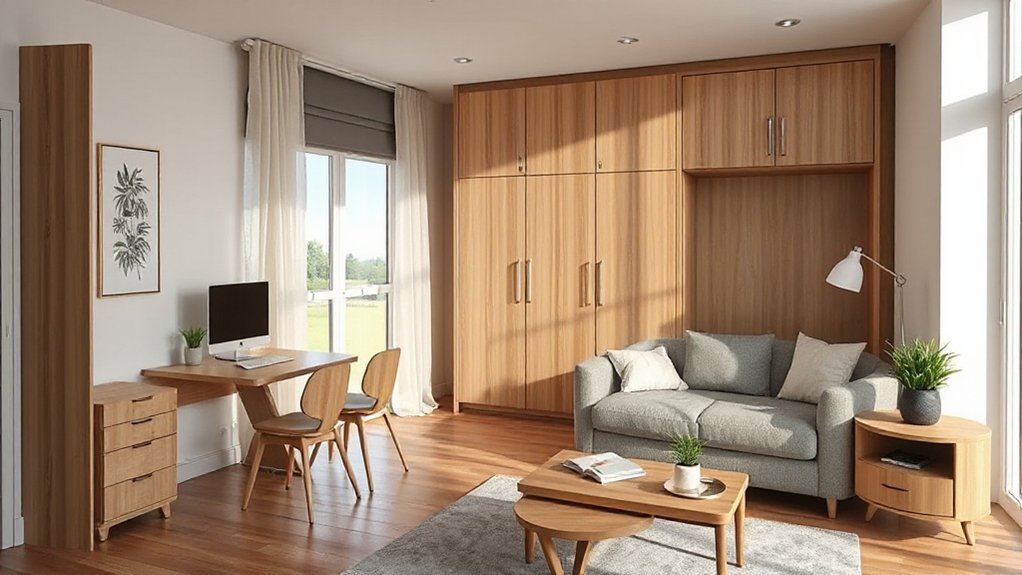
Multi-functional furniture is essential in compact UK studio setups because it consolidates functions without sacrificing flow. You optimize every square metre by selecting pieces that transform with your needs, keeping pathways clear and zones distinct.
Focus on modularity, durability, and ease of use to sustain daily routines without clutter. Prioritize clean lines, hidden storage, and lift mechanisms that reveal seating, desks, or beds as needed. This approach delivers space saving solutions while preserving a polished, professional aesthetic.
- Invest in a roll-out desk with integrated shelving to switch from work to rest seamlessly.
- Choose a sofa bed with discreet storage compartments to reduce extra furniture.
- Opt for a coffee table that lifts to dining height and includes concealed bins for essentials.
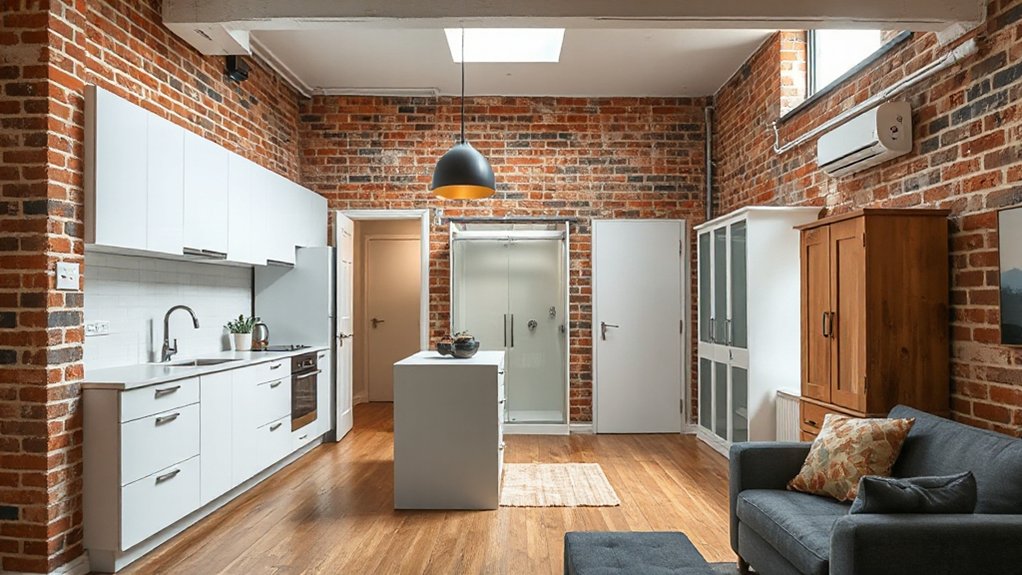
Kitchen and Living Areas That Play Well Together
Open-plan harmony informs how you define kitchen and living zones, ensuring flow without visual clutter.
You’ll leverage smart storage tricks to keep surfaces clear while maintaining accessibility and function.
Start by aligning sightlines, zones, and utilities to support seamless interaction between cooking, dining, and relaxing spaces.
Open Plan Harmony
An open plan kitchen and living area creates a cohesive flow that maximizes space while maintaining defined zones. You’ll optimize circulation, sightlines, and acoustics, ensuring functional separation without visual clutter. The aim is balanced integration: surfaces, materials, and lighting coordinate to support both daily tasks and moments of artistic expression, while acknowledging historical influences in detailing and proportion.
- Define zones through层材 contrasts, furniture placement, and lighting scenes that cue shifts between cooking, dining, and lounging.
- Select palettes and textures that unify the space, yet allow individual functions to read clearly from across the room.
- Align venting, power, and storage strategies with a single, coherent plan that respects historic cues without sacrificing modern convenience.
Smart Storage Tricks
With an open-plan kitchen and living area, smart storage isn’t just an afterthought—it’s the backbone of a cohesive, clutter-free space. You’ll implement integrated cabinetry that hides appliances and wiring while preserving countertop efficiency.
Prioritize vertical storage: tall units, wall-mounted boards, and shallow alcoves optimize reach and legroom without crowding. Use pull-out mechanisms, lazy Susans, and corner carousels to maximize access in narrow zones.
In living zones, appoint dual-purpose furniture—ottomans with storage, coffee tables that lift, and media consoles with concealed compartments—to minimize visible clutter.
For kitchen-adjacent areas, specify modular modules with adjustable shelves and hidden dividers to accommodate variable cookware and small appliances.
Emphasize durable finishes and consistent hardware to reinforce storage optimization and space maximization throughout the layout.
Space-Saving Bathroom Upgrades
You can optimize a compact bathroom by selecting space-saving fixtures that maintain full functionality. Consider smart storage solutions and modular fittings to keep surfaces clear without sacrificing usability.
We’ll also assess wet room efficiency and compact fixture upgrades to maximize flow and accessibility in a small footprint.
Compact Fixture Upgrades
Rather than oversized fixtures, opt for compact, wall-mounted bathroom components that maximize footprint without sacrificing function. You’ll achieve efficient layouts by selecting slimline basins, concealed cisterns, and wall-hung toilets that free floor space while preserving accessibility.
For reliability, pair compact solutions with robust valve systems and corrosion-resistant finishes to sustain long-term performance. Focus on installation geometry to maintain comfortable reach and user comfort, ensuring service access remains straightforward for future fixture upgrades.
The result is a streamlined bathroom that reads as generous despite its real footprint, enabling flexible furniture placement and easier cleaning. Expect improved water efficiency via dual-flush options and efficient aerators, enhancing overall usability and value.
- Wall-mounted basin with slim profile
- Concealed cistern with dual-flush system
- Wall-hung toilet and frame with easy maintenance
Smart Storage Solutions
Smart storage in a compact bathroom hinges on purpose-built units that maximize available space without compromising access. You assess wall geometry, then select modular vanity drawers, toe-kick drawers, and recessed shelves that align with plumbing projections.
Prioritize verticality: tall cabinets with internal dividers yield creative storage without expanding footprint. Use corner configurations and magnetic organizers inside medicine cabinets to reduce clutter.
Opt for reflective surfaces and lighting to enhance perceived space, aiding space optimization. Install pull-out baskets behind doors for detergents and toiletries, and hinge-accessible shelving to keep frequently used items reachable.
Consider multi-functional fixtures: mirrored cabinet with integrated outlet, towel bars doubling as storage rails, and a compact linen tower. Precision planning minimizes waste and supports efficient maintenance.
Wet Room Efficiency
In a compact wet room, efficiency hinges on seamless waterproofing, targeted zoning, and components that minimize water spread while maximizing usability. You optimize layout by defining distinct zones for shower, washbasin, and toilet, using wet-room trays and curbless thresholds to reduce trip hazards.
Select dual-purpose fixtures and compact fittings that maintain full operation within a tight footprint, preserving clearance for movement. Material choices prioritize slip resistance, easy cleaning, and long-term durability, while integrated channels manage drainage with minimal depth.
Wet room efficiency relies on precise waterproofing details and airtight seals to prevent leaks and mold. Implement these strategies to sustain space integrity without sacrificing comfort or function.
- Plan zones with compact, integrated fixtures
- Use low-profile, cure-free drainage solutions
- Choose durable, non-slip surfaces and seamless joins
Soundproofing and Privacy in a Studio
Soundproofing and privacy are essential in a studio to separate living, working, and sleeping areas without sacrificing space or light. You’ll assess walls, floors, and ceilings for leakage paths, prioritizing critical junctions and service penetrations.
Employ soundproofing techniques that reduce airborne noise through dense, compliant materials, decoupling where feasible, and robust sealing around reveals. Opt for floor treatments with resilient underlays and low-transmission ceiling assemblies to minimize impact sound.
For privacy, implement zoning cues: visual barriers, acoustic screens, and modular partitions that don’t intrude on light or airflow. Select hardware and door assemblies with proper seals and acoustic ratings.
Integrate controllable white noise or HVAC zoning to mask disturbances without compromising comfort. Keep documentation of assemblies for future maintenance and potential retrofit needs.
Eco-Upgrades That Save Money
Eco-friendly upgrades not only reduce running costs but also align with the privacy and sound-control strategies discussed earlier by cutting energy waste and improving envelope performance. You’ll gain efficiency by selecting components that balance performance with cost, while maintaining sound isolation and thermal integrity.
Prioritize durable, eco friendly materials and systems designed for long-term savings, not short-term gimmicks. Implementing renewable energy options reduces utility spikes and future-proofs your retrofit.
- High-efficiency insulation and air sealing using eco friendly materials to minimize heat loss and noise transfer.
- Solar-ready heating or heat pump solutions paired with insulated envelope upgrades for reliable, low-cost energy.
- Durable, compliant windows and doors that enhance comfort, reduce drafts, and support ongoing renewable energy integration.
Lighting That Makes a Small Space Feel Bigger
Strategic lighting can dramatically expand perceived space in a small studio by layering brightness and minimizing shadows. You’ll use a layered approach: overhead ambient light, task illumination for work zones, and decorative lighting accents to sculpt depth.
Choose compact, glare-free fixtures with dimming to control intensity as you switch between daily tasks and evening lounging. Place wall-washers or floor grazing lights to soften corners and reveal architectural details without creating hotspots.
Integrate under-cabinet LEDs for kitchen counters and desk lamps with adjustable arms for versatility. Favor light-colored finishes on fixtures to preserve an airy aesthetic.
This setup fosters an ambient atmosphere that feels larger, while decorative lighting adds personality without clutter. Maintain clean cord management and strategic placement to avoid visual congestion.
Color, Texture, and Material Pairings
- Define a restrained color palette across walls, furniture, and textiles.
- Pair matte surfaces with controlled sheen for depth.
- Layer textiles and materials to modulate acoustics and tactility.
Smart Home Tech for Compact Living
Prioritize modular devices that mount unobtrusively and communicate via robust hubs, guaranteeing reliable performance across rooms.
Home automation centralizes lighting, climate control, and window treatments, enabling scenes that adapt to occupancy and time of day.
Opt for low-profile sensors and compact controllers that blend with finishes rather than disrupt them.
Security systems should be layered yet discreet: door/ window sensors, tamper alerts, and camera coverage that respects privacy but deters intrusion.
Choose wired options where feasible to reduce wireless congestion, and assure compatibility with voice assistants.
Regularly update firmware, manage access, and maintain clear maintenance windows to avoid downtime.
Finishing Touches: Personal Style on a Budget
Finishing touches matter as much as structure, and you can express personality without breaking the budget by smartly selecting textiles, finishes, and focal accents. In this phase, you curate elements that read as cohesive, not cluttered, using restrained palettes and functional textures to reinforce space perception.
Prioritize lighting contrast, tactile fabrics, and purposeful art to convey your style without overwhelming the footprint. Integrate a defined vintage decor motif with modern silhouettes to preserve a clean look while adding character.
Plan focal pieces that can migrate between zones as needs evolve, preserving flexibility. Avoid decorative overload; let each item earn its place with quality and resonance.
- Assemble a small art gallery wall with statement frames and a unified color rhythm.
- Introduce vintage decor accents that echo the era of the space without dominating it.
- Select textiles that blend durability, drape, and subtle patterning for cohesion.
Budget in Phases: A Practical Renovation Plan
Phase-based budgeting empowers you to prioritize milestones and align expenditures with measurable goals.
By framing the renovation in practical, incremental steps, you can monitor progress, adjust scopes, and minimize disruption.
This approach sets clear benchmarks for each phase, guiding resource allocation and timeline decisions.
Phase-Based Budgeting
- Establish Phase 1 priorities, estimate costs, and define acceptance criteria to secure early wins without overcommitting capital.
- Allocate funds by phase, linking each milestone to deliverables and contingencies, so you maintain strict cost prioritization and traceable spend.
- Review after each phase, reallocate remaining resources, and adjust timelines to minimize downtime and disruption. Maintain documentation to support future financial planning and stakeholder transparency.
Practical Renovation Milestones
Implementing Practical Renovation Milestones requires a disciplined, phased approach that aligns tightly with cost controls established in Phase-Based Budgeting. You structure milestones around core deliverables: demolition readiness, services rough-ins, framing completion, insulation and drylining, and finishes.
Each milestone links to a fixed budget tranche, with contingency reserved for scope changes. You document baselines, track variance weekly, and revalidate timelines against resource constraints to prevent spillover.
When scheduling, you sequence high-impact tasks early to de-risk later phases, ensuring that electrical, plumbing, and HVAC penetrations align with final layouts. You specify aesthetic elements, including artistic lighting and vintage decor, within design reviews to prevent rework.
You verify compliance, pursue approvals, and harvest lessons learned to refine subsequent phase budgets and milestones. This disciplined cadence preserves value without compromising quality.
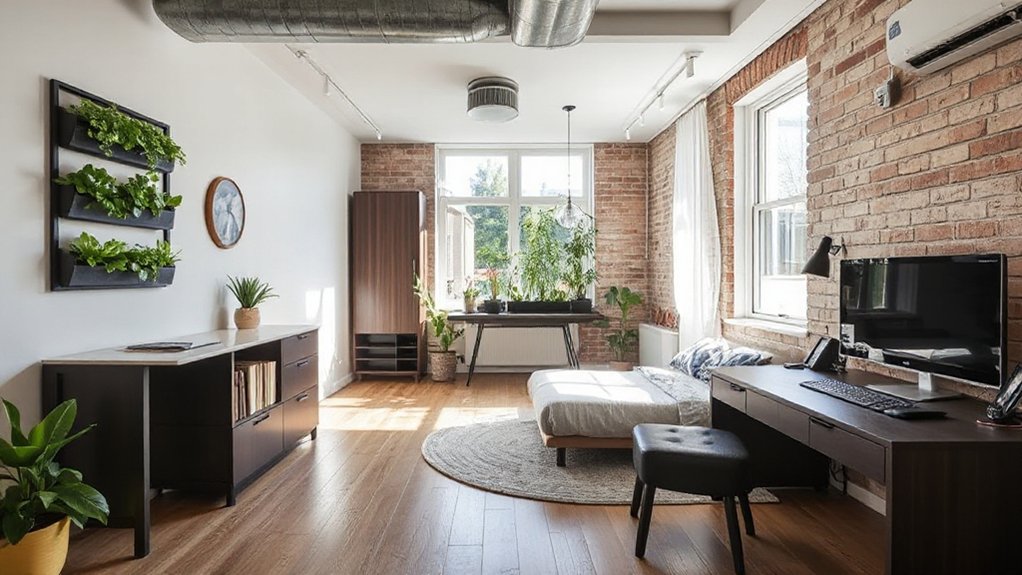
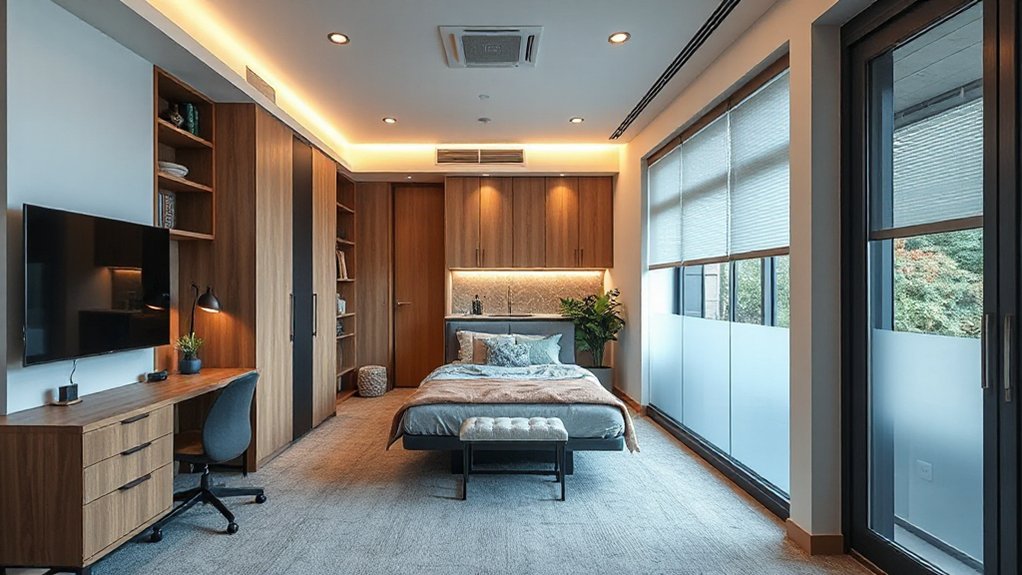
Before-and-After: What a Modern UK Studio Feels Like
When you compare a blank office shell with its finished, modern UK studio counterpart, the difference is tangible: space planning, light control, and utility integration converge to redefine daily living. The after-state highlights a cohesive zone layout, hidden storage, and calibrated acoustics, enhancing focus by day and ambiance by night.
You’ll notice tactile finishes and precise trim, contributing to a sense of permanence and control. Subtle tech, like smart blinds and discreet lighting, elevates energy efficiency without clutter. The design supports curated experiences, from a compact work area to a flexible living zone, enabling progressions with minimal friction.
Art gallery and Urban gardening elements anchor the space, enriching character and sustainability.
- Spatial zoning that adapts to life rhythms
- Integrated systems with minimal visual intrusion
- Aesthetic features that sustain value and utility
Art gallery, Urban gardening
Frequently Asked Questions
How Long Does a Typical Studio Conversion Take Start to Finish?
Typical studio conversions take about 8–12 weeks start to finish. You’ll plan interior lighting, coordinate structural tweaks, and finalize furniture selection, aligning permits with trades. You’ll monitor progression, adjust timelines, and guarantee compliance throughout the project.
What Are the Most Cost-Effective Sustainable Upgrades?
Eco friendly materials and energy efficient appliances top the list for cost-effective sustainability. You balance upfront savings with long-term resilience, comparing tangible performance—quiet, durable, low-maintenance—and intangible comfort, like healthier air, to justify smarter upgrades.
Can Rental Properties Permit Permanent Structural Changes?
Yes, rental properties generally require permits; permanent structural changes depend on lease terms and local permitting processes. Check lease agreements, obtain landlord consent, and follow regulatory codes to guarantee compliant, trackable approvals and documentation.
Which Building Regs Affect Bathroom and Kitchen Projects?
You must follow Building Regulations for bathroom and kitchen projects under Plumbing regulations and Ventilation standards. Guarantee compliance with Part P, Part F, and Part G, verify ventilation rates, extract fan requirements, and appropriate moisture controls before work begins.
How to Prioritize Renovations on a Tight Budget?
Prioritize essential improvements first, you’ll stretch resources and avoid overreach. Budget planning guides you; start with space allocation, basic plumbing, and electrical safety. DIY tips save costs, but know limits to guarantee compliant, durable, and efficient results.
Conclusion
Turning an office into a modern UK studio blends durable planning with agile living. You’ll redefine space, light, and flow, then layer flexible zones and smart tech. It’s like fitting a spare-room jigsaw into a single, bright capsule—everything you need, efficiently organized. In a 12-week plan, you trim costs by phasing work and leveraging daylight. The result is a compact, polished home that feels larger, with clear zoning, robust storage, and a personal style that fits your budget and lifestyle.


