Like a chess move, your terraced home gains from careful positioning. You’ll want space-saving strategies that stack vertically, exploit corners, and blur inside-out through doors and glazing, while keeping party-wall harmony intact. Consider rear wideners, light-willing side extensions, or a loft conversion that adds living areas without expanding footprints. But the choices pulse with constraints—costs, planning, and privacy—so the next step narrows to the option with the clearest path to brighter, more functional space.
What Makes Terraced Extensions Space-Efficient?
Terraced extensions maximize space by stacking functions along a single axis and minimizing footprint. You optimize layout by aligning rooms vertically, using shared walls, and reducing circulation waste.
Core strategies include compact stair cores, under-stair storage, and loft-like ceiling heights to preserve floor area. Roof geometry and glazing choices influence daylight distribution and thermal performance, so you prioritize insulated envelopes and thermal breaks.
Garden privacy plays a role in plan decisions: selecting opaque or semi-transparent screens and directional windows minimizes sightlines from adjacent gardens while maintaining light.
Materials matter: lightweight, rigid insulation layers, airtight membranes, and continuous floor slabs curb thermal bridging.
Coordination between structural, mechanical, and finishing trades ensures reliable performance.
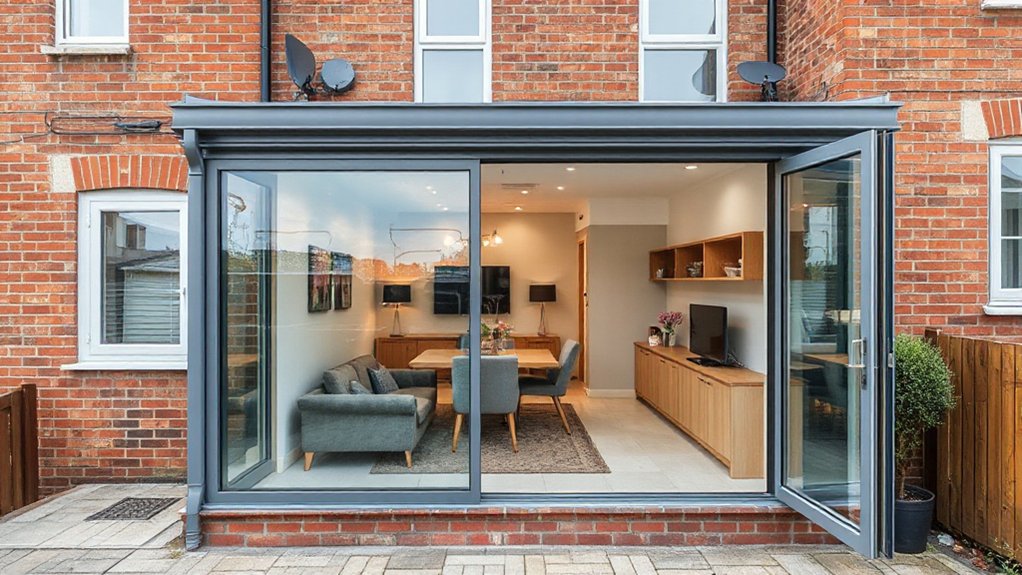
Terraced Rear Extensions: Widening Without Footprint Loss
Widening a terraced rear extension without increasing its footprint hinges on extending into the depth rather than the width, while preserving existing external boundaries. You shape the interior by aligning structural bays, enabling a longer plan without widening the external envelope.
Efficient wall-siting and careful beam placement minimize disruption to adjacent party walls while maximizing usable area. Consider floor-to-ceiling glazing at the rear to visually extend depth and maintain natural light, paired with compact storage zones to preserve width.
Garden landscaping should flow smoothly from house to garden, using stepped patios and screens that imply expansion without bulk. Choose interior color schemes that reflect depth—cool neutrals for walls with warmer accents—creating a cohesive, spacious feel.
Precision planning preserves proportions, avoids lost alignment, and sustains rear access during construction.
Side Extensions That Maximize Light While Respecting Party Walls
You’ll explore light-forward side extensions that balance daylighting with party-wall constraints.
By prioritizing skylight strategies, slender floor plates, and high-performance glazing, you’ll maximize permeability without compromising structure.
Consider alignment with adjacent properties, fire safety, and sound transmission as you plan a compliant, bright footprint.
Light-Focused Side Extensions
How can you maximize daylight in a side extension without breaching party-wall constraints? You design for light paths and glazing efficiency, not volume. Use tall, narrow fixed glazing along the party wall to bounce light deeper inward, paired with skylights or rooflights where structure allows.
Orient openings toward the productive garden-shaded zone, so you maintain interior brightness without overheating. Choose low-iron glass with high solar gain control and minimal mullion clutter to preserve clean sightlines.
Internal finishes should reflect light—gloss doors, pale floors, and Susan-like white ceilings. Keep ventilation deliberate: clerestory or flip-vent windows avoid drafty performance.
Consider garden privacy by positioning screens away from living zones, and plan outdoor lighting integration to illuminate passageways without glare.
Respectful Party Wall Design
Even with light-focused strategies, you must honor the party wall’s constraints by coordinating shared access, fire performance, and vertical alignment. Respectful Party Wall Design centers on maximizing daylight while preserving structural integrity and neighbor relations.
Assess party wall regulations early to establish load transfer, damp-proofing, and insulation continuity, preventing future disputes. Use lightweight, perforated or flush-fit elements that don’t overburden the shared wall, and guarantee continuous fire-stopping where extensions meet the boundary.
Consider shared wall considerations such as acoustic separation, fire-rated plasterboard, and compliant cavity barriers. Align rooflines and window heights with adjacent elevations to avoid overstepping, and specify clear access routes for maintenance without compromising daylight.
Document all agreements, drawings, and notices to maintain transparent, legally sound progress.
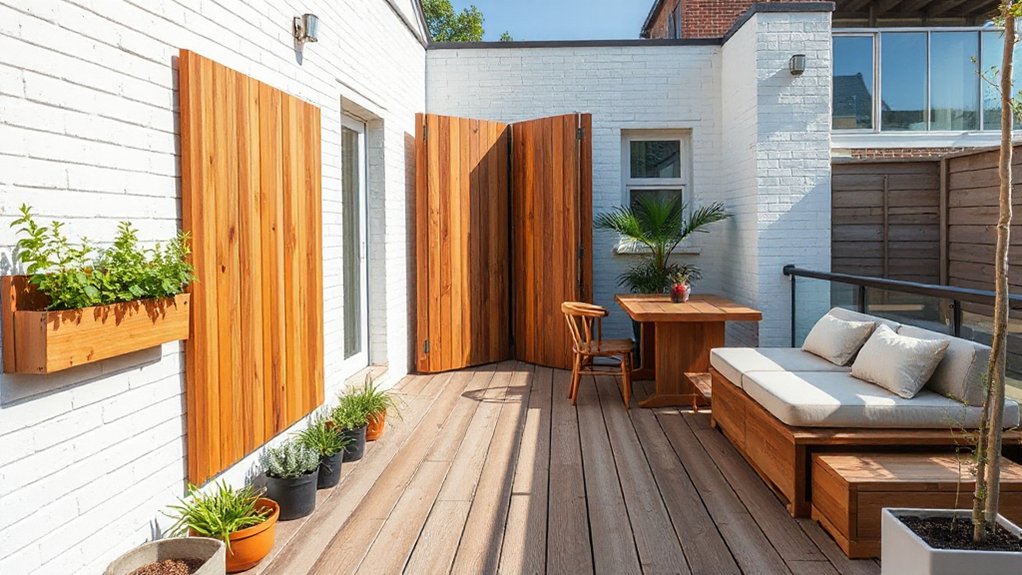
Conservatories: Bright, Compact Flows for Small-Footprint Homes
Conservatories offer bright, compact flows that expand a terraced home’s usable space without sacrificing footprint. You’ll maximize daylight without widening the footprint, using slim framing and low-profile glazing to preserve exterior lines.
Design focuses on seamless indoor–outdoor passages; fixed or operable roof vents regulate climate, while thermal breaks minimize heat loss.
Position ensures functional zones: entry, seating, and access to garden views, with mullioned panels optimizing sightlines.
Construction choices matter: dwarf walls preserve privacy while letting in light, and insulated floors reduce cold bridging.
Consider door geometry that promotes traffic flow to outdoor spaces, keeping furniture aligned with existing rooms.
Garden privacy remains key; outdoor aesthetics should harmonize with neighboring elevations, giving you a coherent, low-profile extension that feels integral.
Loft Conversions: Add Usable Rooms Above
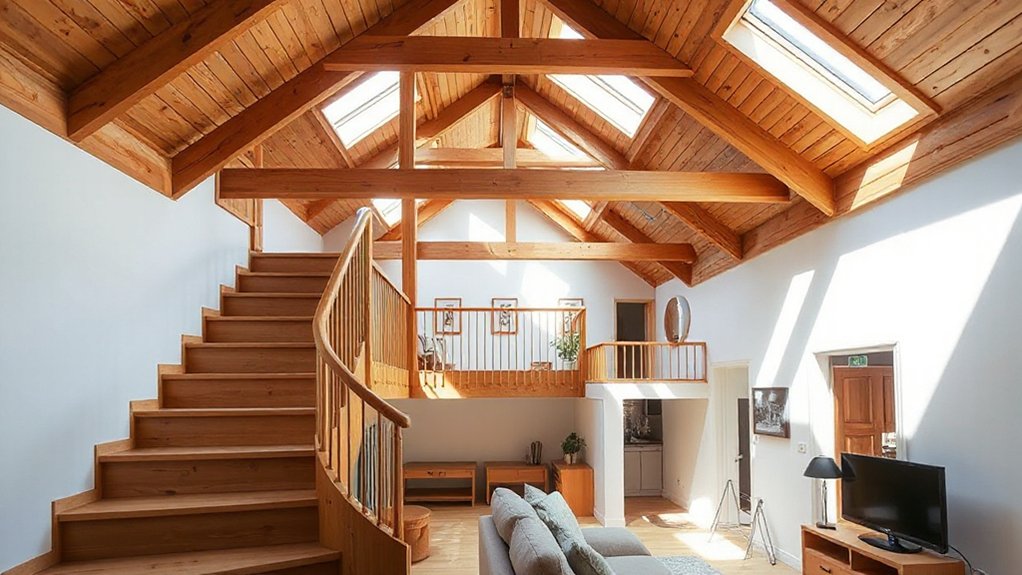
You’ll assess loft space for usable rooms by prioritizing headroom, floor area, and stair access so the layout works without compromising structure.
Consider permits, costs, and potential changes to services early to keep the project on track.
We’ll balance planning, access routes, and storage needs to maximize usable space above your terrace.
Loft Space Planning
- Assess structure and services before design choices.
- Optimize headroom and eave clearance for comfort.
- Plan light, ventilation, and color to enhance perceived space.
You’ll integrate garden landscaping cues for exterior cohesion and align interior color schemes with daylight shifts, creating a seamless upstairs flow.
Keep sections modular to adapt to future needs while preserving structural integrity.
Headroom and Access
How much headroom do you truly need, and how will access work safely and efficiently? You’ll assess stair configuration, light, and usable floor area to maximize loft value without sacrificing clarity of circulation.
Prioritize a minimum head height of about 2.0 meters, with sloped ceilings optimized to create distinct zones—sleeping, study, and storage.
Access must be permanent, with sturdy handrails and non-slip treads; consider a straight, dog-legged, or space-saving spiral where appropriate, ensuring landing widths meet building standards.
Structural work should keep load paths clear, preserving room geometry and avoiding joist conflicts.
Finish with interior aesthetics that respect the roofline, harnessing natural light, and coordinating with exterior materials for cohesive curb appeal and durable drift between levels.
Plan early to avoid future compromises.
Permits and Costs
Before you start a loft conversion, you must secure the necessary permits and estimate costs up front. You’ll navigate Building permits and assess construction costs before any crane or joist reads as essential. Your plan should map usable space, structural limits, and ventilation, so you know where to budget and what to request from authorities.
- Obtain permits for structural work and fire safety
- Price materials, labor, and contingency to establish a firm budget
- Confirm approval timelines, inspections, and potential overheads
Permitted work affects ceiling height, egress, and stair access, so align approvals with your design. Costs hinge on roof structure, insulation, and utilities rerouting. Prepare a cost envelope early to avoid delays and ensure compliant, efficient delivery of an above-living area.
Make the Space Under Your Terrace Usable
Underneath a terrace, usable space often sits idle as a wasteland of posts, beams, and damp. You transform this by profiling the space: clear access, defined zones, and moisture control.
Start with a structural check: verify posts, headers, and drainage, then seal against rising damp with a breathable membrane.
Plan a low-profile floor that’s level and durable, enabling seamless progression to standing space above.
Use vertical storage walls or recessed cabinets to maximize width without narrowing pathways.
For Underground storage, install modular bins and a handling system accessible from a doorway, not through load-bearing elements.
For hidden gardens, create a micro-climate by sealing drafts and introducing compact planters that thrive in shaded, cool areas.
Prioritize lighting, ventilation, and water management to assure usable, low-maintenance under-terace space.
Corner and Wrap-Around Extensions: Smarter Walls, Smarter Layouts
Corner and wrap-around extensions reshape how you use exterior walls, turning dead angles into living space. You’ll gain fluid, continuous layouts that pull light deeper and reduce corridor waste. By threading walls along existing lines, you optimize footprint without pushing your footprint outward. The result is smarter circulation, tighter sightlines, and improved furniture placement.
- Utilize corner glazing to maximize daylight without expanding the footprint.
- Align structural members with existing loads for efficient framing and reduced material use.
- Integrate innovative materials and eco-friendly solutions to balance performance with sustainability.
This approach prioritizes precision over spectacle, delivering spatial clarity and practical flexibility. You gain versatile zones for cooking, dining, and lounging, all while maintaining airtight envelopes and low-maintenance surfaces.
Compact, Daylight-Friendly Stairs That Save Space
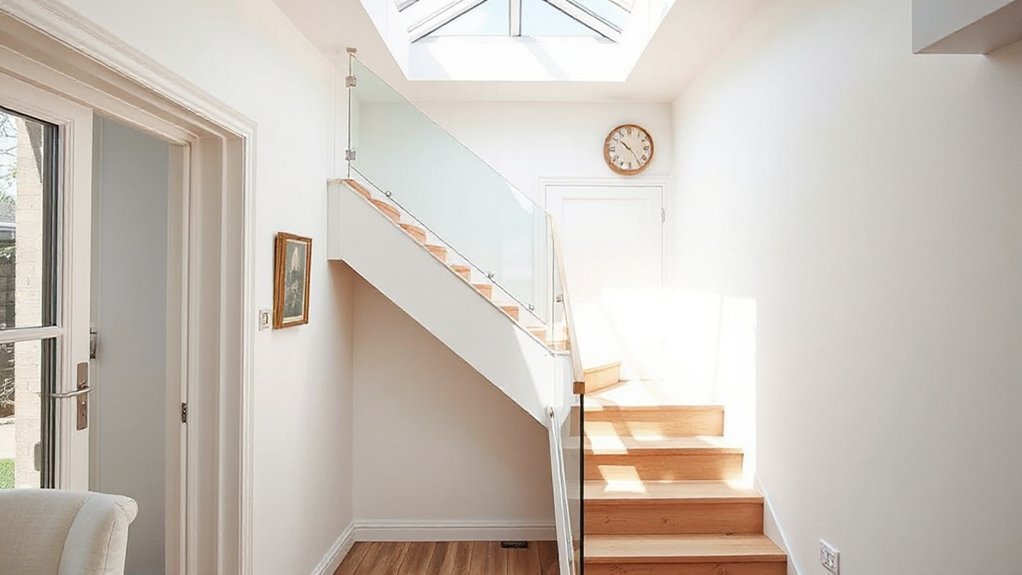
Compact, daylight-friendly stairs maximize floor area while preserving light flow and sightlines. You choose a straight or alternating tread design to minimize run length while keeping risers low, promoting faster, safer navigation.
Opt for open-stringer or glass balustrades to maintain visibility and air movement, reducing sense of confinement. Spacing matters: use 600–700 mm total width where possible, with 150–180 mm risers and shallow 250–300 mm treads for comfortable climbs without intruding on adjacent rooms.
Integrate skylight or high clerestory panels to boost daylight penetration, avoiding dark stair zones. Consider landing blocks that can host compact storage or a small workstation.
Plan for garden privacy and outdoor lighting by aligning the stair enclosure with boundary landscaping and illuminated paths to blur indoor–outdoor passage.
Keep Light and Proportion in Harmony With Neighbors
You’ll balance light with your neighbors by aligning window heights and rooflines to minimize shade and preserve sightlines.
Keep extensions proportionate to the terrace, so depth and mass respect adjacent facades while maintaining a coherent rhythm.
Focus on consistent glazing and setbacks that sustain daylight, views, and a shared sense of scale.
Light Balance With Neighbors
To balance light and proportion with neighbors, assess window alignments, facade setbacks, and common sightlines early in design. You’ll optimize natural lighting while reducing privacy concerns through thoughtful placement and scale, ensuring room proportions remain legible from the street and yards.
- Align windows with adjacent openings to share daylight without glare.
- Setbacks on upper stories to minimize shadow intrusion while preserving interior volume.
- Use partial screens or translucent screens to maintain privacy without sacrificing brightness.
Keep sightlines clear by mapping focal points across boundaries, and choose materials with low reflectance to prevent hot spots. This approach preserves daylight depth, reduces cross-property overshadowing, and maintains a balanced streetscape.
Always evaluate how a small change in exposure affects both rooms and exterior perception.
Proportionate Extensions Alignment
Proportionate extensions align with neighboring structures by matching scale, alignment, and setback cues to preserve the street rhythm and interior light. You assess facade line, window ratios, and roof pitch to avoid abrupt changes that shout “out of place.”
Maintain consistent chimney heights and eaves overhangs where possible, and use similar material tones to blend with the row. Plan the extension footprint to sit within the existing building’s proportions, preventing crowding or recessed gaps that disrupt harmony.
Consider decorative wall finishes that echo adjacent textures, and guarantee garden landscaping remains visible from inside to retain daylighting cues. Align doors and glazing with neighbor openings to minimize awkward transitions, then refine with subtle detailing that supports cohesive street character without sacrificing function.
Budget, Planning, and Design Tricks to Minimize Waste
Budget, planning, and design choices that minimize waste start with clear scope and tight scheduling. You’ll optimize material use by modeling dimensions in 3D and aligning offcuts with other trades. Plan phased milestones to curb overordering and to reuse elements across spaces. Focus on design decisions that reduce waste while preserving function.
- Coordinate components in a single batch run to minimize factory waste and on-site trimming.
- Specify durable, modular products for easy future reconfiguration and reuse.
- Align storage and finish selections with short-lead materials to cut bulk inventory.
Creative storage and thoughtful interior color schemes help you maximize space perception while limiting sourcing waste. Use built-in, adjustable systems to avoid surplus cabinets.
Keep detailing restrained and precise to reduce returns and disposal.
Step-by-Step: Evaluating and Choosing Your Best Terraced-Extension Option
Evaluating terraced-extension options starts with a clear, criteria-driven grid: site constraints, budget limits, structural feasibility, and long-term adaptability. You’ll map how each option preserves daylight, circulation, and exterior integrity while minimizing disruption to Garden landscaping.
Next, compare costs, timelines, and required permits, then test for return on space gained versus impact on neighboring sightlines. Prioritize options that offer modular expansion, sound insulation, and roof- or wall-integrity improvements to reduce future refits.
Assess structural feasibility with a professional for load paths, foundations, and party-wall considerations, and simulate liveability across seasons.
For interior outcomes, align with Interior decor goals—functional zones, storage, and material coherence.
Conclude with a short, risk-adjusted decision matrix and a phased implementation plan.
Frequently Asked Questions
How Much Does a Terraced Extension Typically Cost per Square Meter?
Typically, a terraced extension costs around £1,500–£2,500 per square meter, depending on interior customization and material selection. You’ll assess structural costs, permits, and fittings, ensuring space efficiency and precise glazing, insulation, and load-bearing calculations for ideal floor plans.
What Are Common Planning Permission Hurdles for Terraced Extensions?
Your project meets walls that talk: party wall agreements guard neighbors, and the planning permission process checks height, setbacks, and impact. You navigate thresholds, timelines, and conditions, ensuring compliance before you proceed with confident, spatially aware permits.
Which Extensions Keep Party Walls Intact and Avoid Service Disruption?
You should choose extensions that don’t breach party walls or disrupt services, such as interior redesign and attic or rear additions with shared-supports. Interior redesign preserves walls; garden landscaping minimizes external impact while keeping utilities intact and accessible.
How Long Is the Typical Construction Timeline for Terraced Extensions?
Construction for terraced extensions typically spans 6–16 weeks, depending on scope and approvals. You’ll plan phased timelines, minimize disruption, and integrate interior design choices with sustainability features to optimize space and energy efficiency throughout the project.
Do Homeowners Need Structural Assessments Before Extending?
Yes, you should assess structural integrity and obtain a professional evaluation before extending. You’ll need to confirm Building regulations compliance, ensuring joists, walls, and foundations remain sound and that adjoining properties aren’t compromised. Documentations and potential mitigations follow.
Conclusion
You can extend a terraced home without sacrificing space by stacking, wrapping, and light-optimizing. Picture a rear extension flowing into a glass-wrapped side corridor, with a compact, stair-first plan that tucks above and beside existing walls. Loft or basement adds rooms without widening footprints. If noise or privacy worries arise, imagine frosted, operable screens and cohesive materials tying indoor and outdoor spaces. Your design stays bright, efficient, and neighbor-friendly while preserving outdoor balance.