
If you spot soft spots, bubbling paint, or warped jambs around windows and doors, treat it as serious rot and act quickly. Start by safely cutting away damaged wood, preserving solid framing, and probing for hidden decay. Replace with moisture‑resistant stock, install proper flashing, backer rods, and exterior sealant, then prime, paint, and seal all joints. Use compatible fasteners and weatherproof barriers to prevent future moisture intrusion. If you keep going, you’ll learn even more practical, proven steps.
How to Tell If Window/Door Frame Rot Is Serious

If you notice soft, spongy wood, bubbling paint, or crumbling edges around a window or door frame, the rot is likely serious. Wood decay compromises the frame’s ability to support loads, seal against weather, and resist movement.
Check for surface soft spots that yield to pressure, dark zones beneath finish, and a musty odor indicating fungal activity.
Inspect for spreading cracks, loss of cross-section, or warped jambs that affect alignment. Sunken sills, loose trim, or nails that pull free signal ongoing deterioration.
Structural integrity is at risk when framing members—jambs, studs, and headers—show persistent decay beyond a small area. If you identify these signs, treat the situation as a high-priority repair to preserve safety and functionality.
What Tools and Safety Steps Do I Need Before Removing Rot
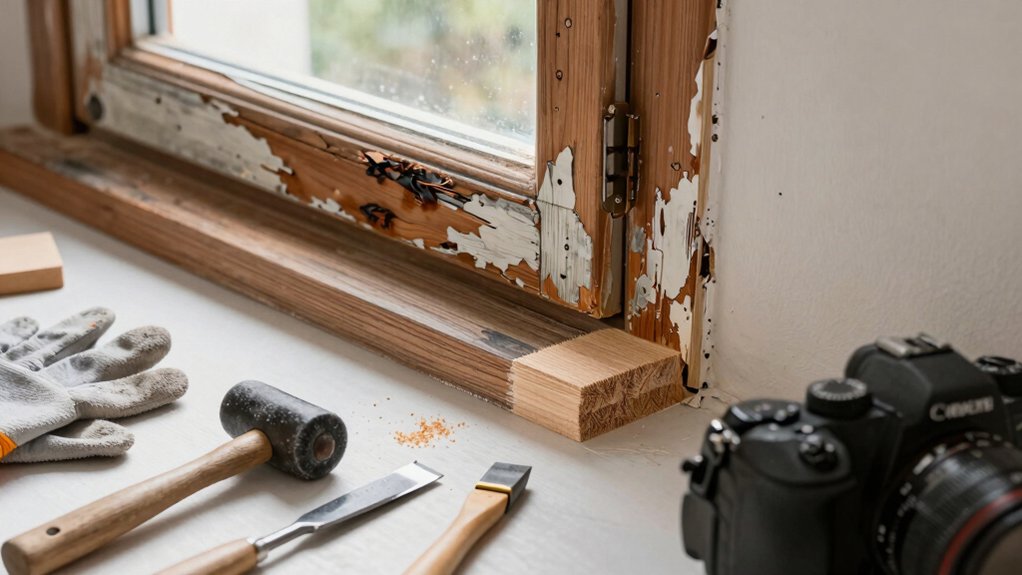
Before you tear into rot, assemble the right tools and establish safety basics. Gather essential items: a sharp chisel, pry bar, hammer, utility knife, reciprocating saw with a blade suitable for wood, and a chalk line for accuracy.
Have a pry bar handy to lift damaged sections without tearing adjacent wood. Power tools enable cleaner cuts, but use them with care.
Put on safety gear: safety glasses, hearing protection, gloves, and a dust mask. Clear the work area, cover nearby surfaces, and unplug or switch off electrical sources to avoid shocks.
Test for hidden rot with careful probing, and mark boundaries with a pencil. Work slowly, maintain stable footing, and respect moisture-damaged materials to prevent accidental breaks.
Safety gear and proper tools reduce risk and improve results.
Safe Rot Removal: Protecting Healthy Framing (Step-by-Step)
To remove rot without compromising healthy framing, start by clearly marking the boundaries of damaged wood and preserve the surrounding studs. You’ll isolate the rot with a sharp utility knife, cleanly scoring before cutting.
Use a multi-tool to remove compromised material in thin, controlled slices, ensuring sound wood remains intact. Avoid tearing into healthy fibers; work steadily to prevent unnecessary widening of the cavity.
As you excavate, keep the edge of the healthy wood solid and square, so patching later is straightforward.
Prioritize safety: wear eye protection, dust mask, and gloves, and dispose of debris promptly.
In practice, focus on preventing future decay by avoiding hidden moisture pockets. Choosing safe removal techniques reduces risk to framing and simplifies repairs downstream.
Best Materials and Methods for Weatherproof Window/Door Repairs
Choosing the right materials and methods is essential for a durable, weatherproof window or door repair. Start with solid framing stock that matches surrounding profiles and moisture resistance.
Use epoxy or polyurethane wood fillers for pinholes and minor decay, then prime and paint with exterior-grade paint for sustained protection.
For weatherproofing, install high-quality flashing and sealant compatible with your siding and trim, and ensure fasteners resist corrosion.
Choose hardware selection that supports tight closures—sturdy hinges, sill nosing, and strike plates rated for outdoor use.
Use backer rods and silicone where joints move or expand, avoiding gaps that trap water.
Apply paint preparation by cleaning, sanding, and priming before topcoats.
Don’t skip curing times; proper preparation and material compatibility maximize longevity and minimize future maintenance.
Sealing and Finishing to Prevent Future Rot
Sealing and finishing are essential to prevent future rot, so apply a continuous, moisture-resistant barrier around openings using compatible products. You seal joints and gaps with exterior-grade caulk, then prime bare wood before painting.
Choose paint sealing products that resist UV exposure, moisture intrusion, and temperature cycling, ensuring compatibility with the wood and sealants. Apply a rain-safe coating schedule, allowing full cure between steps, and avoid gaps where water can penetrate.
Use weatherproofing techniques that create a seamless exterior surface, preventing moisture wicking into trim and framing. Inspect after rain and touch up any worn edges. Maintain the finish by reapplying as recommended, focusing on high-risk areas like sill, jambs, and corners.
Proper sealing and finishing protect the repaired wood long term.
Frequently Asked Questions
How Long Does Rot Repair Typically Take to Complete?
Typically, you’ll see timing estimates span 1–3 days, depending on extent. You’ll experience the repair process in stages: assessment, removal, treatment, replacement, and finishing, with climate and access affecting daily progress and final cure times.
Can Rot Recur After Replacement, and Why?
Rot can recur if you don’t stop it at the source. You’ll need proper wood treatment and moisture control, plus ongoing checks. If you neglect either, hidden rot returns, threatening framing and future repairs. Stay vigilant and proactive.
Is Paint Alone Enough to Protect Repaired Areas?
Paint alone isn’t enough; you need proper protection. Use primer, high-quality exterior paint, and sealant for paint protection, then maintain wood preservation with moisture barriers and inspections to prevent future decay. Regular upkeep guarantees lasting results.
Should I Replace Entire Frame or Just Damaged Sections?
You should replace only the damaged sections if the rest remains solid, but replace the entire frame if structural support is compromised. Use wood treatment on new lumber and guarantee proper flashing for ongoing structural integrity.
What Budget Range Should I Expect for a Full Repair?
Budget for a full repair usually runs from $1,000 to $6,000, depending on scope, materials, and labor. You’ll want a precise cost estimation and thoughtful material selection to balance longevity with affordability.
Conclusion
You’ve got the know-how to spot rot early, remove it safely, and replace it with solid, weatherproof framing. By choosing proper materials, sealing, and finishing, you’ll defend against future decay and keep windows and doors performing like new. Stay disciplined about flashing, drainage, and inspection—don’t skimp on steps or safety. With steady hands and a clear plan, you’ll weatherproof your home and avoid bigger headaches down the road. It’s not luck; it’s a job well done. You’re all set.


