To install a pre-hung interior door, start with a clean, plumb rough opening and verify the unit fits the space. Plan precise shimming, alignment, and finishing before securing hinges, hardware, and casing. Remove the old door, square the opening, and fit the frame flush with even gaps. Attach hinges first, then test the swing and adjust as needed. Install casing, seal gaps, and finish smoothly. If you keep going, you’ll master accurate, gap-free operation.
Prepare the Space and Tools

Before installing a pre-hung interior door, clear the work area and gather everything you’ll need. You’ll set a stable surface, place drop cloths, and protect adjacent floors.
Inspect the door slab, frame, and hardware for defects, and confirm hinge placements match the door’s orientation.
Gather a level, square, tape measure, carpenter’s pencil, utility knife, drill, screwdriver, chisels, mallet, shims, nails, screws, and a able for trimming if needed.
Plan for consistent door maintenance by organizing tools and marking hardware. Choose appropriate material selection based on climate, humidity, and usage, ensuring joints are uniform and square.
Keep a trash bin for packaging and debris. Verify the rough opening is plumb and true, then dry-fit the assembly before final installation.
Maintain precision throughout to avoid misalignment.
Identify Door Style and Take Precise Measurements
Start by confirming the door style you’re replacing so you match hinges, mortises, and stop details. Measure the door slab and hardware footprint precisely—handle height, striker plate, and hinge locations—to guarantee a seamless fit.
Compare the chosen style against your measurements and hardware layout to avoid misfits and rework.
Measure Hardware Fit
To measure hardware fit, identify the door style you’re installing and verify all hinge and strike plate positions before you remove any existing components. You’ll confirm clearances, alignments, and compatibility with the chosen door handle and lockset.
- Verify hinge spacing and bore locations match the new door’s specifications.
- Check strike plate depth, screw holes, and latch alignment with the existing door frame.
- Confirm door handle and lockset assembly will clear jamb mortises and frame trim.
If any mismatch appears, adjust mortises or select hardware that matches the door’s pre-cut locations. Document measurements for future reference and ensure the strike plate sits flush for reliable latching. Precision now prevents rework later.
Compare Door Style
Identifying the door style sets the foundation for precise measurements and proper fit. You’ll compare available door styles to your opening and frame, focusing on asymmetrical vs. symmetrical panels, slabs vs. pre-hung designs, and the door’s swing.
Determine whether you need a traditional, modern, or craftsman look to match your space. Consider door material and how it affects thickness, weight, and insulation, then verify compatibility with your existing jambs and trim.
Check the door finish to ensure it aligns with adjacent trim and flooring. Take precise measurements of width, height, and rough opening clearance, noting any obstructions or settling gaps.
Confirm hinge placement, strike location, and hardware compatibility early to avoid rework during installation.
Remove the Old Door and Prep the Opening
Removing the old door and preparing the opening is the essential first step. You’ll remove the existing door, detach hinges, and clear debris, setting a solid baseline for a proper fit. Use removal tools to ease the process and protect surrounding trim.
Inspect the door frame for damage or warping, noting any issues that could affect alignment. Clean out scrap material from the opening and verify rough opening dimensions meet the new unit’s requirements.
- Remove hinges and the door, then inspect the door frame for damage
- Clear debris and verify rough opening is square and true
- Clean edges and test fit the new pre-hung unit
This upfront work minimizes surprises during installation and ensures the frame sits plumb and level.
Square the Opening for a Pre-Hung Unit

The rough opening must be square and true before a pre-hung unit goes in. To verify, measure diagonally from opposite corners of the opening; both diagonals should match within 1/8 inch.
If they don’t, true the opening by adjusting shims at the corners until the door frame sits plumb and square.
Check both verticals with a level, ensuring the plumb line runs true along each side. Confirm the header remains level across the top.
Reconfirm opening dimensions with a tape measure, noting any sag or deviation and correcting before installation.
Maintain a consistent wall reveal around the frame, typically 1/2 inch on hinge and strike sides.
Record any corrections for future reference and ensure the opening is ready for the door unit.
Fit the Pre-Hung Door and Shim Precisely
You’ll place the shim precisely to keep the frame plumb and the door aligned.
Check that the frame stays square as you insert and adjust shims, tightening spacers to secure support without shifting.
Verify gap consistency around all edges before final fastening.
Precise Shim Placement
After you’ve set the door in the rough opening, place shims at the hinge side and strike side to true the door while you test for plumb and level. You’ll adjust shim thickness to achieve balanced clearance and solid contact, focusing on door hinge alignment and framing accuracy.
- Secure the hinge side first, then fine‑tune the strike side for even gaps.
- Place a shim behind each hinge leaf to prevent movement and maintain alignment.
- Recheck plumb, level, and door swing after each adjustment to lock in accuracy.
Keep shifts minimal; avoid over-padding. Maintain consistent gaps at the top and sides, ensuring smooth operation and a square frame.
Plumb Door Frame
Begin by checking that the door frame is plumb in both directions. You’ll verify with a level and a square, adjusting shims as needed until the jamb reveals true vertical and horizontal alignment.
If the hinge side kick is off, shift the frame slightly and retest, then reinsert shims to lock the position. Guarantee the header remains level under load, preventing binding on closing.
As you confirm plumb, keep the hinge mortises aligned with the door, so you can hang smoothly. Aim for a level installation, with gaps even and consistent around the perimeter.
Double-check the gap at the latch side; it should remain even as you tighten screws. Once plumb, secure permanent fasteners, recheck, and proceed with trim considerations without altering the frame’s true alignment.
Tighten Support Spacers
Tighten the support spacers now to seat the door precisely without warping the frame. You’ll stabilize the casing by tightening collars against the jambs until the gap remains even all around. Use steady, incremental turns to avoid pinching the hinge side or bending the strike plate. Check plumb after each adjustment and correct with small pushes on the hinges if needed.
- support spacers positioned evenly between door and frame
- use measured, incremental tightening to prevent distortion
- verify gaps and plumb with a level before final tightening
Apply control pressure if the door binds, then reseat spacers and recheck.
Focus on tightening techniques that maintain square alignment, ensuring consistent clearance at top, bottom, and latch side. This step locks in true alignment for reliable operation.
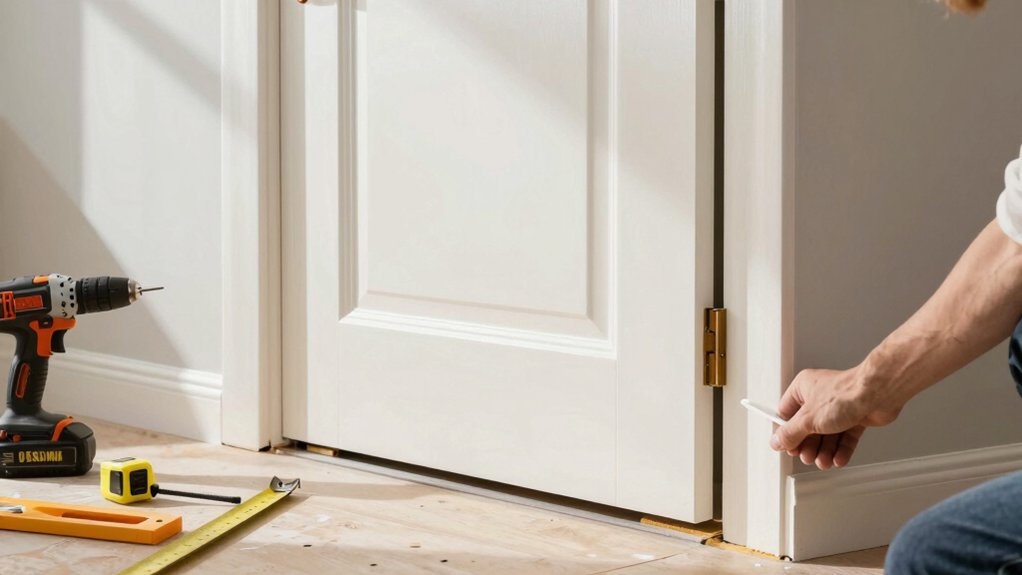
Attach Hinges and Hardware; Test the Swing

Attach the hinges and hardware to the door first, then test the swing to guarantee smooth operation. You’ll align hinge placement precisely with the door edge and frame jambs, ensuring even gaps and level mounting. Check that hinge leaves sit flat against the door and frame; drive screws straight and fully, without overtorque.
Confirm hardware compatibility across all components—strikes, hinges, and knobs—so operate as a single system. If you notice binding, loosen screws slightly and adjust the hinge location in small increments until the door swings freely.
Re-check clearances at top and bottom, and ensure the door closes without rubbing. After a successful swing test, secure all fasteners, and verify alignment remains true. Avoid forcing hardware; precision prevents future sag or misalignment.
Install Casing and Seal Gaps
Install casing around the door to cover the gap between the door and frame, then seal all openings to keep drafts out and improve alignment. You’ll install casing cleanly, aligning with the hinge side and top edge, and mitering corners for a tight fit. Use a framing square to confirm plumb and level before nailing. Apply consistent nails, then patch with wood filler where needed.
For gap sealing, caulk exterior edges and interior seams to prevent drafts and moisture intrusion, and ensure a seamless finish. Finish with paint or stain to match trim.
- Precise casing installation for a clean, professional line
- Gap sealing to stop drafts and moisture
- Sand, caulk, and finish for a durable look
Troubleshoot Common Fit Issues
When a pre-hung door doesn’t fit as intended, start by identifying whether the issue is with the frame, the door slab, or the hinges.
If the gap is uneven, check that the frame is plumb and square, and that the hinge mortises aren’t oversized.
For door clearance issues, verify that the rabbet and latch recess align with the strike plate; adjust strike height if needed.
Tighten hinge screws gradually to improve door hinge alignment, but avoid overtightening.
If the door rubs at the hinge side, shim behind the hinge or add shims to the jamb until the door opens smoothly.
For top and bottom clearances, ensure even gaps all around by planing only as a last resort.
Recheck hardware, mortises, and plumb after any adjustment.
Frequently Asked Questions
How Do I Choose the Right Door Thickness for an Existing Frame?
To choose the right door thickness, measure your existing frame curb and jamb gaps, then aim for door thickness matching framing compatibility. Prioritize standard 1 3/8″ or 1 3/4″ options, ensuring proper clearance and hinge alignment.
Can I Install a Pre-Hung Door Without a Level Floor?
You can, but floor leveling matters; expect extra shims and potential trimming. During door installation, verify the frame sits plumb, then adjust with shims until the header and hinge side align. Uneven floors complicate final latching and clearance.
What’s the Best Shim Material for Uneven Walls?
Yes. For uneven walls, use shims with the door frame to level, ensuring hinge placement remains square; pick shim material like composite or plastic that won’t compress, and adjust as you tighten to maintain plumb and even gaps.
How Do I Fix Binding Hinges After Installation?
To fix binding hinges after installation, lubricate the hinge pins and joints, then test and adjust. If binding persists, hinge replacement may be required. Use hinge lubrication first, and replace only worn or misaligned hinges as needed.
Should I Paint Before or After Installing a Pre-Hung Door?
Paint after installing the pre-hung door. Do paint preparation first, sealing edges and trim, then apply finish evenly. This prevents drips on hinges and weather-stripping, and guarantees a smooth finish during finish application.
Conclusion
With a door snug in its frame, you’ll see daylight dim to a whisper and feel the heft of a job well done. Each shim gleams like a quiet pillar, each hinge a steady breath in a well-tuned hinge orchestra. The gap tightens as you seal, and the casing settles like a closed book. You’ve turned a rough opening into a smooth passage—functional, precise, and ready for years of dependable, quiet doorswing.