You’ll pick the right screw by matching load, substrate, and environment, then dial in material, coating, and drive style for predictable, long-lasting results. Wood screws are tapered with coarse threads for soft/hardwood; metal screws have uniform threads for metal-to-wood or metal-to-metal; masonry fasteners handle concrete and brick. For outdoor use, choose corrosion-resistant stainless, brass, or coated screws; galvanized offers moderate protection. Drywall, deck, and specialty fasteners fit specific jobs. If you want more detail, you’ll discover a practical framework and step-by-step tips.
How to Pick the Right Screw in 3 Steps

Choosing the right screw starts with two questions: what’re you fastening and what material are you working with? You determine the correct screw by specifying load, environment, and access.
Step 1: identify the screw material and coating, then select a corrosion-resistant option for outdoor or humidity exposure.
Step 2: match the thread form and length to the substrate, ensuring embedment without protrusion or strip-out.
Step 3: apply standardized installation techniques, using torque control and pilot holes when required, to achieve predictable withdrawal resistance and shear strength.
Quantify requirements: load in pounds, hole diameter, and fastener embedment depth.
Maintain consistency with fastener systems and installation techniques for repeatable results.
Your power comes from precise choices, verified by performance data and manufacturer specifications.
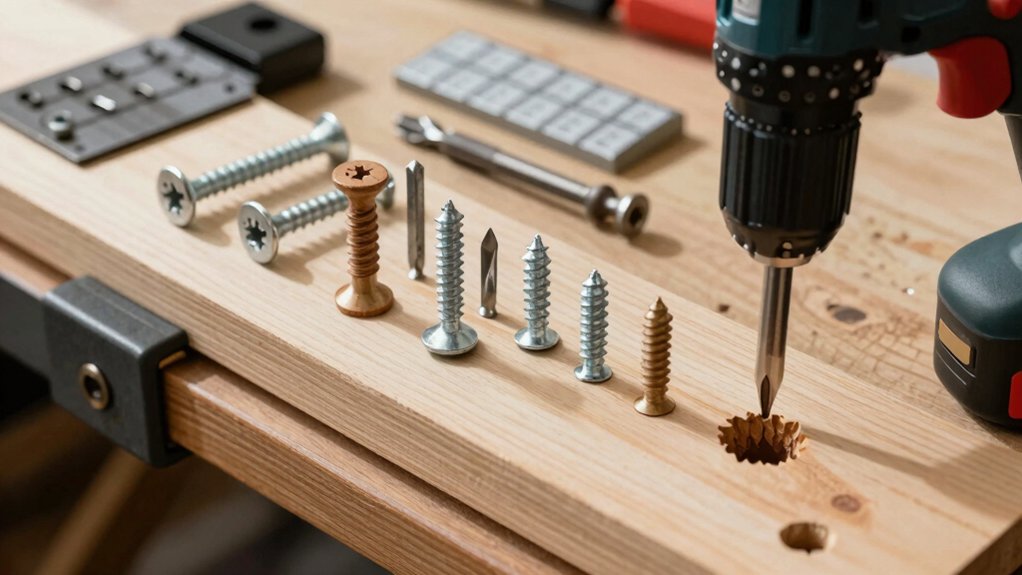
Screw Types at a Glance: Wood, Metal, Masonry
You’ll compare wood screws, metal screws, and masonry fasteners by noting their thread types, core diameters, and typical head styles.
Expect short, objective specs: wood screws use tapered shafts with coarse threads; metal screws rely on uniform threads and stronger cores; masonry fasteners require expansion anchors or specialized thread forms.
This will set a measured baseline for choosing the right screw type in each material context.
Wood Screw Fundamentals
Wood screw fundamentals: Wood screws are designed with a sharp tip and deep, coarse threads to bite into softwood or hardwood, providing strong pull-out resistance and clamp-load when driven with a pilot hole.
You select screw material to match load, environment, and corrosion risk, balancing stainless steel, brass, and zinc-coated options for durability.
Thread pitch and head style translate to holding power and finish, enabling predictable clamping force across joint types.
For installation safety, always verify pilot hole diameter and depth, use proper driver torque, and wear eye protection to prevent strand splinters.
Assess shear and withdrawal loads using manufacturer charts to ensure margins meet project requirements.
Precision matters: quantify engagement length, verify seating depth, and document fastener specifications for repeatable, high-performance assemblies.
Metal Screw Characteristics
Metal screws are engineered for strength, durability, and predictable performance in metal-to-metal and metal-to-wood assemblies. You evaluate tensile strength, shear capacity, and thread profile to select ideal fasteners.
Material properties, such as alloy composition and heat treatment, determine yield strength and fatigue resistance under load.
Coarse threads on self-tapping types maximize grip in thin metals, while finer pitches suit thicker sections with reduced pull-out risk.
Corrosion resistance varies by coating: galvanized, stainless, or ceramic finishes offer distinct service lives in indoor, outdoor, or humid environments.
Head styles influence drive torque and seating flushness, with hex, pan, and flat variants providing precise installation control.
Consider standardized classifications to compare performance, ensuring compatibility with existing joints, required preload, and maintenance intervals for durable assemblies.
Masonry Fastener Varieties
Masonry fasteners span a range of screw types designed for wood, metal, or masonry substrates, each optimized for pull-out resistance and load transfer in its target base. You’ll choose by substrate and load: anchor bolts for through-bolt or sleeve applications, expansion anchors for masonry walls, and special-fastener options like wedge anchors.
Expect measurable performance: pull-out values in pounds, shear capacity in pounds, and embedment depth that governs withdrawal resistance. For masonry, you’ll prioritize material durability, thread pitch, and installation torque to prevent stripping.
Use anchor bolts when bushing or nut access is required, and expansion anchors when mounting heavy items to concrete or brick. Precision counts: verify embedment depth, edge distance, and correct hole size to achieve predictable, repeatable strength under dynamic and static loads.
Wood Screws vs. Deck Screws: Key Differences
You’ll compare thread strength by noting that wood screws use finer threads for grip in softwood and hardwood, while deck screws use coarser threads for exterior deck boards.
Consider material compatibility: wood screws resist corrosion in interior projects, whereas deck screws often require stainless or coated steel for outdoor exposure.
We’ll discuss how thread design and coating affect holding power, insertion ease, and compatibility with common wood species.
Thread Strength Differences
Thread strength differs mainly due to how wood screws and deck screws are threaded and sized for their substrates. You’ll measure performance by thread shear capacity and tensile strength across common gauges (e.g., #8–#14) and embedment depths.
Wood screws typically feature deeper, coarser threads that maximize withdrawal resistance in soft and hardwoods, yielding higher pullout values but lower shear in abrupt loads.
Deck screws use finer, more uniform threads with corrosion-resistant coatings, delivering consistent shear resistance and elevated tensile strength in deck assemblies subject to lateral and dynamic forces.
In rated tests, deck screws often show superior lateral shear under fastener-embedded angles, while wood screws excel in axial pullout when substrate density varies.
Choose based on load path, substrate, and environmental exposure.
Material Compatibility Tips
When choosing fasteners for wood vs. deck applications, compatibility hinges on substrate and environment. Wood screws perform best in dry, kiln-dried lumber with moderate hardness, while deck screws excel in pressure-treated and outdoor-rated substrates exposed to moisture.
Material compatibility hinges on coating, alloy, and head style; stainless steel or zinc-aluminum coatings resist corrosion in humid or coastal environments. For exterior decks, select screws with a corrosion-resistant finish to minimize screw corrosion over time; interior projects tolerate standard steel if moisture is negligible.
Screws must match density: higher-density wood requires longer, stronger fasteners, whereas softer wood benefits from finer threads to reduce splitting. Avoid mixing incompatible metals with treated wood to prevent galvanic reaction.
Verify substrate compatibility and environmental exposure for durable assembly.
When to Use Drywall Screws vs. Masonry Screws
Drywall screws and masonry screws serve distinct purposes based on substrate and pullout demands. You should choose drywall screws for gypsum board, wood studs within 1/2 inch, and thin profiles, using fine-thread variants for sheetrock and coarse-thread for softwood. Expect lower pullout strength but fast installation, maintaining screw maintenance by driving without over-torque.
For masonry, deploy masonry screws with corrosion-resistant coatings, anchored into concrete or masonry cores, ensuring pilot holes and steady torque to prevent breakout. Compare pullout ratings: drywall screws top out around 100–180 pounds per inch of embedment in studs, while masonry screws exceed 500 pounds in the same embedment class when properly installed.
Use precise torque targets and verify fastener durability under load. Avoid dual-purpose use; prioritize substrate specs and required shear capacity.
Corrosion Protection: Galvanized, Stainless, and Coated Screws

Corrosion protection choices—galvanized, stainless, and coated screws—directly affect longevity and performance in exposed or moisture-prone environments. You’ll measure protection by corrosion resistance, coating thickness, and substrate compatibility, then select with confidence.
Galvanized screws deliver strong, economical protection through zinc sacrifice through-thickness, suitable for moderate humidity and outdoor framing.
Stainless options excel where salt spray and immersion occur, offering superior corrosion resistance at a premium cost and marginal strength differences.
Coated screws balance price and performance, using protective coatings designed for specific climates; verify coating integrity and compatibility with fastener materials.
Quantify expected lifespan via product data sheets, then match to service conditions—dew point, humidity, and exposure duration.
Decision outcomes: optimized durability, predictable maintenance, and minimized failure risk.
Drive Systems Explained: Phillips, Torx, Pozidriv, and More
Drive systems define how screws engage and how tools apply torque, so understanding Phillips, Torx, Pozidriv, and other drive types improves drive stability, reduces cam-out, and enhances installation control.
You’ll evaluate drive system design by torque transfer efficiency, contact area, and driver fit. Torx patterns provide high bit-to-screw engagement, minimizing slipping under high torque, while Phillips favors rapid self-centering in dense materials but increases cam-out risk at peak loads.
Pozidriv adds cross-slot alignment benefits with reduced cam-out relative to Phillips, though compatibility varies with screw head design. Diagrams of bit geometry reveal standardized tolerances that govern tool compatibility, set-point accuracy, and repeatable performance.
For a drive system comparison, prioritize engagement reliability, torque capacity, and driver availability. This focus ensures precise, repeatable results across projects.
Head Styles That Matter: Flat, Pan, Countersunk, and Combo
Flat heads sit flush for surface finishes, while versatile heads offer a wider seating option across materials.
Countersunk designs reduce protrusion but require drilling accuracy, with pros and cons that scale by material hardness and screw size.
Start by comparing flat vs versatile and weigh countersunk trade-offs to choose the best fit for your project.
Flat vs Versatile Heads
When choosing screw heads, the distinction between flat and versatile styles matters for both appearance and performance: flat heads sit flush with the surface for a clean finish, while versatile heads—such as pan, countersunk, and combo—offer different seating depths and contact areas to match material and drive type.
You evaluate screw head design by penetration, shear strength, and legibility of finish after installation. Flat heads deliver a 0.2–0.5 mm countersink tolerance in typical woods; pan and combo heads present 0.0–1.0 mm protrusion allowances for metal and composites.
You prioritize screw head compatibility with drill point, drive type, and material density, selecting standardized diameters and lengths in increments. Precision selection minimizes loosening, corrosion risk, and surface blemishes, ensuring repeatable fastening performance.
Countersunk Pros and Cons
Countersunk heads sit flush with or below the work surface, reducing snag risk and enabling clean top finishes. However, they require precise countersinking depth to avoid under- or over-driving and to guarantee seating stability.
You gain flat, unobtrusive surfaces and improved shear resistance when fastened into thin panels. Yet, you trade install tolerance for depth control.
Countersunk pros include streamlined appearance, reduced head protrusion, and compatible joint flushness with recessed hardware.
Countersunk cons involve risk of cam-out if driven incorrectly, the need for accurate bit alignment, and potential material splitting on brittle substrates.
When selecting, quantify material hardness, required finish height, and available tooling. Use consistent countersunk dimensions, verify seating with test sample, and apply correct pilot holes to maximize performance and minimize failure risk.
Thread Patterns for Wood and Metal: What to Know
Thread patterns for wood and metal differ in pitch, form, and engagement. You’ll notice wood-threading uses coarser pitches and wider crests, enabling rapid bite and strong pull without stripping soft substrates.
Metal threads present finer pitch options, higher engagement density, and tighter tolerances for precise alignment. Thread pattern variations affect load distribution, with wood screws typically featuring tapered bodies to start threads quickly, while machine-style metal screws emphasize uniform engagement along the shank.
For structural accuracy, measure actual screw pitch differences against joint requirements, and select patterns that optimize shear and withdrawal resistance. In practice, test one or two pilot inserts, then confirm through torque readings and fit conformity.
Knowledge of these differences yields decisive choices, maximizing hold power and project reliability.
Sizing Your Screws: Gauge, Length, and Fit

Screws must match the joint, material, and load, so start by selecting a gauge appropriate to the substrate and fastener type. Gauge determines withdrawal strength and shearing capacity; choose 1/8-inch increments that align with the substrate thickness and load.
Next, set the length to ensure full engagement without protrusion. For wood, aim for at least 2–3 times the thickness. For metal or thin materials, cap length to prevent tear-out and interference.
Confirm screw fit by testing bite: the head should sit flush without cam-out or wobble, and threads must bite cleanly into the substrate. Record the final gauge and length for repeatability.
Precision matters: document tolerances, pilot hole diameter, and thread engagement to guarantee predictable performance with every install.
Specialty Screws for Concrete, Tile, and Masonry
When installing in concrete, tile, or masonry, choose specialty screws designed for substrate hardness and moisture exposure, such as masonry screws, self-drilling anchor screws, and tile-to-concrete fasteners.
You require proven performance: count on corrosion resistance ratings, pull-out values, and embedding depth that match your substrate.
Precision matters: select concrete anchors with verified shear and tension values, and verify installation torque per manufacturer data.
Use specialty fasteners engineered for grout and tile backers to prevent cracking and dezincification under humidity.
Document compatibility with fast-setting mortars and epoxy grouts to maintain structural integrity.
For reliability, specify stainless or coated steel grades, and track load limits, installation time, and withdrawal resistance.
In short, chose concrete anchors that deliver consistent, repeatable results.
How to Choose Screws by Load, Material, and Environment
Selecting the right fastener starts with matching load, material, and environment to the screw. You quantify load as working shear, withdrawal, and tensile ratings, selecting a factor of safety around 2:1 for critical joints.
Material choices—steel, stainless, brass, or aluminum—govern corrosion resistance and modulus, with corrosion-resistant alloys rated by K factors and yield strength.
Environment drives coatings and substrate compatibility: indoor dry, outdoor, or chemically aggressive settings demand specific fastener coatings to minimize oxidation and galling.
Match thread form to substrate for consistent pullout strength.
Evaluate environmental factors, including moisture, temperature cycling, and chemical exposure, to prevent creep and failure.
Use standardized torque values and installation habits to maintain resistance, ensuring predictable performance across assemblies.
How to Install Screws: Predrilling, Bit Sizing, and Driver Tips
To install screws reliably, start with proper predrilling, bit sizing, and driver technique tailored to the fastener and substrate.
Choose pilot holes equal to 60–80% of the screw shank diameter for hardwoods, and 40–60% for softwoods.
For metal, use clearance or slightly undersized holes per the screw material, minimizing binding.
Select bit types: brad-point for wood, stepped or carbide-tipped bits for dense composites, and high-speed steel for metal.
Drive screws with steady, perpendicular pressure and a controlled, full-depth bite; avoid overdriving.
Use a torque-limited driver to prevent thread extraction.
Monitor material thickness and clamp securely.
Record installation techniques and material compatibility to guarantee repeatable results, and verify flush seating without cam-out.
Precision here drives performance and longevity of every project.
Quick Decision Framework: Pick the Right Screw in Three Steps
Choosing the right screw is a three-step decision: assess the substrate, select a screw type and size, then confirm drive compatibility.
You evaluate substrate hardness, thickness, and vibration exposure to determine load demand and withdrawal risk.
Next, you select a screw type and size, quantifying diameter, length, and thread pitch to meet passive restraint and shear requirements.
Then, you verify drive compatibility, confirming head type and drive recess align with your tool and torque limits.
Prioritize screw head types that minimize cam-out under high torque, and match screw material properties to corrosion environment and strength needs.
Record nominal values for head diameter, shank diameter, and grip length to standardize procurement.
This framework accelerates decisions, reduces waste, and guarantees repeatable performance across projects.
Frequently Asked Questions
How Do I Remove Stripped Screws Without Damage?
You’ll remove a stripped screw by applying penetrating oil, using a precision screwdriver, and employing impact methods; if needed, drill out the core. This guarantees screw extraction with minimal damage, enabling damaged screw removal and reuse of components.
Can Screws Affect Wood Staining or Paint Finish?
Sparks lift like lanterns in a storm; yes, screws can affect wood stain and paint finish. You’ll see color absorption change, sheen variance, and edge lugging if fastereners aren’t proper, precise, and corrosion-resistant for your material.
What’s the Difference Between Wood-To-Wood and Wood-To-Metal Screws?
Wood-to-wood screws, usually steel with a wood-thread and shallow head, differ from wood-to-metal screws, which often have thicker cores, deeper threads, and a washer-style head design. Screw material and head design optimize for load, corrosion, and seating.
Are There Eco-Friendly or Recycled Screw Options?
Yes—you have eco friendly fasteners available, including recycled screw options. You can select stainless or coated steel options with known recycled content, quantify by cycle life and load ratings, and compare certifications to maximize durability and environmental impact.
How Do I Store Screws to Prevent Corrosion?
Store screws in labeled, sealed containers in a cool, dry place; use desiccants and rust prevention coatings where needed. Maintain humidity below 60%, monitor for corrosion monthly, organize by size, and implement strict storage solutions for consistency.
Conclusion
Choosing the right screw boils down to three questions: material, environment, and load. Match the screw type to wood, metal, or masonry, then pick corrosion protection appropriate for indoor or outdoor use. Consider drive type, length, and thread. For high-load or hardwood, use deeper threads and longer screws. Use predrilling when needed, and guarantee bit size matches. With this framework, you’ll loft confidence as easily as a ruler measures inches—precise, repeatable, and dependable.