
End-of-terrace house extension costs hinge on design, size, materials, and planning rules, with single- or multi-zone layouts driving structural needs and site constraints like boundaries and permitted development. You’ll balance material prices, labor, and specialist trades against permits and contingencies, while energy features and landscaping can shift long-term value. Accurate quotes and clear timelines matter, but subtle hidden costs and financing interplay can surprise you, so you’ll want a solid framework before you commit.
What an End-Of-Terrace Extension Is and When It’s the Right Move

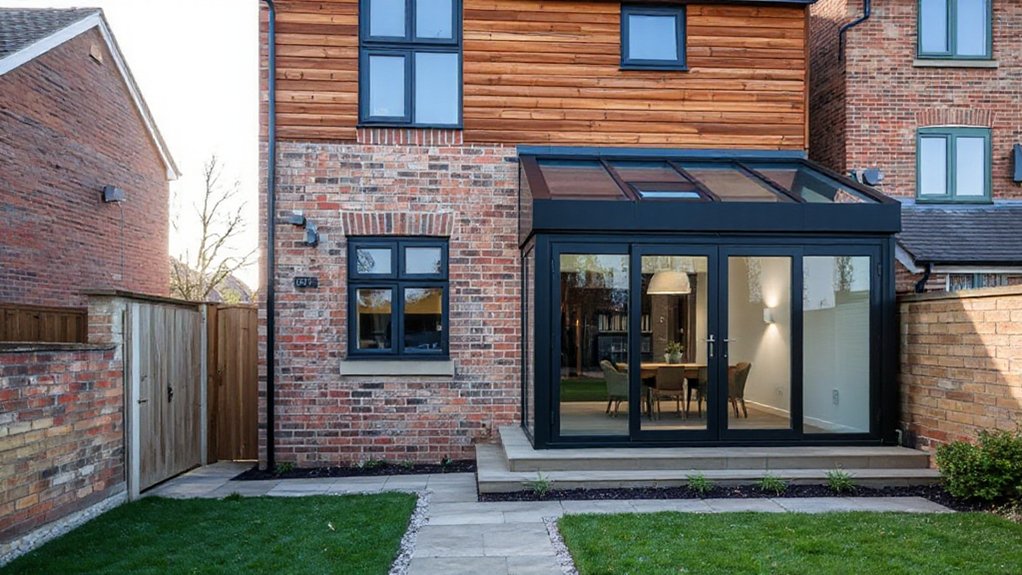
An end-of-terrace extension is a rear or side addition that attaches to the end townhouse, expanding usable floor area without altering the front-facing home’s alignment. You assess fit by footprint, height, and boundary constraints, then compare incremental floor area to total box length.
For planned layouts, consider Landscaping upgrades to outdoor space, optimizing sightlines and drainage, and Interior decor to maintain cohesive style with the existing unit.
Structural options include single-story or multi-zone configurations, with load-bearing requirements quantified in kN/m2 for walls and roofs.
Budgeting should reflect material costs per square meter, labor rates, and potential rail or step integrations.
Timing hinges on permitting, weather windows, and trades availability, ensuring site access remains uninterrupted for efficient, predictable progress.
Do You Need Planning Permission or Building Regulations for an End-Of-Terrace Extension?
Whether you need planning permission or Building Regulations approval for an End-of-Terrace extension depends on scale, site specifics, and permitted development rights. In practice, many rear or side additions fall under Permitted Development (PD) if they meet size, height, and proximity criteria, but some configurations require formal planning consent or full Building Regulations compliance.
- PD thresholds: depth, height, and side space must meet local limits; check the 4m or 8m rear extension rules for terraced homes.
- Neighbor notification: potential objections affect approvals and may trigger extra controls or conditions.
- Landscaping considerations: retaining walls, drainage, and privacy screens influence compliance and landscaping plans.
- Neighborhood impact: view lines, daylight, and access must be evaluated to avoid adverse determinations.
What Drives Costs: Materials, Labor, and Specialist Trades
Material costs vary by material type, unit price, and waste allowances, setting a baseline that you’ll see reflected in per-square-meter figures.
Labor time impacts hinge on scope, productivity, and crew rates, so you should expect a direct correlation between task duration and total labor cost.
Specialist trades, such as structural engineering, electrical, and plumbing, add discrete line items with proficiency-based pricing and required approvals.
Materials Cost Factors
Materials costs are driven by unit prices, quantities, and sourcing quality; you’ll see substantial variation based on material type, finish, and 공급 chain factors. In this subtopic, you quantify drivers and apply unit economics to the project model.
Roof insulation choices vary from U-values to thickness, affecting per-square-meter costs and long-term energy savings.
Window framing costs reflect dimensions, profiles, and thermal breaks; end-of-terrace assemblies intensify scope due to alignment and glazing options.
Material wastage, removal of existing elements, and packaging margins compress or extend budget envelopes.
Exterior cladding and roof finish selections further calibrate totals through panel counts, fastener types, and weatherproofing systems.
You’ll model scenarios to compare material-only deltas, isolating price-per-unit effects.
- Roof insulation options and U-values
- Window framing profiles and thermal breaks
- Cladding, panels, and fasteners
- Waste, packaging, and logistics adjustments
Labor Time Impacts
Labor time is driven by how long tasks take, not just who does them. You quantify task durations line-by-line: excavation 0.5–1.0 days, foundations 2.0–3.5, structural frame 3.5–6.0, roof and cladding 2.0–3.5, internal trades 4.0–7.0.
Variability arises from site access, weather, and material cure times, all affecting crew synchronization. You’ll see staged sequences where delays propagate: framing before electrical, plumbing, and insulation, then plastering and plasterboard.
Decorative finishes add time at later stages: skimming, sanding, and paint coats extend up to 5.0 days depending on finish quality. Interior design choices influence finish precision, joint detailing, and tolerance bands, increasing labor density by 8–15% in high-detail scenarios.
You’ll monitor productivity via daily output targets and rebaselining after weather interruptions.
Specialist Trade Roles
Specialist trades add unique cost drivers beyond generic labor and material rates: trades such as electrical, plumbing, HVAC, glazing, and carpentry each carry specialized scope, certification requirements, and lead times.
You’ll see surcharge factors for permits, testing, and snag lists, plus coordination windows that affect sequencing and ongoing site access.
In practice, electrical and HVAC pulls can add substantial wiring, ducting, and control-system costs, while glazing and carpentry impact fit-out timing and weatherproofing.
Interior decor and landscaping design considerations influence finish, mood, and external interfaces, driving access planning and protection measures during works.
Precise budgeting hinges on trade-specific allowances, inspection cycles, and warranty periods, all feeding into risk reserves at key project milestones.
- Trade scope and certifications
- Permits, testing, and snagging
- Sequencing and lead times
- Finish interfaces with interior decor and landscaping design
Design Choices That Affect Both Budget and Value

If you’re balancing cost and value, the design choices you make early on drive both upfront spend and long-term worth. You quantify impact by module area, material class, and performance targets.
For interior decor, select neutral palettes and standard fixed fittings to minimize resale risk while preserving appeal; hewing to mid-range finishes can yield a 5–15% value delta versus premium options.
Landscape design adds marginal first-costs but can push perceived footprint efficiency, increasing marketability by 2–8% depending on alignment with local norms.
Window-to-wall ratio, insulation grade, and service routing directly affect energy costs; optimize these within code without over-engineering.
Budget-conscious, you balance size, light, and alignment to avoid diminishing returns over a typical 15–25 year lifespan.
A Practical Budgeting Framework: Estimating Your Extension Cost
You’ll start by itemizing Material And Labor Breakdown, assigning unit costs and labor hours to each component.
Next, you’ll attach a Contingency And Allowances Handle to cover unforeseen events, typically as a percentage of direct costs.
Finally, you’ll recalculate totals with a risk-adjusted margin to guarantee the estimate remains feasible within your budget.
Material And Labor Breakdown
Material and labor costs form the core of any extension budget. You’ll quantify items by unit, area, and labor rate to achieve precise totals.
Direct material costs include framing, insulation, sheathing, drywall, finishes, doors, and windows, allocated per square meter.
Labor is itemized by trades: carpentry, electrical, plumbing, and finishing, with hourly or per-square-meter rates.
Attachments such as scaffolding, waste removal, and site protection are tallied as discrete line items.
Schedule-based costs reflect sequencing, lead times, and productivity factors, using a 0.9 to 1.15 multiplier for complexity.
Interior lighting specifications, fixture counts, and wiring runs integrate into electrical totals.
Landscaping design inputs remain separate from the build scope.
Confirm reconciliation of material quantities, labor hours, and subcontractor quotes for final报价.
Contingency And Allowances Handle
Contingency and allowances form the practical core of a reliable extension budget. You allocate a primary contingency of 5–15% of total construction costs, calibrated to project risk and design complexity.
Document a separate allowances schedule: line items for scope gaps, pricing volatility, and late-stage changes, each with explicit trigger criteria.
Implement contingency planning by using a two-tier reserve: a firm, non-recoverable contingency for unforeseen conditions and a negotiable, adjustable buffer for design refinements.
Track variances weekly, updating forecasts to reflect confirmed subcontractor quotes and material price trends.
Guarantee allowance management aligns with contract terms, marking each adjustment to the cost ledger and notifying stakeholders.
Use a clear audit trail to justify deviations, maintaining transparency for decision-makers and lenders.
Hidden and Optional Costs to Watch for
Hidden and optional costs can silently inflate project totals; careful accounting helps prevent surprise overruns. You’ll identify non‑essential line items that commonly slip into budgets, quantify them, and cap their impact. Track every addition against baseline scope, and forecast variability with explicit contingency bands. Prioritize verifiable quotes, and document changes via formal change orders to avoid claims delay.
Include garden landscaping and interior decor as separate allocations, then compare against overall project value to ensure alignment with design intent. Maintain a rolling cost ledger, updating weekly, and require owner approval before committing to any material upgrades or decorative options beyond agreed specs. Use unit costs, margins, and tax implications to keep the total transparent and auditable.
- Documentation and change orders for scope shifts
- Garden landscaping and exterior elements budgeting
- Interior decor allowances and approval thresholds
- Contingency tiering by risk and phase
Energy and Efficiency: Long-Term Savings Vs Upfront Investment
Energy and efficiency investments in an end-of-terrace extension deliver measurable long-term savings, but the upfront costs require careful appraisal. You evaluate cost-per-watt, payback period, and annual energy reductions to quantify value.
Typical solar panels yield 250–340 W per module, with an 8–12% annual production variance by orientation and shading. Installed capacity commonly ranges 3–6 kW for modest adds, influencing first-year electricity bill reductions by 20–40%.
Smart thermostats trim heating and cooling by 10–25% depending on occupancy and insulation.
Net present value (NPV) and internal rate of return (IRR) provide guardrails for decision-making. Consider maintenance, replacement cycles, and electricity price forecasts.
Prioritize high-performance glazing, insulation, and air-sealing to maximize efficiency gains alongside these technologies.
How to Compare Quotes Like a Pro and Spot Red Flags

When you compare quotes for an end-of-terrace extension, start by standardizing scope and assumptions across all bids. Then verify unit rates, contingency allowances, and VAT treatment.
Inspect inclusions list for site setup, protection, and waste handling; demand itemized totals with clear descriptions to enable apples-to-apples comparison.
Look for hidden costs in permit fees, scaffolding, and electrical or plumbing core work.
Assess supplier reliability with project timelines, staffing, and warranty terms; request prior project references.
Watch for disproportionate allowances that inflate totals, or unpriced lines that shift risk to you.
Guarantee design scope covers garden landscaping and interior decoration in both plan and finish specifications.
- Standardize scope and unit rates across bids
- Verify contingencies, VAT, and inclusions
- Check timelines, warranties, and references
- Identify hidden charges and unpriced lines
Timeline Planning and Financing Options for End-Of-Terrace Extensions
Timeline planning for end-of-terrace extensions hinges on a precise, schedule-driven approach that aligns milestones with financing milestones. You’ll map a 12- to 20-week build window, identifying critical path tasks and their cashflow triggers.
Begin with a pre-commitment budget, allocating 15–25% contingency for unforeseen site constraints.
Secure a loan drawdown schedule that mirrors stage approvals: planning consent, demolition (if required), foundation, structure, roof, and finishings.
Track equipment rentals, permits, and utility diversions in a single ledger to avoid leakage.
For interior decor, specify finish levels and schedule related payments to align with fit-out milestones.
Garden landscaping is phased: hardscape installation precedes planting, with final invoices tied to certificate-of-completion.
Maintain weekly progress snapshots, updating forecasted costs by ±5% and communicating variances within 72 hours.
Frequently Asked Questions
How Long Does an End-Of-Terrace Extension Typically Take From Start to Finish?
Typically, you’ll complete an end-of-terrace extension in 8–14 weeks, depending on size and complexity. You’ll factor in Design considerations, material choices, planning checks, and on-site sequencing, with inspections every two weeks and precise progress milestones.
What Are the Most Common Hidden Costs Not in Quotes?
Hidden costs often creep in: permit requirements, planning permissions, survey fees, utility upgrades, scaffolding, temporary power, waste disposal, snagging, and professional fees. You’ll encounter these when budgeting for your end-of-terrace extension, with precise, itemized estimates. Overall, expect contingencies.
Can I Offset Extension Costs With Shared Party Wall Agreements?
Yes, you can offset costs via party wall agreements with cost sharing. The party wall, cost sharing, splits typically: surveyor fees 1/3 each, structural alterations 50/50, legal notices 100% borne by claimant adjacent. Confirm with a documented agreement.
What’s the Typical Return on Investment for These Extensions?
Typically, your ROI hovers around 5–15%, depending on design considerations and material choices. Picture a blueprint turning to brick, numbers ticking up: frame costs, resale uplift, and energy savings, all converging into a precise, tangible value.
Do Listed Buildings or Conservation Areas Affect Costs?
Listed buildings and conservation areas increase costs due to restrictions and additional checks. You’ll face longer timelines, higher fees, and extra design iterations; expect more planning permissions work, heritage assessments, and documentation in architectural heritage compliance.
Conclusion
Think of your extension as a bridge between today and tomorrow. Like a carefully calibrated instrument, you’ll align budget, scope, and timing to hit target costs and timelines. Use clear quotes, contingency drawers, and phased milestones. Remember the golden rule of allusions: plan as Daedalus did with wings—but with caution—so you don’t overreach. In short, define inputs, monitor variances, and anchor decisions to value, efficiency, and durable compliance.


