
To build a sturdy mudroom bench with storage cubbies, start with a precise plan: measure, label, and cut components, then dry-fit before final assembly. Build a square, stable frame, tightening fasteners in stages and checking 90-degree corners. Secure cubbies firmly, align faces, and prevent wobble with shims as needed. Attach a moisture-sealed top, seal joints, and finish with even coats. For added utility, include hooks and baskets, and stay aware of maintenance—there’s more you can optimize if you continue.
Build a Mudroom Bench With Cubbies

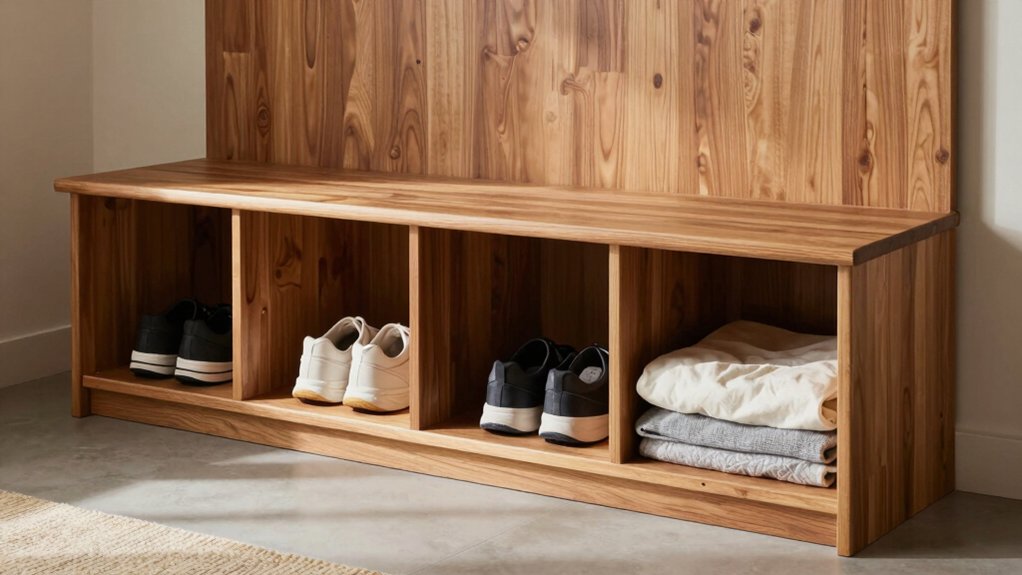
To build a mudroom bench with cubbies, start with a sturdy base that can bear daily weight. You’ll frame a solid platform, then attach leg supports that resist lateral movement. Use 3/4-inch plywood for the seat and a reinforced underside to prevent sagging.
Install dividers for cubbies with precise cuts so each compartment remains square. Align front trim flush to the frame for a clean, professional look. Add decorative accents that reflect your style, such as routed edges or contrasting wood tones, without compromising durability.
Plan lighting options, like under-seat LEDs or shelf lamps, to illuminate belongings and deter clutter. Secure fasteners with a helper, check levelness, and test load distribution before finishing with a protective coat. Your bench meets daily use with efficiency and polish.
Plan Layout, Dimensions, and Budget
Plan your layout, dimensions, and budget with precision: map a single-wall footprint or corner layout that fits your mudroom’s flow. Then dial in seat height, cubby widths, and overall depth to guarantee comfort and accessibility. Begin with a tight sketch showing entry points, doorway clearance, and adjacent storage.
Translate that onto finished dimensions—target a 16–20 inch seat height, 12–15 inch cubby openings, and 14–18 inch overall depth for easy kneeling and storing footwear. Establish a realistic budget by itemizing core components and costs, then build in a small contingency for fasteners and finish.
Prioritize cohesive design inspiration and cohesive color schemes that align with your home’s palette. Confirm tolerances, space allowances, and potential future tweaks now to prevent retrofit work later.
Tools and Materials You’ll Actually Need
Here’s what you’ll actually need: a practical mix of hand and power tools, plus durable, easy-to-work-with material. You’ll select plywood or MDF for panels, plus solid boards for supports, all cut to exact measurements.
Tools: a tape measure, square, level, clamps, and a cordless drill with bits; a jigsaw or circular saw for accurate cuts; a countersink bit for clean screw recesses; and a familiarity with a palm sander or sanding block for final finish.
Fasteners include stainless or coated screws, wood glue, and corner brackets for rigidity.
Finish materials matter too: a durable primer, undercoat, and paint or stain with a sealer.
Add decorative accents and lighting options to tailor the look, keeping the build sturdy, accessible, and visually cohesive.
Cut and Assemble the Bench Frame
Measure precisely and mark your cuts before setting up the saw. Then cut exact lengths for the bench frame.
Assemble the pieces square and true, confirming joints are snug and aligned as you go.
Check square alignment at each corner to guarantee a stable, even frame.
Cut Exact Measurements
To cut exact measurements, start by labeling each board and double-checking the planned dimensions before you cut. You’ll establish a clear cut list, confirming lengths, widths, and thicknesses against your cut diagram.
Use a sharp saw, make straight, measured passes, and routinely check against the plan with a steel rule and square. Mark every piece’s orientation and joint locations to prevent mix-ups during assembly.
Maintain consistent edge alignment and zero kerf loss by accounting for blade width in your marks. Double-check that all parts fit within your mudroom decor and color schemes goals, ensuring clean overlaps and flush surfaces.
If a piece refuses to align, reconsider layout rather than forcing a miscut. Precision now prevents rework later.
Assemble Bench Frame
Assemble the bench frame by laying out the frame pieces on a flat workspace and verifying the cut list against the planned dimensions. Align all edges squarely before joining.
Use metal fasteners or wood screws matched to the frame material, and drive them in with steady, even pressure to avoid offset. Glue non-corresponding joints only where specified, then clamp until set.
Check that the legs are perpendicular to the rails and that the back supports sit flush with the uprights. Maintain a consistent fastener pattern to ensure uniform load transfer.
After framing, wipe away excess glue and inspect for gaps. Add decorative accents and finishing touches later, but ensure the frame is rigid and true now to support storage cubbies.
Tighten all connections and verify overall squareness.
Check Square Alignment
Even with the frame pinned, you must confirm square alignment before proceeding. Start by measuring diagonals from opposite corners; they should match within a small tolerance specified by your plan. If a discrepancy appears, adjust clamping or joint fasteners until the frame sits square.
Use a carpenter’s square to verify each corner is ninety degrees, then recheck across the diagonals. Ensure the top edge aligns parallel to the base and that side rails run true without twist.
When satisfied, tighten all fasteners in a deliberate, incremental sequence to avoid shifting. During this step, document any deviations for future decorative finishing notes.
Consider safety considerations, guarding clamps and keeping hands clear of pinch points. Precision now prevents misalignment later and yields a sturdier, professional result.
Build Cubbies and Secure Them Against Wobble
Secure the cubbies to sturdy footing using secure anchoring, so each unit sits firmly without shifting.
Identify and fill any wobble gaps with shims or evenly spaced shims, ensuring true alignment across all faces.
Tighten all fasteners to spec, then verify stability by applying light lateral pressure on each cubby.
Securery Anchoring Footing
To prevent wobble in your cubbies, start by anchoring the footing securely to the floor or base framework, ensuring a solid foundation for the entire mudroom bench. Secure fasteners must penetrate structural substrate with solid bite, using appropriate anchors for concrete, plywood, or studs.
Verify level at the footing corners and shim as needed to maintain true plane, preventing skewed cubbies later. Use corrosion-resistant screws and washers, and avoid overtightening that could split the base.
Ensure the footings resist lateral movement by pairing with cross-bracing or a ledger, maintaining footing stability under load. Maintain a clear, unobstructed pathway for access, and check periodically for loosened hardware.
This approach reinforces foundation safety and supports long-term bench rigidity.
Block Wobble Gaps
When you build the cubbies, fill any wobble gaps with tight, precision fits that resist shifting under load. You’ll address block wobble by matching cross-sectional profiles and testing fit before final assembly. Set aside small shims only after confirming flush joint alignment, not as a last resort.
Use straight edges to verify square corners and ensure each block sits solidly against its neighbors. For gap correction, tailor-pocket the contact faces so load paths align along the strongest grain.
Avoid forcing pieces; if a panel binds, back off and re-cut rather than stress the assembly. Cement or wood glue should cure with clamped pressure, not shear.
Document zero-gap results, and recheck after initial load tests to prevent recurring wobble.
Tighten All Fasteners
After ensuring the cubbies sit flush and square, tighten every fastener to lock in alignment and prevent wobble. You’ll go across corner brackets, shelf supports, and leg anchors, applying steady torque until there’s zero play. Avoid over-tightening, which can strip threads or crush materials; snug is sufficient, then test by lightly nudging each unit.
Recheck joints after tightening to confirm uniform contact and square edges. Once secure, confirm the overall frame remains square by measuring diagonals. Finishing touches matter here: replace any mismatched washers, align face panels, and wipe away fingerprints.
Accuracy at this stage prevents future creaks and stabilizes the aesthetic details of the storage cubbies. This precise tightening enhances durability and completes the look without unnecessary bulk or wobble.
Attach the Top and Seal Against Moisture
Once you’ve measured and cut the top, position it firmly in place and secure it to the cabinet frame with screws or appropriate fasteners.
Next, check for even seating along the front and sides, then tighten all fasteners to eliminate gaps.
Apply a high-quality moisture barrier along the top edge and at any joints where water could seep in, especially under edges and corners.
Use silicone or polyurethane sealant at seams, then smooth with a caulking tool for a clean line.
Allow sealant to cure per manufacturer instructions before placing loads.
Wipe away excess adhesive and inspect for uniform coverage.
Implement proper sealing techniques around fastener heads and exposed edges to prevent moisture intrusion and prolong bench life.
Add Seating, Hooks, and Extra Storage Ideas
To maximize usefulness, add seating, hooks, and extra storage where you already have the base cabinet. Plan a shallow bench with a comfortable seat height, then test seating comfort by sitting for a minute and adjusting.
Choose Hook variety to cover coats, bags, and hats without crowding the rails; mix single hooks with a row of double hooks for versatility.
Integrate Extra baskets beneath the bench to corral small items, like gloves, keys, and mail, so the surface stays clear.
For shoe storage, allocate a dedicated cubby or pull-out bin with moisture-safe lining to prevent odor. Label baskets or use color coding for quick retrieval.
Keep components aligned and fasteners hidden for a clean, professional finish.
Common Mistakes and Quick Troubleshooting
Common mistakes can derail a DIY mudroom bench project long before you finish. You’ll stay on track by planning joints, fasteners, and spacing before you cut. If a cut is off, correct it now instead of forcing fit later. Use straightedge checks for alignment, and dry-fit components to confirm clearances. Finish mistakes are costly, so label parts and keep hardware organized.
When painting, avoid drips by light, even coats and proper sanding between steps. If you notice bubbling or uneven color, apply paint touch ups after curing, not during. Ventilate to minimize paint fumes, and wait for proper drying before assembly. Proper sanding, sealing, and clean edges prevent wobble.
- Measure twice, cut once
- Dry-fit before final assembly
- Pre-drill to reduce splitting
- Control moisture and ventilation
- Schedule drying intervals for finish
Frequently Asked Questions
How Can I Customize the Bench for an Odd Doorway?
You can customize it by trimming depth to match doorway width and adjusting leg height for clearance, ensuring the bench sits flush. Use a matching stain for aesthetic matching, and add a narrow, angled back support if needed.
What Safety Features Prevent Child Injuries on the Bench?
Coincidentally, you’ll prevent injuries by using child proof hardware and rounded edges, you guarantee the bench’s corners are smooth, you secure fasteners, and you maintain stable, low shelves so kids can’t reach dangerous gaps or topple it.
Can I Repurpose Scrap Wood for the Cubbies?
Yes, you can repurpose scrap wood for the cubbies. Use reclaimed wood and scrap material with careful planing, sanding, and joints to guarantee stability, then treat, seal, and fit securely for durable, kid-friendly storage cubbies.
What Finishes Resist Humidity in a Mudroom?
Humidity resistant finishes and moisture proof coatings are essential; you should choose proven options like polyurethane or epoxy, apply per manufacturer directions, and maintain ventilation. You’ll seal surfaces, reduce warping, and protect cubbies from humidity over time.
How Do I Integrate a Shoe Rack Area Discreetly?
You can integrate a discreet shoe rack area by tucking it beneath the bench’s seating, using a slim pull-out or hinged panel. Keep shoe storage behind decorative accents, maintaining clean lines and accessible, hidden compartments.
Conclusion
You’ve learned to plan, cut, assemble, and finish a mudroom bench with cubbies that’s sturdy and practical. Measure twice, cut once, and secure every connection. Prioritize moisture resistance and solid fasteners so your bench lasts. Install seating and hooks with intention, align cubbies, and maintain clean lines for easy use. Think of this project as a bridge between clutter and calm—each component supports the next, carrying you from chaos to organized efficiency, one purposeful detail at a time.


