To install a vapor barrier in a crawl space, start by prepping the area: remove debris, fix drainage, and dry the surface. Choose a low-permeability, durable material suited to your climate, then seal all penetrations around pipes and rim joists with compatible sealant. Lay the barrier flat on the ground, overlapping seams by 6–12 inches, and tape or seal joints securely. Anchor and edge-seal the membrane, inspect for gaps after backfilling, and you’ll gain lasting protection—more details await.
Why Moisture Demands a Vapor Barrier (and What You’ll Gain)
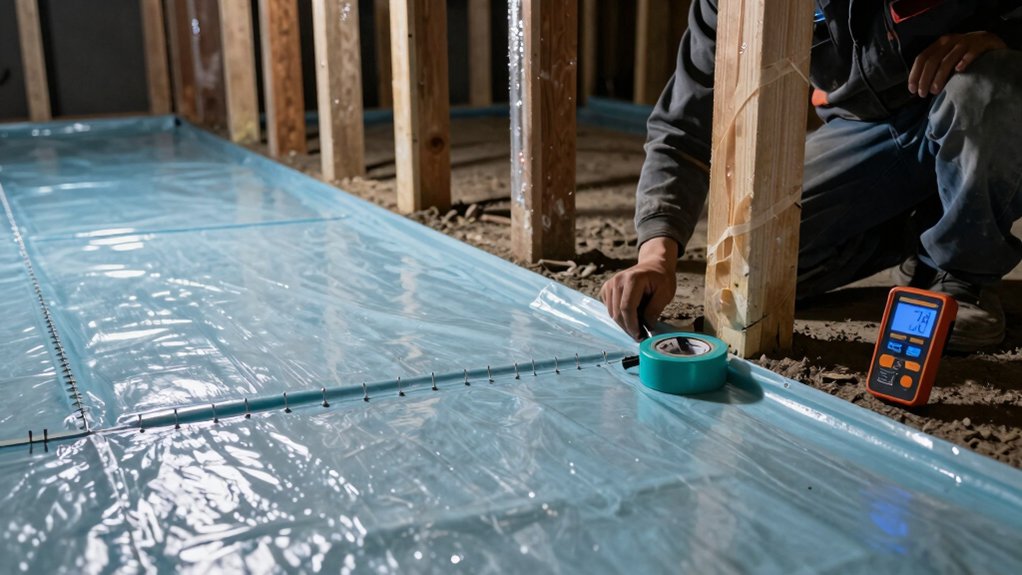
Moisture moves where it can, so a vapor barrier is essential to control and limit that movement. You’ll gain predictable indoor conditions by reducing vapor diffusion through walls and floors, limiting condensation points, and protecting insulation performance.
Moisture control starts with understanding how humidity enters the structure: ground moisture, groundwater seepage, and indoor moisture production from daily activities. A barrier minimizes these pathways, creating a stable enclosure for crawl-space assemblies.
You’ll also achieve improved indoor air quality, since fewer humid cycles reduce mold and mildew risk and lessen musty odors. Humidity regulation becomes more reliable when the barrier works in concert with proper sealing at joints, seams, and penetrations.
This reduces seasonal moisture swings and preserves structural integrity, longevity, and energy efficiency.
Pick the Right Material for Your Climate and Budget
Choosing the right vapor barrier starts with climate and budget considerations, because different materials perform best under specific temperature and humidity ranges. You’ll evaluate material options against your crawl space’s conditions and cost constraints, prioritizing long-term performance over upfront savings.
In humid climates, opt for barrier materials with low permeability and robust tear resistance to minimize pinholes and moisture migration.
In dry or mixed climates, consider thinner films that reduce cost without compromising integrity, while ensuring durable seams and edge seals.
Climate considerations also affect installation methods, such as installer recommendations for overlaps and fasteners.
Budgeting should include anticipated lifespan, replacement cycles, and potential retrofit needs. Select a barrier that meets performance specs for your conditions while fitting your financial plan.
Prep Your Crawl Space for a Durable Install
Before you install the barrier, prepare the crawl space to guarantee a durable result. To maximize performance, you must address moisture control and verify material selection before laying any barrier.
Clear debris, improve airflow, and fix puddles or drainage issues to reduce hydrostatic pressure. Inspect the subfloor for contamination, mold, or prior leaks and remediate as needed. Confirm the crawl space has a clean, dry surface compatible with the chosen vapor barrier.
Ensure sheets or rolls align with joists without gaps, folds, or punctures. Use appropriate fasteners and seam tapes to maintain continuous coverage.
- Assess moisture pathways and install drainage or sump considerations as required.
- Verify material selection meets local codes and warranty terms.
- Schedule dehumidification or vapor management steps after installation.
Seal Piping Vents, Rim Joists, and Joins for a Tight Barrier
You’ll start by identifying all piping vents and rim joists that penetrate the barrier.
Apply appropriate sealant or airtight tape at every joint and around each vent flange to prevent air leaks.
Tighten and test all connections to confirm a continuous, vapor-tight enclosure.
Seal Piping Vents
Seal piping vents, rim joists, and joints to create a continuous vapor barrier. You must seal penetrations thoroughly to prevent moisture migration and maintain system integrity. Use proper materials and methods to minimize thermal bridging and air leakage around vents and piping.
- Fit pipe insulation around exterior or interior sections, ensuring snug contact with the wall and barrier.
- Install vent covers with gasketed edges to seal gaps and reduce convective flow.
- Seal all joints with compatible sealant, then back up with flashing or tape where required to maintain a continuous barrier.
Apply the barrier over vent openings and around pipes, leaving no exposed substrates.
Inspect regularly for punctures, tears, or displacements that compromise performance.
Rim Joist Tightening
Rim joist tightening guarantees a continuous vapor barrier by securing the edges around vents and penetrations, preventing air leakage and moisture migration. You’ll methodically inspect all rim joists, noting gaps, cracks, and where framing meets sheathing.
Use backer rods or foam-compatible sealant to fill irregular joints, then apply airtight tape or low-permeance sealant along the full perimeter.
Install rigid foam or mineral wool boards where space allows, sealing seams to rim contacts with compatible adhesive. Ensure any installed pipe penetrations are flashed and sealed, preventing moisture paths into the crawl space.
Recheck all connections after insulation for continuity, re-taping as needed. This rim joist tightening approach strengthens moisture control, reduces cold bridging, and maintains a durable, cohesive vapor barrier system.
Install the Vapor Barrier on the Ground Properly
Before laying the ground barrier, make certain the site is clean and level, with all sharp objects removed and any protruding stones or debris brushed aside. You’ll then perform ground preparation to ensure a flat, dry base and consistent barrier performance.
Choose material selection with an eye toward vapor resistance, durability, and installation compatibility for your crawl space conditions. Unroll the barrier, align it to cover the entire footprint, and allow for overlaps per manufacturer specs. Maintain minimum seam overlap and avoid wrinkles that trap moisture.
Secure placement using approved fasteners or adhesive where appropriate, and keep the sheet taut to prevent gaps.
- Inspect substrate for moisture and debris before laying
- Align seams with recommended overlap and orientation
- Plan for drift, folds, and cumulative thickness without gaps
Secure Edges and Corners for Long-Lasting Durability
You guarantee edges are secured firmly to prevent gaps and movement.
Seal corner seams thoroughly to prevent vapor leaks and moisture intrusion.
Use durable barrier anchors to maintain tension and long-term stability.
Secure Edges Properly
Securing edges and corners is essential for long-lasting durability in a vapor barrier installation. You’ll guarantee a sealed, continuous barrier by properly aligning panels and pressing seams flat to the substrate. Use edge sealing at all perimeters to prevent wind-driven vapor intrusion and curb tearing at folds.
For reliability, perform barrier reinforcement at joints with compatible tape or adhesives rated for crawl spaces. Maintain a tight fit around posts, columns, and equipment stubs to avoid gaps.
- Align panels square to the space, then press and smooth seams along the entire length.
- Apply edge sealing along outer edges and at all corner intersections for a continuous seal.
- Reinforce joints with approved tape or adhesive, ensuring no lift or peel.
Seal Corner Seamage
Seam integrity at corners is critical for a durable vapor barrier; properly sealed corner seams prevent wind-driven vapor intrusion and reduce tearing at folds. You should complete corner sealing by aligning panels flush and minimizing overlaps, then press firmly to activate adhesive bonds without creating air pockets.
Use manufacturer-recommended tape or seam tape for edge-to-edge sealing, ensuring full contact along all adjacent surfaces. For gaps at corners, apply a continuous bead of compatible sealant or patching material, then smooth to a uniform profile.
This gap filling step prevents moisture migration and fibers from snagging during installation. Inspect corners after set, re-securing any loose edges as needed. Maintain tension along perimeter, avoiding overstress that could compromise seam integrity.
Corner sealing and gap filling are essential for durable performance.
Durable Barrier Anchoring
Now that corners are sealed, durable barrier anchoring focuses on locking edges and joints to resist movement and wind-driven forces over time. You must select secure fastening methods and compatible materials to guarantee long-term stability.
Barrier anchoring relies on tying seams to the structure and using adhesives or mechanical fasteners that suit crawl spaces. Material selection determines strength, corrosion resistance, and compatibility with moisture exposure, preventing edge curl or tearing.
Avoid over-tensioning, which can cause premature failure at corners. Regular inspection ensures joints stay sealed and edges stay flat.
1) Choose fasteners rated for outdoor/moist environments and compatible with your vapor barrier material.
2) Use edge tapes and corner strips engineered for crawl spaces.
3) Verify all seams remain sealed after seasonal shifts and minor ground movement.
Manage Vents, Sump Pits, and Utilities Inside the Space
Managing vents, sump pits, and utilities inside the space requires a precise layout and careful routing so moisture and air don’t travel where they shouldn’t. You’ll plan vent management to prevent condensation paths and to maintain balanced airflow without creating cross-flows into living spaces.
Position sump pits away from the barrier seam, with a clear drainage path and accessible access hatches for maintenance. For utilities, designate dedicated runs with insulated conduits and protected cables to avoid punctures or abrasion of the vapor barrier.
Maintain clean gaps at penetrations using compatible sealants, and keep utility access points above the barrier level where feasible. Document routes for future servicing, ensuring quick retrieval and minimizing barrier disruption during inspections.
Overlap Seams and Tape Techniques for a Leak-Free Finish
To guarantee the barrier stays watertight, you’ll focus on overlapping seams and proper tape techniques. You achieve a continuous envelope by aligning sheets with consistent overlap, typically 6 to 12 inches, and city-ready seam seals. Use primer if your tape requires it, then apply straight, tensioned runs to prevent puckering. Check that no staple heads or debris interrupt the seam, and press firmly to activate adhesive.
For seam sealing, you’ll reinforce critical joints with additional strips at corners and progressions. Tape techniques demand clean, dry surfaces and smooth tensioning to avoid bubbles.
- Align and over-lap seams evenly, then press with a roller for full adhesion
- Apply one-piece tape runs across long seams, avoiding breaks
- Add extra sealing at corners and gradations for redundancy
Inspect, Maintain, and Troubleshoot Common Issues
Regular inspections detect minor issues before they escalate into leaks or failures. Start each check with a visual scan for gaps, tears, or displaced sheets. Then verify sealants and tapes are still firmly bonded.
You should systematically verify edge seals around all penetrations and corners, ensuring no uplift or wrinkling exists that could create breakthrough paths. Record any moisture indicators on the substrate and confirm the vapor barrier remains flat and continuous.
Focus on moisture control by addressing stray moisture hints immediately, replacing damaged sections, and re-sealing seams as needed. Assess insulation efficiency by confirming the barrier covers exposed insulation surfaces and doesn’t trap condensation.
Establish a routine maintenance cadence, promptly address fan or sump-related humidity changes, and document findings for ongoing durability. Avoid blind spots that compromise performance.
Quick-Check Before Backfilling: Final 10-Point Audit
Before you backfill, perform a final 10-point check focusing on visual conditions, sealant integrity, and drainage/vent status.
Confirm there are no gaps, cracks, or pinholes in the barrier and that all seams are properly sealed.
Verify drainage paths and vent connections are clear and unobstructed to prevent moisture buildup.
Visual Inspection Check
As you perform the final 10-point audit, start with a visual inspection to confirm the vapor barrier’s integrity and placement before backfilling. You’ll verify seams are continuous, edges are flat, and no punctures or gaps exist that could channel moisture.
Check that the barrier fully covers all crawl-space surfaces and overlaps transitions to prevent leaks. Assess whether any moisture staining or delamination indicates hidden moisture sources, and note insulation compatibility with the barrier’s underside to ensure proper contact.
- Confirm seam overlaps and unbroken coverage along all walls and columns.
- Inspect for punctures, tears, or holes; seal with compatible tape or patches.
- Verify the barrier’s placement avoids contact with heat sources and maintains proper clearance.
Sealant Integrity Review
A quick sealant integrity review confirms that all joints, seams, and patches maintain a continuous, uniform bond, with no gaps or signs of cure distortion.
You verify that the air barrier remains continuous across penetrations, corners, and progression, and you check for any voids that could compromise performance.
Inspect solvent or adhesive residues that could affect adhesion and cure, and confirm compatible materials are used throughout the system.
You assess cure timing against the substrate, ensuring no tackiness or delayed set that could permit moisture intrusion.
Document any irregularities, and reapply sealant as needed to restore uniform coverage.
This quick audit supports effective moisture control and maintains the integrity of the air barrier during backfilling.
Drainage and Vent Status
Drainage and vent status must be verified now to guarantee the backfill won’t trap moisture or pressure against the structure. You’ll confirm exterior grading directs water away, verify interior drainage paths are clear, and ensure vents aren’t obstructed, so moisture doesn’t accumulate near the vapor barrier.
This check supports moisture control and minimizes vapor diffusion into occupied spaces. Any stack or sump pump discharge should be routed away from the crawl space, with proper slope and drainage materials in place.
Verify vent openings remain unobstructed after backfill, maintaining ventilation for pressure equalization. Address any drainage gaps or hydrostatic risks before sealing.
- Confirm exterior grading, downspouts, and perimeter drains direct water away from the foundation.
- Inspect interior drainage paths and sump pump discharge routing.
- Ensure vents stay unobstructed and capable of venting air and pressure.
Frequently Asked Questions
How Long Does a Vapor Barrier Installation Take?
Installing a vapor barrier typically takes a day or two, depending on space size and conditions. Your installation timeline hinges on factors influencing duration like access, drying times, and inspections, ensuring compliance and thorough sealing throughout the crawl space.
Can I Install It Myself or Hire a Pro?
You can do it yourself, but weigh DIY challenges against professional benefits. If you lack drywall, ventilation, or moisture-control experience, hire a pro for reliable installation, while you handle smaller tasks and avoid costly mistakes.
What Maintenance Prevents Future Leaks?
Investigating moisture behavior shows you prevent future leaks by continuous moisture control and pest prevention. You seal seams, inspect for punctures quarterly, maintain slopes to drains, repair gaps promptly, and guarantee proper ventilation to minimize condensate and microbial growth.
Will Vapor Barrier Affect Crawl Space Ventilation?
Yes, it can influence ventilation by restricting air circulation if sealed tightly, but proper moisture control remains essential; guarantee crawl space vents or mechanical ventilation run to maintain air exchange while vapor barrier reduces moisture buildup.
Are There Safety Concerns With Adhesives and Nails?
Juxtapose caution with efficiency: you should avoid prolonged adhesive fumes and guarantee nail safety. You’ll ventilate briefly, wear PPE, and follow manufacturer guidance; if unsure, pause work. Adhere to safe practices and minimize exposure during installation.
Conclusion
A properly installed vapor barrier protects your crawl space from moisture intrusion and subsequent structural rot, mold, and energy waste. By following these steps, you create a durable, airtight enclosure that lasts. For example, consider a homeowner who sealed a damp crawl space: moisture dropped, HVAC efficiency rose, and indoor air quality improved. If you maintain seams, vents, and penetrations, you’ll prevent costly repairs and enjoy a healthier home for years to come. Start with a solid plan and stay meticulous.