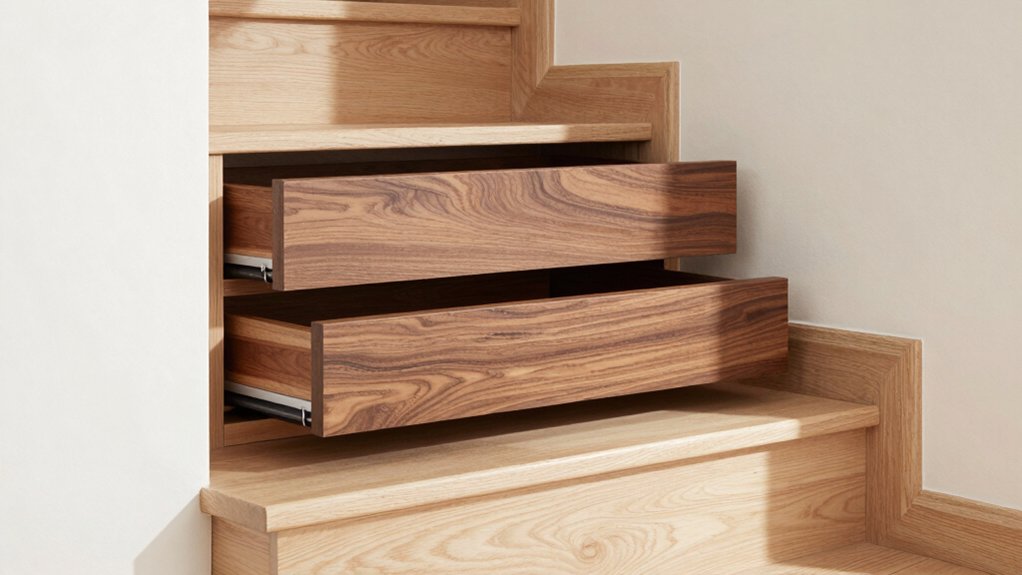
Under-stair storage works best when you first define your goal: quick-access drawers or a dense hidden closet. Start with precise measurements, noting obstructions and door swings, then pick durable materials and full-extension, soft-close slides. Decide between drawers for fast access or a concealed closet for bulkier items, and plan tidy electrical, lighting, and ventilation. Finish with trim that matches your décor and paint, then test every component. If you keep going, you’ll unbolt deeper, field-tested steps and tips.
Assess Your Under-Stair Space and Set a Storage Goal

Assess the space beneath your stairs and define a clear storage goal. Begin by measuring width, height, and depth, noting any obstructions like pipes or access doors.
Visualize how you’ll use the area day to day, then set a specific objective—for example, create a pull-out toolbox nook or a slim pantry for rarely used items.
Consider the frequency of access and weight limits to guide hardware choices and door configurations.
Evaluate existing staircase aesthetics to ensure new storage blends with the surrounding decor, not clashes.
Plan material selection that suits humidity and wear, favoring durable, low-maintenance options.
Document dimensions, desired access, and finish ideas, then refine your goal to a precise, actionable brief you can execute confidently.
Decide: Drawers or a Hidden Closet for Under-Stair Storage
You’ll weigh the benefits of drawers versus a hidden closet to fit your routine and access needs. Consider how drawers improve organization and quick access.
While a hidden closet boosts overall storage density and clean aesthetics. Use space-optimization strategies like modular units and smart door designs to decide which option aligns with your goals.
Choose Between Drawers
When you’re deciding between drawers or a hidden closet for under-stair storage, start by considering access, space, and how you’ll use the area day to day.
Drawers excel at quick retrieval, labeled organization, and maximizing shallow depths, while a hidden closet favors bulkier items and fewer openings. Think about load weight, mechanism durability, and your preferred maintenance routine.
If you prize frequent access and visible organization, opt for drawers and plan dividers for seasonals, tools, and textiles. If you need concealed storage or larger items, a hidden closet can be more efficient, provided you allocate a clear doorway or pocket door.
Balance aesthetics with space accessibility, ensuring the system aligns with traffic flow and interior style. Choose the solution that minimizes steps and wasteful searching.
Hidden Closet Benefits
Hidden closets shine when you need to stash bulkier items out of sight and out of the way. A hidden closet gives you clean lines, fewer visual interruptions, and a cohesive look that complements existing décor.
You gain practical storage that doesn’t crowd rooms or hallways, preserving floor space for daily movement. Accessibility options, such as reachable shelves, pull-out baskets, and smart lighting, ensure you can access items without wrestling with tight spaces.
Decorative accents, like trim, molding, or a small hardware finish, help the enclosure blend with your interior style rather than stand out as a separate cabinet.
With a hidden closet, you maintain order, reduce clutter, and retain room versatility while preserving a refined appearance.
Space Optimization Strategies
Choosing between drawers and a hidden closet for under-stair storage hinges on how you use the space. Space optimization starts with a clear inventory: what belongs hidden, what’s daily-accessible, and how often you’ll reach it.
If you prioritize quick access, slim-profile drawers maximize grab-and-go items without disturbing your flow. For bulk storage or seasonal items, a hidden closet keeps clutter out of sight and preserves floor space for movement.
Use vertical shelving, dividers, and pull-out trays to maximize capacity without increasing footprint. Plan entry points, lighting, and ventilation to avoid dark, stale corners.
Tie the design to your color schemes and decorative accents so storage feels integrated, not incidental. Efficient lighting and consistent finishes reinforce function with style.
Measure Carefully to Fit Snugly and Safely

Accurate measurements are the foundation of a secure, cleanly fitted setup, so take your time and double-check every dimension before cutting or assembling. You’ll work from a precise plan, marking all lines, joints, and clearances before any tool touches material.
Measure floor clearance to ensure nothing binds or scrapes as the drawers slide or the door swings, and confirm obstruction-free travel at every position. Recheck height, depth, and side gaps to avoid binding once installed.
Use a straight edge and a tumbling measurement method to detect slight deviations. Account for hardware thickness and tolerances, then test fit with mock components.
Prioritize safety considerations: clamp pieces, keep fingers clear, and pause to remeasure if anything feels off. Trust redundancy—two independent checks beat a single pass.
Choose Durable Materials and Finishes for Long-Term Use
Durable materials and finishes are your first line of defense against daily wear and tear. When you choose, focus on material selection that balances strength, weight, and cost, so you don’t sacrifice function for form. Finish durability matters just as much; pick coatings that resist moisture, scuffs, and abrasion in high-traffic stair areas.
Look for plywood cores with solid veneers or high-grade MDF for a stable drawer box, and use metal hardware for longevity. Consider finish types that are easy to clean and repair, like polyurethane or vinyl-wrapped surfaces.
- Assess moisture exposure and choose water-resistant finishes.
- Prioritize denser cores and reinforced joints for durability.
- Match hardware to load expectations and cabinet weight.
- Test a small sample for wear before full application.
Build or Install a Drawer System With Quality Slides
Once you’ve selected strong components, install a drawer system with quality slides to guarantee smooth operation and reliable support. Choose slides rated for the load you expect and install them per manufacturer guidance.
Focus on material durability in the cabinet shell and drawer sides, ensuring rails won’t bind with expansion or humidity changes. Use full-extension slides if you’ll access deep bins, and consider soft-close options to reduce noise and wear.
Align mounting rails precisely to prevent binding; loose screws cause sticking and wobble. Install anti-tip devices if the drawer system weighs heavy.
Verify drawer alignment is square, doors, if present, operate freely, and there’s even spacing along the track. With precise installation, slide quality translates to long-term performance and minimal maintenance.
If You Need a Hidden Closet, Plan Doors, Access, and Organization
If you’re adding a hidden closet, plan doors and access first so the space stays seamless and secure. Then map a simple organization system that fits your items and daily routines, keeping shelving, rods, and bins within easy reach.
We’ll explore practical door options, access considerations, and storage layout ideas next.
Doors Or Access Planning
When planning doors and access for a hidden closet, start by defining how you’ll conceal the space and how you’ll reach it. You’ll want reliable door hardware and simple access mechanisms that blend with the stair area and stay quiet.
- Determine concealment method: true cabinet door, tambour, or a flush panel.
- Choose the access mechanism: push-to-open, magnetic catch, or recessed pull.
- Match hardware finish to existing trim for cohesion.
- Plan clearance and swing or slide path to avoid obstruction.
Keep this practical: test opening speed, ensure smooth operation, and verify weight capacity.
With sturdy door hardware and clear access mechanisms, you’ll balance stealth with daily usability—no fuss, just secure, accessible storage.
Organization For Hidden Closet
Use smart organization so your hidden closet stays functional as well as sneaky. Start with a simple zoning plan: define what gets stored, what stays hidden, and what needs quick access. Separate everyday items from seasonal or rarely used belongings to minimize rummaging.
Choose a door or panel system that remains discreet yet operable; consistency in hardware helps you glide between access points without fuss. Incorporate decorative accents inside the space to blend with your home’s design while signaling what belongs where.
Ventilation options matter: small vents or a passive intake improve airflow and reduce moisture buildup. Label shelves or bins clearly, but keep the labels out of sight when closed. Regularly purge and reorganize to maintain efficient, unobtrusive storage.
Hidden Closet Storage Solutions
Hidden closet storage works best when you plan doors, access, and organization together. You’ll achieve a clean, integrated look by matching doors to your room’s furniture styles and aesthetic themes, so the closet blends instead of shouting.
4 key steps to lock in great hidden closet storage:
1) Assess access points and choose a door type that disappears when closed.
2) Align interior compartments with items you use most, enabling quick reach.
3) Select hardware and trim that echo existing furnishings for a cohesive vibe.
4) Build in labeling or a lightweight inventory system to maintain order.
Implementing these elements guarantees efficient use of space and a polished, purposeful result.
Plan Electrical, Lighting, and Ventilation for the Space
To plan electrical, lighting, and ventilation for the space, start by mapping what you need: outlets for tools, lighting for visibility, and a vent or passive air exchange to prevent moisture buildup.
Assess existing circuits and add a dedicated line if you’ll run power for a drill press or sander. Choose commercially rated switches, GFCI outlets where needed, and safe cord management to keep things tidy.
For lighting, favor bright, color-accurate fixtures with a simple switch layout.
Ventilation planning should account for airflow, hesitation-free exhaust, and moisture control—consider a passive vent or small exhaust fan linked to a humidity sensor.
Label circuits clearly, and leave spare capacity for future upgrades.
Prioritize safety, code compliance, and easy access for maintenance.
Finish and Hardware: Trim, Paint, and Touch-Ups for a Seamless Look
You’ll set a consistent finish with careful trim finishing touches that align with the surrounding space. Use a paint consistency guide to match sheen and color across all faceframes and panels. Then, apply touch-up techniques to conceal any nicks or gaps.
When completed, the hardware, trim, and paint should read as a single, seamless installation.
Trim Finishing Touches
When finishing trim and hardware, prep and plan before any coat goes on. You’ll aim for a seamless look with clean joints and careful alignment, using decorative trim where it enhances the reveal.
Apply paint touch ups only after masking is removed and edges are tidy. Then seal edges to prevent chipping and guarantee color consistency.
- Check fit and gaps, adjust casings, and level surfaces.
- Sand lightly for a smooth base, then wipe away dust.
- Prime where needed, especially on raw wood or filler.
- Apply two even coats, then touch up edges and corners as needed.
Paint Consistency Guide
Achieving a flawless finish starts with paint consistency that’s right for the job. For trim and hidden-closet surfaces, aim for a smooth, rugby-ball viscosity—thick enough to hide grain, thin enough to lay evenly. Stir paint thoroughly and consistently; avoid air bubbles by using steady, slow turns, not vigorous whisking.
When painting vertical trim, load your brush with a thin bead and remove excess on the lip to prevent drips. For large panels, switch to back-rolling after brushing to even texture and eliminate roller hollows. Emphasize paint mixing accuracy between coats to maintain uniform color and sheens.
Maintain a precise flow by thinning only as directed by manufacturer guidelines. Brush techniques matter: steady wrist, short strokes, and feathered edges deliver a seamless finish.
Touch-Up Techniques
To deliver a seamless finish, focus on precise touch-ups that blend with the surrounding trim, paint, and hardware. You’ll seal gaps, smooth seams, and camouflage changes from installation, using matching paints, stains, and finishes. Start with a clean surface and confirm that wall insulation and moisture barriers remain intact behind trim.
Then follow these steps:
- Test color match on a hidden edge, adjusting lighting to ensure consistency.
- Apply minimal coats for even tone; avoid overbrush or over-sanding.
- Touch up fastener heads, screw holes, and edge bevels to disappear.
- Seal joints with a compatible sealant to prevent future cracking. Maintain a uniform sheen across all surfaces for a cohesive look.
Common Mistakes to Avoid and Quick Fixes
Common mistakes can derail a storage upgrade fast, but quick fixes keep you moving. You’ll avoid delays by verifying measurements twice before cutting and by planning hardware placements around your stair geometry.
Don’t rush material selection; mismatched plywood and hardware can warp or fail under load. Prioritize safety considerations by securing drawers with proper supports, rails, and anti-tip hardware, especially in high-traffic areas.
For aesthetics, keep a cohesive look with consistent gaps, align pulls, and choose finishes that resist scuffs. Misalignment of tracks is a common pain point—fine-tune with a level, shims, and test drawers before final installation.
If a fit seems stubborn, recheck clearance and avoid forcing components. When in doubt, revisit the plan rather than forcing a subpar result.
Budget, Timeline, and a Step-by-Step Project Checklist
Now that you’ve avoided common missteps, it’s time to lock in your budget, set a realistic timeline, and map a clear step-by-step plan.
You’ll balance materials, tools, and finishes to fit decorative accents and historical styles while keeping the project practical.
- Define scope and budget: list components, hardware, and finishes; add a small contingency for surprises.
- Establish a timeline: allocate days for framing, drawer construction, trim, and installation, with built-in buffer.
- Create a step-by-step plan: sequence tasks logically, assign durations, and confirm tolerances with your space.
- Track progress: review milestones, adjust as needed, and document decisions for clean handoffs and future updates.
Frequently Asked Questions
How Can I Maximize Under-Stair Space for Storage?
Maximize under-stair space by planning vertical storage, slim drawers, and pull-out bins. Install staircase lighting to reveal corners, and choose decorative finishes for a cohesive look that’s practical. You’ll gain organized storage with stylish, accessible design.
What Are the Best Drawer Slides for Small Depths?
Sure, you’ll want a reliable drawer mechanism and great slide durability for small depths. You’ll choose soft-close, full-extension slides, and you’ll test load and clearance, because you’re practical, ironic, and precise about maximizing under-stair storage.
Should I Use a Hidden Closet or Visible Drawers?
You should weigh hidden closets for clean aesthetics, but visible drawers win accessibility. Prioritize decorative accents and aesthetic integration to keep space cohesive; choose concealed storage if you crave uncluttered lines, otherwise opt for practical, accessible, stylish drawer runs.
How Do I Prevent Moisture and Mold Behind Stairs?
Ventilation is your ally—think of it as a calm lighthouse. Use ventilation strategies and moisture barriers; seal gaps, promote airflow, and monitor humidity. Regularly inspect for leaks, and install vapor barriers to keep hidden corners dry.
What Safety Basics Protect Kids Around the Project?
To protect kids, you must implement childproofing and use safety locks on doors, drawers, and access panels. Secure heavy units, store hazardous materials out of reach, supervise closely, and teach kids boundaries around the workspace for ongoing safety.
Conclusion
To wrap it up, you’ve got a practical under-stair storage plan you can trust. Don’t fear the fit or the finish—measure twice, cut once, and pick durable slides for smooth use. If space feels tight, you’ll still gain usable volume with a hidden closet or slim drawers. Objection: “it’s too complex.” Not so—follow the step-by-step checklist and tackle one task at a time, keeping safety and ventilation in mind for a clean, lasting result.