

A durable shed base starts with a site assessment—check soil stability, drainage, and climate, then pick gravel, concrete, or pavers based on load, moisture, and maintenance. Gravel works fast and drains well but needs good subgrade and weed control. Concrete offers stiffness and longevity but costs more and can crack. Pavers give a solid, modular feel with decent drainage if edged and joined properly. Each option benefits from proper edging, compaction, and slope; more tips follow.
How a Shed Base Protects Longevity
A shed base protects longevity by giving the structure a stable, level foundation that resists settling, shifts, and water intrusion. You’ll learn how a solid base minimizes movement that can crack joists, warp panels, or misalign doors.
In practice, a well-constructed shed foundation distributes loads evenly, reducing concentrated stress and preventing premature wear. Material durability matters: choose components that resist moisture, freeze–thaw cycles, and UV exposure while remaining workable for your site.
A thoughtful base also limits weed growth and pest intrusion, keeping termites and rodents at bay. With careful detailing, you enhance rigidity where it counts, improving seasonal performance and reducing maintenance.
The result is predictable framing behavior, easier assembly, and a longer-lasting shed that preserves value over time.
Assessing Site Criteria: Soil, Drainage, and Climate Before Choosing
To choose a shed base that lasts, start by evaluating the site where it’ll sit: soil type, drainage behavior, and local climate.
You’ll assess soil stability—how well it bears load, compacts, or shifts with moisture—and identify any frost heave or seasonal swelling.
Drainage behavior matters: will surface water shed quickly, or pool nearby and undermine footing?
Consider climate considerations, including freeze–thaw cycles, wind exposure, and sun patterns that affect drying.
Map existing grading, nearby trees, and utility access to anticipate future effects on stability.
Use this data to select a base system that accommodates movement without transferring stress to the structure.
Precise measurements and written notes reduce guesswork, guiding a durable, low-maintenance installation.
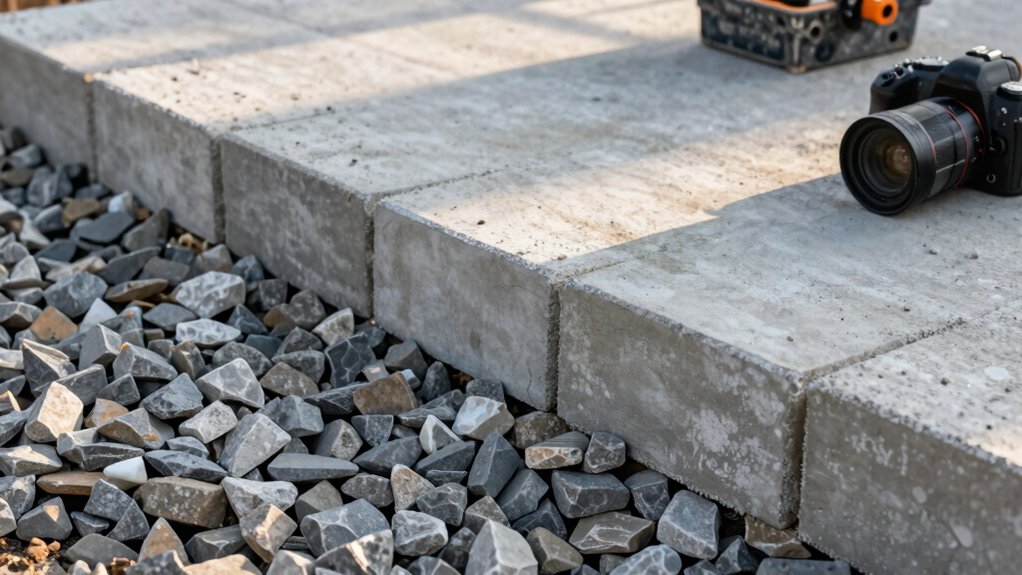
Gravel Foundations: When to Choose and When to Avoid
Gravel foundations work well when drainage is favorable and loads aren’t extreme, but they’re not a one-size-fits-all solution. You choose gravel when you need fast setup, lower cost, and good subgrade flexibility, provided site conditions support it.
If soil stability is questionable or groundwater flows can alter compaction, consider alternatives or added stabilization measures, because shifting soil undermines performance. You’ll gain permeability and ease of inspection, yet you must respect environmental impact: avoid contaminated runoff, and plan for erosion control and sediment capture.
Use clean, angular aggregate with proper sizing to reduce rutting and wear. Avoid gravel when you require precise level accuracy, heavy live loads, or clay-rich soils prone to swelling. In those cases, evaluate concrete or paver paths for durability and predictable performance.
Gravel Base Installation Basics and Prep
Setting up a gravel base begins with a clear plan and clean site work, building on the choice of gravel when you need fast setup and flexible subgrade. You’ll map the footprint, mark edges, and remove topsoil in a thin, even strip to expose solid ground.
Level and compact the soil gently with a plate compactor, checking for voids and soft spots. Spread a weed barrier if you’re concerned about future growth, then lay a consistent, well-graded gravel layer, typically 4 to 6 inches deep, loosening joints during placement.
Material sourcing matters: choose clean, angular aggregates for stability and drainage. Address DIY challenges early—limited access, weather delays, and tool handling—so you stay on schedule and avoid rework.
Finish with a final, thorough compaction pass before framing.
Concrete Bases: Benefits, Drawbacks, and Installation Basics
Concrete bases offer solid support with long-term stability, but they require careful planning for load, drainage, and frost resistance.
You’ll weigh benefits like durability and uniform load distribution against drawbacks such as cracking risk, expansion needs, and higher upfront cost.
Then map installation basics—from site prep to formwork and curing.
With practical precision, we’ll cover key decisions, essential steps, and design considerations to guide your shed’s foundation choice.
Concrete Bases Benefits
Are concrete bases worth it for a shed? Yes—for stability, load tolerance, and a clean integration with surrounding landscaping. Concrete provides a solid, flat platform that resists frost heave when properly cured and reinforced, reducing future movement under seasonal cycles.
It’s low maintenance and easier to seal against staining or moisture than many alternatives. You’ll appreciate predictable leveling, a consistent surface, and compatibility with a range of foundations and sizes.
When you plan, consider sustainable materials and local mixes to minimize transport impacts, and design for drainage to prevent pooling. Aesthetics aren’t sacrificed: you can finish with a broom, trowel, or decorative edging to suit your site.
Drawbacks Of Concrete
While concrete bases offer solid stability, they’re not without drawbacks that can impact long-term performance and cost. You’ll want to anticipate how this choice behaves under load, weather, and shifts.
Concrete cracking is common when restraints aren’t proper or the mix isn’t matched to frost cycles, causing uneven while-setting stress that propagates over years. Thermal movement and soil moisture variation can create microcracks that invite water ingress and weaken edge support.
Environmental impact matters too: cement production emits significant greenhouse gases, and curing salts can affect adjacent soil chemistry.
Repairs can be heavy and disruptive, often requiring lifting or removal of sections to rework substrate or relevel the base. If you value flexibility and simpler maintenance, weigh gravel or paver alternatives alongside long-term lifecycle costs.
Installation Basics
Installing a concrete shed base starts with clean, level ground and a precise plan. Once you lay out the perimeter, you’ll trench for edge restraints, determine the pour thickness, and choose reinforcing if needed.
You assess foundation materials early, weighing slab vs. slab-on-grade and considering local conditions. A concise site assessment helps you pinpoint drainage, soil type, and frost considerations, guiding your tamping and forms.
Prepare a dry, broom-finished surface and ensure form alignment is square and true, with consistent capillary breaks where required. Install a proper vapor barrier if moisture is a concern.
Pour and screed in one pass, then cure with controlled moisture. Plan for expansion joints, and verify levelness before backfilling and anchoring.
Concrete Base Prep and Placement Steps
To start, make certain the site is properly prepared: clear debris, level the excavation, and set a stable perimeter with compacted subgrade.
You’ll then lay a well-cut form and confirm square corners before any concrete goes in. Mix or order a consistent batch, using a proper slump for finishability, and pace placement to minimize cold joints.
Slope 1/8 inch per foot away from the shed to prevent ponding, and embed a suitable vapor barrier if moisture is a concern.
Pour in lifts no more than 4 inches, vibrating lightly to remove air voids, then screed and broom finish for surface traction.
Cure with controlled moisture, keep out traffic, and seal joints for foundation stability and material durability.
Inspect for level, joints, and crack development before backfilling.
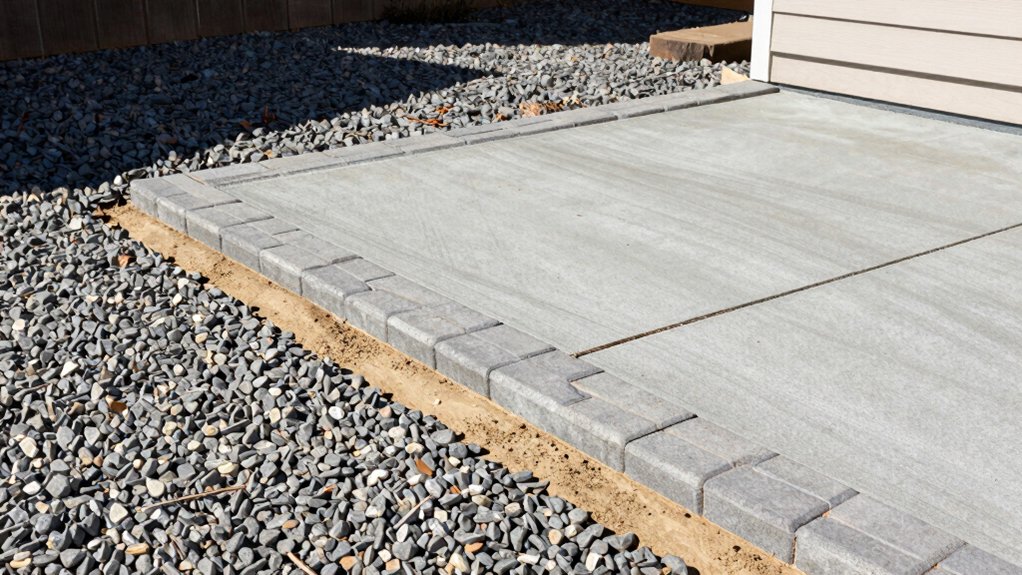
Weed-Free Paver Bases: Design and Drainage Considerations
A weed-free paver base starts with a well-planned substrate that supports long-term performance and drainage. You design for a stable, permeable layer that resists weed growth while enabling proper water movement.
Begin with a graded aggregate mix that minimizes voids and reduces weed roots taking hold, then specify a compacted subbase that prevents soil migration. Drainage matters: align slope toward the edge or a collection point, using a layer thickness that tolerates seasonal settlement without cracking the pavers.
Avoid excessive soil compaction under the base; too-dense soils impede infiltration and promote pooling. Include a breathable separator, like a permeable fabric, to limit weed transit while preserving drainage.
Clear specs, appropriate compaction targets, and observable tests keep the base predictable and resilient.
Paver Base Installation and Finishing Details
You’ll start by setting up clean base material, ensuring the correct thickness and compaction for long-term stability.
Next, layer the gravel with even surface and precise edges, then finish with edging and a tidy, compact surface to guide water away.
Keep the sequence tight: base preparation, gravel layer details, and finishing steps to lock in a durable, level shed pad.
Base Material Preparation
Proper base preparation starts with sequencing the layers: compactable subgrade, geotextile, and a well-graded paver base. You’ll verify that foundation materials suit load, drainage, and frost risk, then perform a precise site assessment to define compacted thickness and edge support.
Remove organic matter, envision placement lines, and establish a clean, stable plane. Lay geotextile to separate soil from base, preventing mixing and reducing rutting.
Spread the paver base in even lifts, compacting each to target density and minimizing settlement. Check for levelness, slope, and consistent thickness, adjusting where needed.
Ensure joints align with planned layout, and document material tolerances for future maintenance. This disciplined prep minimizes shedding and provides a predictable, durable platform for your shed.
Gravel Layer Details
Have you laid a solid foundation yet? Gravel layer details start with a clean, level subgrade. Spread 4–6 inches of well-graded aggregate, then rake to a uniform slope that drains away from the shed. Roll or compact in two passes, pausing to check for soft spots and re-tamping as needed.
Soil compaction matters most where traffic will concentrate; under no circumstances should you skip it. Use a plate compactor to achieve specified density, avoiding over-compaction that crushes fines and reduces drainage. Monitor moisture content during compaction to prevent dust or clumping.
Fine-tune thickness with a finish rake, ensuring joint alignment for any subsequent pavers or edging. Keep moisture control in mind to prevent frost heave and differential settlement over time.
Edging And Finishing Steps
Edging and finishing steps tighten the base and define the shed’s footprint, guiding paver installation and preventing lateral movement. You install a solid edge, using compacted sand or a continuous concrete strip to secure pavers in place.
Align perimeter joints with precision, then stagger rows to distribute load evenly. Check that the finished surface slopes slightly away from the shed to shed water, avoiding ponding.
Use metal, timber, or plastic edging that resists compression and decay for lasting landscaping aesthetics. Fill joints with correctly graded sand or polymeric jointing material to resist weed intrusion and washout.
Protect edges during compaction, then sweep the surface clean and seal if the pavers require it. Prioritize material durability to ensure long-term performance and low maintenance.
Compare Costs, Prep Needs, and Drainage Implications Across Bases
Choosing a shed base isn’t just about price; it’s about how each option handles prep and drainage while staying stable over time. You’ll compare costs, prep steps, and how drainage is managed with gravel, concrete, or pavers, then plan for long-term performance.
Consider how shed color and security features influence placement and anchoring needs, and how each base type supports even load transfer and moisture control.
- Cost profile and material lifecycle for Gravel, Concrete, Pavers
- Prep steps: site leveling, compaction, edging, and moisture barrier
- Drainage behavior: slope, perforated drain, and water dispersion
- Maintenance and durability: cracking risk, weed control, resealing, and upgrades
Choose based on stability, install effort, and future-proofing your shed against weather and shifting soil.
Frequently Asked Questions
How Long Does Each Shed Base Last Under Common Loads?
You’ll see gravel bases last roughly 5–8 years, concrete 15–40 years, and pavers 20–40+ years under typical loads. Foundation lifespan depends on compaction and drainage; guarantee proper load capacity planning for your shed’s weight and use.
Can I Reuse an Old Foundation for a New Shed?
Did you know 60% of failed sheds stem from poor foundations? Yes, you can reuse an old foundation if it’s solid, level, and properly drained. Foundation materials, drainage solutions must be assessed, then reinforced or rebuilt as needed for longevity.
What Maintenance Reduces Base Settlement Over Time?
To minimize base settlement, you reduce drainage issues and soil compaction by installing proper grading, ensuring a durable subgrade, and maintaining flush gutters; you compact in stages, monitor moisture, and address slow drainage promptly to preserve stability.
Which Base Is Best for Extreme Freeze-Thaw Cycles?
Cold hands of winter bite hardest here; you should choose concrete for extreme freeze-thaw cycles. It offers superior material durability, and the climate considerations favor a solid, well-compacted, moisture-controlled base for lasting performance.
Is Permit or Code Required for Shed Foundations?
Yes, permit or code may apply; check local zoning restrictions and setback requirements before starting. You’ll notify authorities, guarantee setbacks, and align with foundation rules, sprinkler lines, and utility access to avoid compliance issues. Plan carefully, document permits.
Conclusion
You weigh the dream against the dirt: ambition rests on a solid base, while doubt sinks in loose gravel. You crave simplicity, yet embrace precision, timber and time-tested spacing. You want speed, but deserve longevity, so you choose the right mix of drainage and compaction. Dreams rise where plans meet soil, and your shed stands steady as weather changes. The contrast is your craft—short-term effort, long‑term shelter, built with clarity and care.


