
Start with a hazard-focused plan: identify insulation type, potential asbestos or mold, and moisture issues before you disturb anything. Set up containment with plastic barriers, negative pressure if needed, and HEPA filtration; wear a fitted respirator, goggles, gloves, and disposable coveralls. Handle material gently to minimize dust, seal waste in labeled, airtight containers, and follow local disposal rules—prefer licensed facilities and receipts. After removal, verify dry conditions, conduct air tests, and document all findings; you’ll uncover more steps if you continue.
Identify Hazards and Plan Your Insulation Removal

Start with a clear hazard assessment and a practical plan before you touch anything. You assess materials, identify potential exposure routes, and decide containment needs. In this phase, you determine if existing guidance flags asbestos, fiberglass, or other hazardous materials, and you plan accordingly.
You map access points, ventilation, and waste flow, documenting findings for reference. You select Protective clothing appropriate to anticipated risks, including gloves, respirator if required, goggles, and disposable coveralls. You establish a sealed work area with plastic sheeting to prevent cross-contamination.
You set disposal strategy and emergency procedures, including spill response and first aid. You confirm that every step aligns with local regulations and manufacturer instructions, maintaining meticulous records and ensuring ongoing monitoring throughout removal.
Hazardous materials awareness guides every decision in this preparatory stage.
Identify Insulation Types and Material Hazards
How can you quickly distinguish insulation types and their hazards before removal? You assess visible cues, labeling, and provenance, then verify with a documented source.
Fiber glass and mineral wool present as fluffy or batts, often pale or tan, with no notable odor when intact. Cellulose appears as loose sagging granules, typically gray-brown, and may crumble.
Pipe and duct wraps, foams, and spray insulations show varying textures and densities, sometimes coated. Understand insulation composition to anticipate hazards—asbestos may lurk in older materials; radon risks connect to material history.
Always treat uncertain materials as hazardous until proven otherwise. Material safety data sheets guide handling.
Note that safe planning hinges on accurate identification and conservative assumptions about potential contaminants, not on guesswork.
PPE and Containment: Set up and Best Practices
PPE and containment setup should be executed with a disciplined, stepwise approach to minimize exposure and cross-contamination. Begin with a pre-work briefing, confirm roles, and verify that all gear is intact.
Personal protective equipment should include a properly fitted respirator or mask, eye protection, gloves, and a disposable coverall or long sleeves. Ensure footwear is clean and covered.
Establish containment barriers to prevent dust migration, using sealed plastic sheeting or dedicated work zones, and seal doors and vents when possible.
Set up a clean-to-dirty workflow, with a dedicated disposal bag system and labeled bins for debris. Maintain an air-tight waste path from removal area to containment.
Inspect seals, replace damaged components, and document any deviations to make certain traceability and accountability.
Handle Asbestos, Mold, and Rodent Hazards Safely
As you handle asbestos, mold, and rodent hazards, prioritize containment, identification, and control to prevent exposure and cross-contamination. Begin with a documented assessment to distinguish asbestos-containing materials from other debris, and label all suspect items for status and route of disposal.
Use approved containment barriers, negative-pressure units, and HEPA filtration to limit airborne migration. For asbestos abatement, follow local regulations, employ licensed personnel, and implement air clearance testing after work concludes.
For mold remediation, isolate affected zones, control moisture sources, and use proven cleaning protocols with appropriate PPE.
Address rodent hazards by sealing entry points and removing nests under guidance. Maintain meticulous records of findings, actions, and waste streams.
This disciplined approach supports safe disposal and reduces liability.
Removal Techniques by Insulation Type
Removal techniques must align with the insulation type and its condition, because each material requires specific handling to minimize exposure and debris. You assess the material first, then choose a corresponding approach.
For batts and blown-in mineral wool, you minimize dust with sealed containment, gently disengage fasteners, and bag waste in labeled disposal sacks.
With cellulose, you moisture-lightly dampen fibers to prevent dispersal, then collect with a HEPA-equipped vacuum and damp-wipe surfaces afterward.
Fiberglass requires careful cutting and containment to avoid skin irritation; use non-shedding tools and complete bagging.
Vermiculite or legacy materials demand professional evaluation before removal.
Always rely on appropriate removal equipment, including respirators, gloves, and sealed bags. Document waste streams, preserve samples if needed, and follow local regulations for disposal.
Containment and Dust Control During Removal

Containment begins before you start disturbing material. Plan a controlled work zone with clearly defined boundaries and a dedicated entry/exit path to minimize cross-traffic. Implement airflow management by closing doors, sealing gaps, and using HEPA-filtered air movers to circulate air away from the work area.
Erect dust barriers at the perimeter to contain particles within the active zone, and avoid creating drafts that pull debris into uncontaminated spaces. Use plastic sheeting and tape to seal penetrations around outlets, vents, and light fixtures.
Dampen dry material with minimal moisture to reduce fugitive dust, then proceed methodically with careful, directional removal. Maintain a clean edge along fabric barriers and promptly bag waste to prevent re-entrainment.
Disposal, Recycling, and Local Regulations You Must Follow
Before you begin disposal, recycling, and regulatory steps, understand the specific rules that apply to your project and jurisdiction. You’ll identify local waste codes, permit requirements, and any disposal fees before you handle material.
Follow documented procedures for containment, labeling, and transport to authorized facilities, avoiding unauthorized dumps.
Check if your insulation qualifies for recycling programs or returns to supplier take-back options, and document the process for compliance audits.
When selecting disposal options, prefer licensed facilities with clear processing descriptions and hazardous-material safeguards.
Consider insulation alternatives for future projects, such as non-curbside options that minimize waste streams.
Engage with community programs or recyclers early to confirm eligibility and timelines, and obtain receipts or certificates of disposal.
This careful planning reduces penalties and supports responsible environmental stewardship.
Cleaning up and Preventing Future Hazards
You’ll establish clean-up protocols that minimize dust exposure, seal work areas, and double-check containment before you finish.
We’ll cover practical cleanup best practices, hazard prevention steps, and safe disposal tips to keep your space safe after removal.
You’ll set clear expectations for waste handling, air monitoring, and future-proofing to prevent recurrence.
Cleanup Best Practices
Cleanup after removing old insulation demands careful steps to minimize exposure and prevent recontamination. You should seal the work area, collect debris in labeled bags, and avoid spreading dust beyond the room.
Wear a tight-fitting respirator, disposable coveralls, gloves, and eye protection throughout cleanup.
Vacuum with a HEPA-filter unit only; never dust mop or sweep bare floors, as that can resuspend fibers.
Wash hands and exposed skin before removing PPE to reduce cross-contamination.
Store reusable tools in a designated tray to prevent contamination of other areas, and inspect them for wear before next use.
Practice storage precautions for any insulation fragments remaining in containers.
Document disposal details and schedule professional disposal if you encounter hazardous materials or moisture damage requiring remediation beyond routine cleanup.
Hazard Prevention Steps
To prevent hazards from resurfacing, you should implement strict cleanup controls and ongoing containment, then establish prevention routines that reduce reexposure and moisture risks. You follow procedural checks, document findings, and seal off work areas to prevent cross-contamination.
Address Asbestos risks and mold hazards with targeted measures, including air clearance testing where applicable, ongoing monitoring, and prompt remediation of moisture sources. Maintain barriers, proper PPE, and labeled waste streams to ensure accountability and quick rollback if conditions change.
- Establish containment boundaries and air filtration checks during cleanup
- Seal and drain moisture sources, then verify dry conditions before reoccupation
- Use HEPA filtration and ventilation discipline to limit fiber dispersion
- Document all steps, tests, and corrective actions for future audits
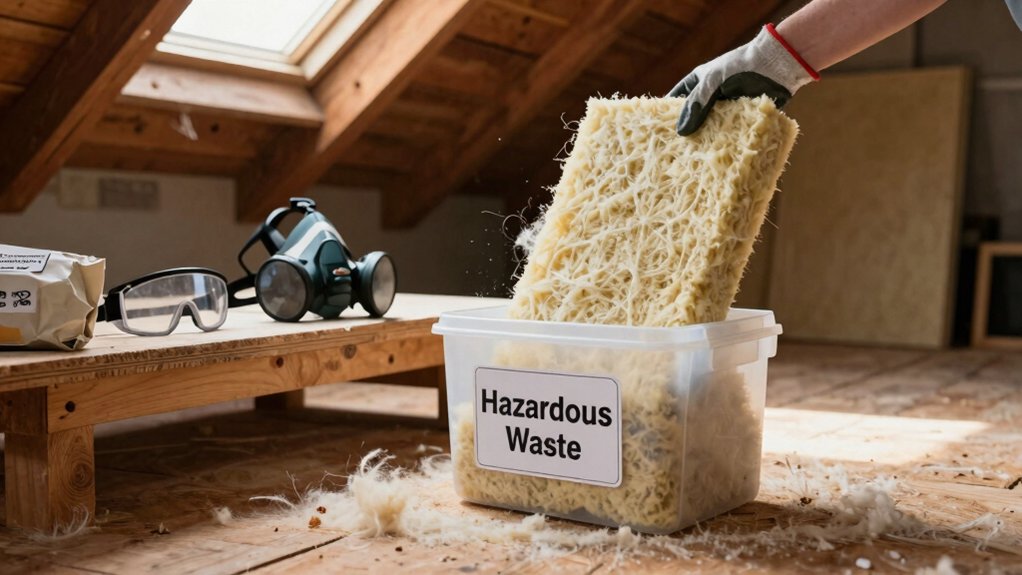
Safe Disposal Tips
When disposing of contaminated materials, follow strict, documented procedures to prevent recontamination and exposure. You’ll cap all containers, label clearly, and segregate refuse by material type to avoid cross-contact.
Wear appropriate PPE, including NIOSH-approved respirators, gloves, and eye protection, and handle waste with minimal agitation to reduce dust.
Seal off work zones, wipe surfaces with damp methods to minimize airborne particles, and place contaminated tools in sealed containers for later cleaning.
Adhere to local regulations for hazardous materials and disposal procedures, and verify waste streams with the disposal contractor before transport.
Maintain an incident log and report any exposure or spills immediately.
Verify final disposal receipts and ensure storage areas remain clearly marked and secure until removal.
Regularly review procedures to prevent future hazards.
Aftercare: Inspection, Air Quality, and Documentation
After removal work, conduct a thorough inspection to verify that all remaining debris is removed, joints and penetrations are sealed, and any potential moisture sources are addressed.
You then assess ventilation improvements to ensure proper airflow and minimize trapped contaminants, documenting gaps or stiffened materials.
For air quality, perform air quality testing to establish baseline conditions and detect volatile organic compounds, dust, or fibers before final closure and packaging.
Maintain meticulous records for compliance and future work. Communicate findings with clear recommendations and deadlines.
- Document containment status and sealed penetrations
- Record ventilation improvements and fixture placements
- Note air quality testing results and action thresholds
- Archive photos, readings, and corrective measures for accountability
Frequently Asked Questions
What Are the Most Common DIY Mistakes to Avoid?
Common DIY mistakes include rushing, skipping PPE, and ignoring ventilation. You’ll avoid them by choosing proper insulation material, using safe Removal techniques, sealing off areas, and inspecting for dust, mold, and moisture before disposal. Stay meticulous, disciplined, and careful.
How Can I Tell if Insulation Contains Asbestos Safely?
“Knowledge is power,” you remind yourself. To tell if insulation contains asbestos safely, perform asbestos testing or hire professionals for safe removal; don’t disturb suspected material. Follow expert guidance and guarantee meticulous labeling, disposal, and regulatory compliance.
What Kits or Tests Confirm Mold Presence Beyond Visual Cues?
You should use mold testing and inspection kits to confirm mold presence beyond visual cues. Choose accredited kits, follow manufacturer instructions, collect samples carefully, and send them to a certified lab for definitive analysis and actionable results.
Which Local Agencies Regulate Insulation Disposal and Permits?
Local waste authorities regulate disposal permits; EPA regulations also apply. You should contact your city or county waste department to confirm specific rules, timelines, and required packaging, labeling, and disposal methods for insulation products.
How Often Should Post-Removal Air Quality Be Tested?
Air quality matters, testing frequency matters, and you should test after removal, then periodically. You should test air quality at baseline, after cleanup, and quarterly thereafter to confirm ongoing safety and compliance with guidelines.
Conclusion
You’ll finish with confidence because the odds lined up: proper planning met precise PPE, and careful removal matched strict containment. Coincidentally, the same habits you used to guard your lungs and home will protect your neighbors and bottom line—from safer disposal to compliant paperwork. If you stay meticulous, inspection won’t surprise you, air will stay clean, and the last dust particle will seem to vanish in plain sight. Trust the process, document every step, and breathe easier tomorrow.


