
To fix a soggy yard, start by tracing how water moves after rain and identify pooling spots. Check soil permeability and note low areas, then plan grading that directs water away from your home. Choose drainage solutions suited to your site—French drains, surface drains, or sleepers-and-swale layouts—lay trenches with a continuous slope, and cover with gravel and soil. Maintain & recheck after storms; more tips await to guide you further.
How to Fix a Soggy Yard: A Step-by-Step Drainage Plan
To fix a soggy yard, start with a clear assessment of the drainage problem and a plan for proper grading. You identify water sources, soil type, and existing runoff paths, then prioritize grading changes that direct flow toward a safe outlet.
Use a level and string line to verify slope, aiming for a gentle 1–2% grade away from structures. Implement stormwater management practices that reduce standing water, such as curb cuts, French drains, or swales, ensuring materials match soil conditions.
Install erosion control measures during grading to prevent sediment transport and protect landscaping. Schedule work in dry periods and monitor after rainfall to confirm improvements.
Document results, adjust as needed, and maintain access routes to avoid future compaction that hinders drainage efficiency.
Assessing Your Yard’s Drainage: Where Water Goes and What to Fix
Water runs along predictable paths in your yard, so start by tracing those flow paths to see where water concentrates.
Check soil permeability in several spots to know where leaks and runoff will persist, and identify drainage problem spots like low areas or near foundations.
With those findings, you’ll know what to fix first to move water away and prevent soggy spots.
Water Flow Paths
Understanding your yard’s water flow paths is essential before any fixes. You’ll identify how water travels from downspouts, roof pitches, and lawns toward low spots, noting where it collects and where it tends to escape. Start by tracing surface runoff edges during a rain event and observing persistent puddles.
Then map subsurface behavior: where water moves below the soil surface, which areas dampen it, and which zones channel it toward drains or streets. Your goal is to prevent concentration of flow in one place and reduce erosion risk.
Plan to segment drainage routes to minimize unchecked discharge, using subsurface barriers where pathways converge and to encourage even dispersion. This approach clarifies needs for grading adjustments, swales, or drain placement without overhauling the entire yard.
Soil Permeability Check
Soil permeability is the key to how quickly water moves through your yard after a rainfall or irrigation. To assess drainage, you’ll gauge how fast water soaks in and where it pools, then identify fixes.
Knowing the soil’s texture helps you predict behavior: heavy clay content slows movement, while sandy mixes drain faster. Look for signs of soil compaction that reduce pore space and hinder infiltration.
- Perform a simple infiltration test to observe how many inches of water soak in per hour, noting variations across your yard.
- Check for clay content and compacted zones by pressing a boot print into soil after dry conditions, then pressing again when damp.
- Record areas with standing water after a light rain to map permeability patterns and prioritize improvements.
Drainage Problem Spots
Identifying drainage problem spots starts with a straightforward map of where water accumulates and where it drains away slowly. You’ll observe puddles after rain, low-lying areas, and sections with standing moisture longer than surrounding soil.
Note the slope—water should flow away from structures and toward designated outlets, not linger. Mark drain lines, downspout discharges, and any turf that stays soggy.
Inspect turf health; compacted or sparse areas often reveal drainage issues. Use a simple flow test: pour a bucket of water and watch for quick, even dispersion.
Record soil texture and drainage patterns, then plan targeted drainage solutions. Recommend soil testing to tailor amendments and determine permeability.
Address problem spots with appropriate trenching, grading, or vents, ensuring outlets remain free of debris.
Choosing the Right Drainage Approach for Your Space
Start by evaluating how water flows across your yard to identify problem spots.
Then match the drainage type to each area, based on soil, slope, and intended use.
Finally, outline practical installation steps so you can move from plan to action with confidence.
Assess Site Water Flow
Assess how water moves across your yard before choosing a drainage approach. To assess flow, observe after a rain and note where water pools, the slope direction, and any surface runoff paths. This informs which drainage method fits your space and helps with stormwater management and erosion control.
Pinpoint concentrated drainage points and check soil saturation to decide if you need upstream grading or infiltration.
- Map water trails, pooling spots, and slope, then note potential near structures.
- Test soil percolation and consider diverting runoff with swales or French drains.
- Plan for future rain events by sizing trenches and outlets to handle peak flow.
Match Drain Type
Choosing the right drain depends on how water moves through your yard and where it tends to pool. You’ll match a drain type to the patterns you observed, prioritizing efficiency and maintenance needs.
If runoff gathers quickly in low spots, consider a surface or French drain that intercepts before pooling worsens.
For widespread sogginess with slow evaporation, a perforated pipe system buried near the soil surface can promote rapid soil absorption and redirect water away from foundations.
In compact, clay-heavy soils, a shallow trench with gravel improves drainage and encourages soil absorption, but you may need higher precision in grading.
In sandy or loamy soils, you can rely more on gravity-assisted subsoil piping.
Always align the drain type with site conditions and soil absorption capacity.
Plan Installation Steps
Once you’ve selected a drainage approach, plan out a tidy installation scheme that aligns with your yard’s slope, soil type, and water flow. You’ll confirm trench locations, install components, and set grades to promote downhill drainage. Your plan should integrate landscape design principles so features look intentional rather than patchwork, blending with existing plants and hardscape.
Anticipate seasonal adjustments, like adding mulch to slow erosion or adjusting inlet spacing after heavy rains. Document measurements, materials, and timelines to keep the job on track. Verify accessibility for future maintenance and ensure code compliance.
- Determine trench depth and width based on chosen method
- Sequence installation to minimize soil disruption
- Schedule testing and final grading after each rain event
Budget-Friendly Drainage Retrofit: Planning What to Install
A budget-friendly drainage retrofit starts with a clear plan: identify problem areas, set priorities, and choose proven solutions that fit your yard and budget. You’ll map low spots, high-traffic zones, and existing contours, then rank needs by impact and cost.
Prioritize passive, proven options like grading tweaks, downspout re-routing, and overflow safeguards before resorting to more invasive measures. Align your choices with landscape aesthetics so improvements don’t clash with your home’s style or garden vision.
Consider plant selection early to support soil stability and water management without creating future maintenance burdens. Estimate material and labor costs, then build a staged timeline that minimizes disruption.
Document expected outcomes and performance metrics to track effectiveness and adjust as seasons change.
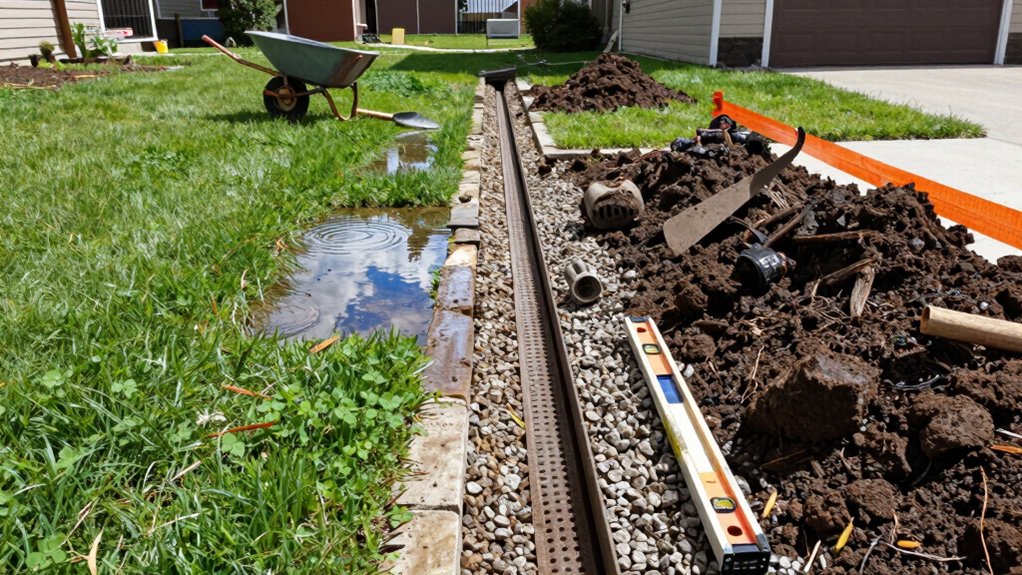
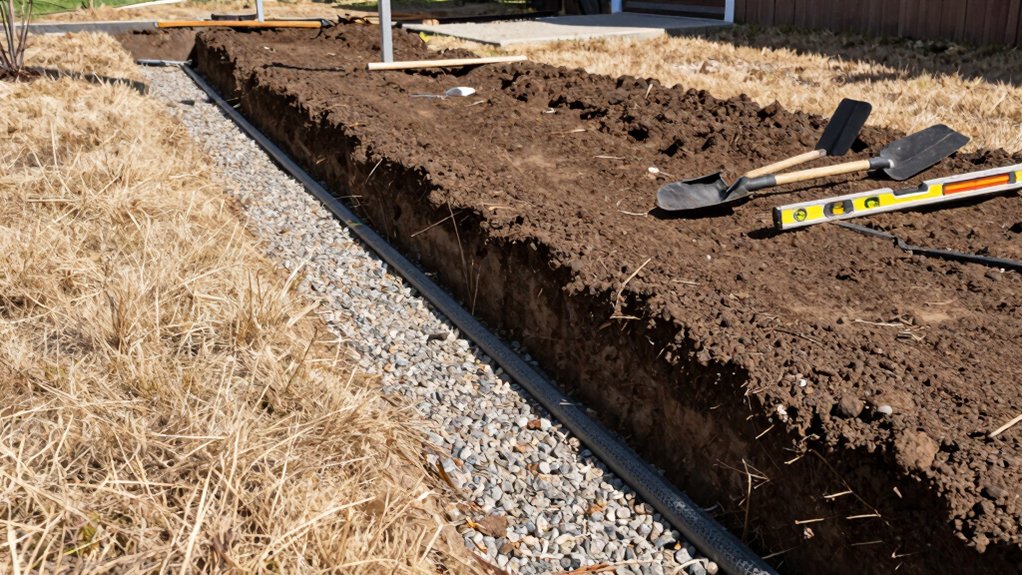
Install Trenches, French Drains, and Grading: A Practical Install Guide
To fix a soggy yard, start by laying out trenches, installing a French drain, and shaping the grade to direct water away from the house and high-traffic zones.
You’ll integrate garden landscaping principles and soil amendment where needed to guarantee stable, permeable beds and effective drainage. Precision planning reduces erosion and speeds water flow toward the outlets.
- Lay trenches precisely, with clean edges and a continuous slope toward the drain outlet.
- Install a French drain with perforated pipe, then cover with gravel and soil, compacting lightly.
- Grade the surface to maintain a gentle slope away from structures, mixing in soil amendment where compacted areas exist.
This approach yields reliable drainage, clearer soil structure, and improved yard usability.
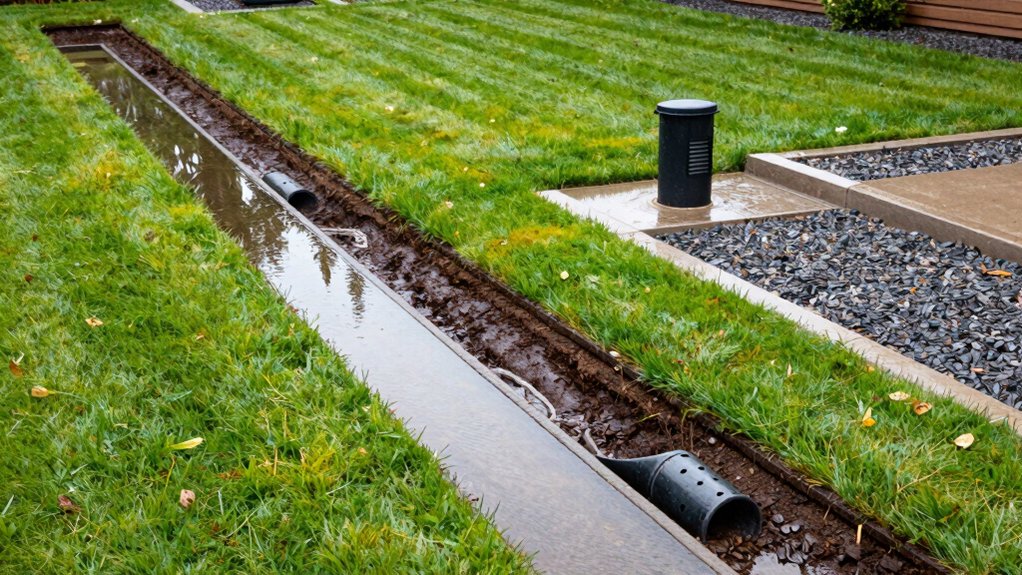
Maintenance for Long-Term Drainage Performance
Maintaining long-term drainage performance hinges on proactive inspection, timely cleanup, and simple upgrades as needed. You should schedule seasonal checks of surface inlets, downspouts, and grading to catch standing water before it causes erosion or foundation risk.
Keep debris clear and verify that swales, trenches, and French drains remain aligned with water flow, not landscaping beds. Use stormwater management practices like tucked-in outlets and gentle slopes to sustain efficiency during heavy rains.
Regularly top-dress or re-compact disturbed soils to preserve infiltration rates and prevent erosion. If you notice erosion channels or sediment buildup, address them promptly with minimal disruption.
Plan modest upgrades—filter fabrics, protective edging, or additional French drains—so you preserve performance without overhauling the system.
Troubleshooting Common Post-Rain Drainage Issues
After setting up a routine for long-term drainage maintenance, it’s time to address what happens when rain turnout exceeds expectations. When a storm floods your yard, identify the failure points quickly and act decisively to restore flow paths and reduce erosion. Use these targeted steps to troubleshoot post-rain drainage issues with confidence.
- Inspect downspouts and gutter extensions; guarantee they channel water away from the foundation and toward safe discharge areas.
- Check the soil’s infiltration rate; if runoff ponds, consider a Rain garden to absorb excess water and slow down flow.
- Verify grading and surface drains; regrade if necessary to create a stable slope that directs water away from structures and toward proper outlets.
Frequently Asked Questions
How Long Does a New Drainage System Take to Mature?
A new drainage system typically matures in 1–3 growing seasons, depending on soil, slope, and maintenance. You’ll notice improved flow as soil stabilization occurs and rainwater harvesting systems integrate, reducing erosion and accelerating stabilization around trenches and outlets.
Can Drainage Problems Be Cured Without Digging?
Yes, you can, by prioritizing permeable surfaces and rain gardens over concrete, reducing runoff instead of digging; you’re juxtaposing harsh impermeability with welcoming greens, creating a natural, effective drainage system that works without invasive excavation.
Will Drainage Changes Affect Underground Utilities?
Yes, drainage changes can affect utility lines. You must plan carefully, check maps, and call utility locators. This protects underground safety and minimizes utility impact while guiding precise, compliant drainage modifications. Always verify before digging or trenching.
Should I Water More or Less After Installing Drains?
Water less at first after installation; adjust to a steady watering schedule, not a flood. Monitor soil moisture and seasonal needs, using a consistent watering schedule to prevent drought, enabling drainage to work effectively without overwatering. You’ll curb drought prevention issues.
How Often Should I Inspect a Drainage System?
You should inspect your drainage system at least once a year, or after heavy storms. Maintenance tips: schedule reminders, check for leaks, unclog filters, and guarantee outlets remain clear. Inspection frequency should be documented and followed consistently.
Conclusion
You’ll stand back as rain finally drains away, just when you think you’ll need a pool, and your yard reveals its hidden pattern: a gentle slope guiding water to a safe outlet. Coincidence nudges the plan forward—one trench meets another, a grate aligns with the low spot, and every intake finally works with gravity. With steady attention, your repaired yard becomes predictable, resilient, and dry, proving that proper drainage isn’t luck, but a deliberate, repeatable method.


