
To modernise an older UK home, start with a structural assessment to map load paths, decay, and wall ties, then reconfigure layouts without compromising party walls or floorplates. Choose durable, timeless finishes—wide engineered timber planks, honed concrete, and resilient vinyl—paired with layered lighting that highlights architectural details. Use warm, period-respecting palettes with tactile textures, and zone spaces with sightlines and discreet storage. Plan thresholds, operable walls, and planting to frame views; phased budgeting keeps projects predictable as you progress. You’ll discover practical steps to apply these principles throughout.
What Modernising an Older UK Home Entails

Modernising an older UK home involves a careful balance of preserving character while upgrading systems and layouts for today’s living. You start with a structural assessment to identify load paths, timber decay, and wall ties, then prioritise essential upgrades.
Electrical and plumbing updates come next, ensuring compliance with current regulations while minimising invasiveness. You should plan for energy efficiency by adding insulation, draft protection, and efficient glazing without compromising historical architecture.
Layout reconfigurations must respect existing party walls and floorplates, preserving room proportions and access routes. Materials selection matters: opt for compatible finishes that offer interior durability and maintainable performance.
Document decisions for future maintenance, and schedule phased work to reduce disruption. Informed choices here safeguard long-term value, comfort, and the home’s heritage.
Illuminate Historic Rooms With Layered Lighting
Layered Lighting creates multiple layers of illumination to illuminate historic spaces without glare or harsh shadows.
You’ll combine ambient, task, and accent lighting to reveal architectural details while preserving ambiance.
Strategically place fixtures to illuminate space evenly and highlight focal features, using controllable layers for flexibility.
Layered Lighting Layers
To illuminate historic rooms effectively, layer lighting combines ambient, task, and accent sources so each space feels cohesive and functional. Layered lighting layers separate duties, allowing you to control mood and performance without overhauling ceilings or walls.
Begin with ambient glow from diffused ceiling fixtures or wall washers that evenly bathe the area, minimizing harsh contrasts. Add task lighting for precise activities—desk lamps, under-cabinet strips, or adjustable sconces ensure clear visibility without glare.
Use accent lighting to sculpt architectural features, highlighting mouldings, alcoves, or artwork with targeted beams. Calibrate color temperatures to maintain historical warmth while preserving legibility; avoid cold tones that clash with period materials.
Incorporate dimming schemes to facilitate from day to evening, preserving atmosphere and energy efficiency.
Illuminate Space Strategically
Strategically illuminate historic rooms by layering light sources to balance ambience, visibility, and architectural features. You’ll implement a layered approach with ambient, task, and accent lighting, tailored to each space’s proportions and demands.
Begin with dimmable ceiling fixtures to provide even base illumination without glare on period plasterwork. Add wall sconces at eye level to emphasize moldings and artwork, ensuring wattage respects historic finishes. Introduce task lighting at read zones and work surfaces, using directional luminaires that avoid harsh shadows.
Consider cove or hidden uplights to sculpt cornices and ceilings, enhancing depth. Plan grid-free layouts by coordinating light zones with solar planning considerations and natural daylight angles.
Finally, align lighting with furniture placement to preserve circulation, maintain focal points, and support flexible use of traditional rooms.
Warm Palettes That Respect Period Features
You’ll explore how warmth with heritage can guide palette choices that honor period features rather than overwhelm them.
By pairing historically informed tones with restrained contrast, you accentuate architectural details, mouldings, and timber without masking them.
This practical approach blends softening palettes with deliberate emphasis on original character, keeping rooms cohesive and true to their lineage.
Warmth With Heritage
Begin with a base of muted warm neutrals—creamy oaks, flax, and stone—then layer with low-saturation terracotta, sage, or graphite for contrast that won’t overwhelm plaster cornices or ceiling roses.
Apply finishes that read as tactile, such as engineered timber veneers and matte limewash on walls to retain visual texture.
Introduce historic textiles and vintage accessories sparingly to reinforce provenance without overpowering details like coving or quarry tiles.
Control contrast via lighting temperature and dimming to sustain atmosphere at scale, ensuring modern comfort while respecting period aesthetics.
Validate choices by testing samples in natural and artificial light across rooms.
Palette And Period Features
Palette choices anchored in warm tones can harmonize period features with contemporary comfort, ensuring historic details like plaster cornices and timber floors remain legible. You’ll apply a restrained warm palette on walls, keeping saturation modest to preserve architectural lines.
Use natural clay, ochre, and sesame hues as base neutrals, then introduce accents via textiles and cabinetry with precise, low-contrast contrast to maintain legibility of plasterwork. When selecting finishes, prefer low-sheen varnishes and matte, breathable paints to protect timber floors without reflecting excessive light.
Incorporate vintage patterns cautiously—small-scale checks or subtle damask—within upholstery and soft furnishings to echo era motifs without overpowering rooms. For metallic details, opt for aged brass or bronze hardware, aligning with Art Deco cues while avoiding monotone period clichés.
This approach supports timeless warmth and architectural respect.
Softening Traditional Rooms
Begin with a base of muted neutrals—sage, wool, and clay—then introduce accent tones like warm terracotta or muted olive to enhance architectural rhythm without overpowering ornament.
When placing antique furniture, guarantee scale and provenance support the room’s cadence; choose finishes that echo original patina rather than overpower it.
Layer textiles deliberately: add lampshades and vintage textiles in tonal increments, aligning with wood undertones and natural fabrics.
Finally, test light quality at various times; softened illumination preserves texture while improving daily usability.
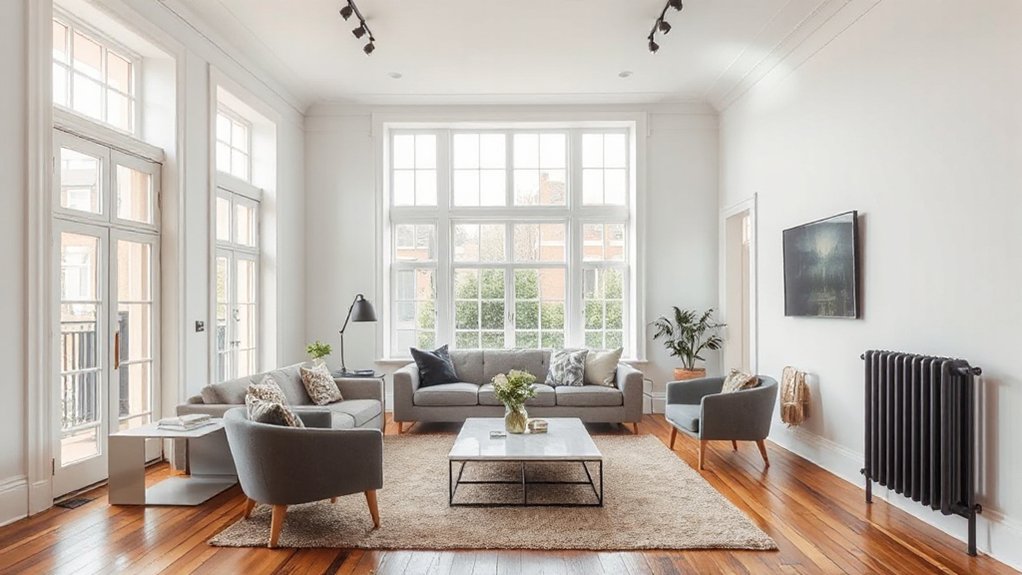
Flooring That Joins Past and Present
When you choose flooring that bridges past and present, you aim for durability and visual continuity that suits an older UK home’s character. You’ll pair materials and finishes that resist wear while echoing period details, creating a cohesive flow from room to room.
Focus on practical installation and accessible maintenance, so the result endures years of daily use without sacrificing style. The goal is to deliver Vintage charm with Modern contrast, so think textures, tones, and joints that read as timeless rather than trendy.
- Wide, engineered timber planks with UV-cured topcoats for stability and a warm, classic look.
- Honed concrete tiles or boards in soft, neutral shades to balance vintage elements and contemporary lines.
- Megaintensity vinyl with realistic grain and bevels for resilient, low-maintenance surfaces.
This approach keeps spaces cohesive and durable.
Create Open-Plan Feeling Without Losing Character

You can create an open-plan feel by carving zones with subtle architectural cues that preserve room-to-room characters. Use furniture placement, varying ceiling heights, and soft contrasts in materials to define areas without breaking flow.
This approach balances open connectivity (Open-Plan With Character) with clear zones (Zoning Without Losing Charm) so you retain heritage details while improving everyday usability.
Open-Plan With Character
Creating an open-plan feel in a traditionally compartmental UK home requires deliberate zoning that preserves character. You’ll balance flow and identity by selecting finishes, furniture, and architectural cues that read as cohesive yet distinct zones. Key strategies include sightlines, tactile contrasts, and calibrated lighting to maintain vintage charm while delivering modern comfort.
Edge-to-edge design decisions must respect original details and scale, avoiding over-saturation with contemporary gimmicks.
- Use framed sightlines to suggest separate areas without walls, pairing period mouldings with modern materials.
- Choose a restrained palette that ties rooms together, incorporating heritage textures alongside soft, contemporary textiles.
- Integrate adaptable furniture and concealed storage to keep spaces airy yet functional, preserving character while improving practicality.
Zoning Without Losing Charm
An open concept layout benefits from clear sightlines and scale-aware furniture arrangement; position islands or credenzas to visualize boundaries without interrupting sight. Material continuity matters: repeat a unifying wood tone, a cool-white plaster, or a restrained palette across zones to maintain cohesion.
Employ privacy solutions that don’t feel boxed in—slatted screens, frosted glazing, or partial-height partitions—so natural light remains abundant. Acoustic considerations are essential: insert rugs, ceiling panels, and soft furnishings to absorb sound within open areas.
Finally, document intentional sightlines and function arrows for consistent, practical zoning that respects character.
Clever Storage for Tight, Quirky Spaces

Clever storage in tight, quirky spaces hinges on precise planning and modular solutions that maximize every inch. You’ll harness vertical potential, integrated furniture, and hidden compartments to maintain flow while increasing capacity.
Prioritize flexible layouts, dual-purpose pieces, and compact hardware to support daily use without visual clutter. For space optimization, choose components with slim profiles, soft-close mechanisms, and easy access to frequently used items.
Confirm joints and transitions are airtight, so odd corners don’t waste depth. Material choices should resist wear and be easy to clean in high-traffic areas.
Test access early, reconfigure as needed, and document specs for future tweaks. Creative storage becomes practical only when systems are scalable and repeatable across rooms.
- Measure once, plan twice for each corner
- Use modular cabinetry and hidden pivots
- Label and zone contents for quick retrieval
Clean Sightlines on Stairs and Hallways
To achieve clean sightlines on stairs and hallways, apply clear sightline principles by minimizing visual clutter and selecting unobtrusive architectural elements.
Use a neutral palette across walls, floors, and accents to maintain continuity and reduce breaks in line of sight.
Match trim details throughout the space for consistency, ensuring finish and depth are uniform from stairs to landings.
Clear Sightline Principles
Clear sightlines on stairs and hallways are essential for safety and function. You’ll prioritise unobstructed view, consistent lighting, and predictable geometry to reduce missteps and improve navigation through the home’s core routes.
1) Lighting and contrast: ensure even illumination with barrier-free transitions, high-contrast treads, and shadow-free wall lines to guide steps without glare.
2) Spatial clarity: keep walls unbroken by bulky furniture, artwork, or decorative screens; store items out of sight behind doors or in recessed alcoves.
3) Materials and finishes: choose durable, non-slip surfaces with uniform color and grain that respect time worn craftsmanship and vintage charm while supporting modern movement.
Maintain clear sightlines with routine checks, addressing obstructions promptly and preserving the staircase’s functional, elegant flow.
Neutral Palette Choices
Neutral palettes are a practical way to maintain clean sightlines on stairs and hallways while still honoring period features. You’ll implement a restrained base of whites, warm beiges, and soft greys to create visual continuity across spaces.
Choose low-saturation tones with subtle undertones to minimize reflective glare and preserve architectural details. Focus on color coordination across walls, ceilings, and key architectural features, ensuring consistent luminance levels to prevent hotspots.
When selecting finishes, prefer matte or satin sheens to reduce glare and enhance texture without drawing attention from trim.
For furniture arrangement, place compact, low-profile pieces along walls to preserve corridor width, and avoid oversized items that interrupt flow.
Document your palette and test swatches under varied lighting to confirm lasting neutrality.
Consistent Trim Details
- Align profiles across rooms for uninterrupted lines.
- Match decorative moldings with ceiling heights and finishes.
- Seal connections to maintain clean sightlines and stability.
Restore or Replace Windows for Natural Light
If your goal is to maximise natural light without compromising energy efficiency or security, you should first decide whether to restore existing windows or replace them with modern equivalents.
In practice, assess frame condition, glazing type, and weather sealing to determine feasibility of window restoration. Restore if timber frames are structurally sound, sashes operate freely, and glazing can be upgraded to double or triple glazing without altering external dimensions.
Replacements suit degraded profiles, poor insulation, or obsolete hardware, enabling slimmer profiles and advanced seals. Consider U-values, solar gain, and daylight transmission for each option.
Prioritise security features, compliant egress where required, and careful flashing details to prevent condensation.
Document changes for listed or protected properties and choose energy-efficient, low-maintenance materials that maintain proportion with traditional facades.
Natural light remains the focus.
Modern Finishes That Complement Traditional Details

You’ll explore how subtle material pairings create a cohesive look that respects traditional details while adding modern texture.
Exposed traditional elements should read as anchor points, with contemporary finishes reinforcing rather than competing with them.
Aim for a balanced harmony where contemporary looks—like matte metals or concrete tones—enhance, not overwhelm, the historic character.
Subtle Material Pairings
- Use contrasting but complementary textures for key surfaces.
- Select a restrained palette anchored to natural materials.
- Integrate period-inspired hardware as quiet, practical detail.
Exposed Traditional Details
Apply breathable paint systems to decorative timber trims, avoiding sheen levels that shout “refurbish” and instead opt for satin or eggshell to balance contrast. When upgrading plaster or plaster-like cornices, seal joints with low-contrast caulk and consolidate with compatible plasters to prevent cracking.
Then repaint in a restrained palette that echoes adjoining walls. Integrate lighting at the cornice line to illuminate profiles without overpowering them, ensuring dimmable control for ambience.
Reserve industrial fixtures for non-ornamental spaces to keep the traditional detailing coherent and legible.
Contemp Finishes Harmony
Contemporary finishes can harmonize with traditional details by leveraging restrained contrasts and breathable materials. You balance form and function by selecting finishes that respect scale, proportion, and heritage features, while ensuring daily usability remains uncompromised.
Focus on surface tactility, light diffusion, and acoustic comfort to preserve character without clutter. The goal is a calm, coherent look that reads as cohesive rather than contrived, with a clear material hierarchy guiding every decision.
Practical choices favor low-reflectance textures, mid-toned woods, and matte metals that echo historic rooms while delivering modern ease. Embrace Contemporary minimalism and Urban industrial cues to create spaces that feel airy, durable, and adaptable to evolving needs.
- Material palette and contrast strategy
- Lighting harmonization with period details
- Durable, easy-care finishes for high-traffic zones
Kitchen Updates That Honor a Heritage Home
To update a heritage kitchen without erasing its character, start with functional upgrades that respect the room’s proportions and materials. You’ll prioritise durable, period-appropriate fixtures, such as solid timber cabinetry with traditional joinery and brass hardware that patinas over time.
Install appliances with minimal footprint and discreet housings, preserving sightlines to original architectural details. Lighting should combine task efficiency with warmth, using low-glare LEDs and heritage-inspired fittings.
Choose finishes that balance durability and patina: softly chalked paints, slate countertops, and quarried stone backsplashes. Storage must align with work zones, keeping the cook‑top, sink, and fridge within efficient triangle distances.
Integrate vintage textiles in fabrics and soft furnishings for texture, while maintaining Classic color palettes that echo the era. Prioritise ventilation, moisture control, and easy maintenance for long-term fidelity.
Bathroom Refreshes Without Sacrificing Charm
If you want bathroom refreshes that keep their charm, start with a plan that respects the space’s proportions, materials, and craft. You’ll balance vintage charm with modern comfort by selecting fixtures that preserve period lines while delivering contemporary performance.
Prioritise robust materials, restrained ornament, and accessible ergonomics to minimise future updates. Use sealed timber or stone finishes, pale tiles, and subdued brass or nickel hardware to maintain authenticity without sacrificing hygiene or efficiency.
- Align fixtures to original sightlines, swapping components for low-maintenance equivalents that meet current regulations.
- Choose a water-efficient mixer, concealed cistern, and soft-close cabinetry to sustain character while improving practicality.
- Integrate smart controls subtly (lighting, heating) so comfort enhances daily routines without overpowering the vintage aesthetic.
Textures: Layering Materials for Tactile Interiors

Layering materials creates depth and tactility by pairing textures with purposeful grain, sheen, and porosity. You’ll design tactile interiors by combining hard-wab materials—stone, ceramic, concrete—with softer options like wool, linen, and brushed timber.
Prioritize textural contrasts: a smooth porcelain tile next to a rough-hewn oak, a high-sheen metal lamp against a matte plaster wall, or a ribbed fabric against a flat leather panel. Plan a unified palette; limit to three base hues to keep coherence as materials vary.
Consider scale and grain direction to prevent visual noise, and layer warmth through underfloor heating or warm timber underfoot. Guarantee joints and transitions are clean, with deliberate overlaps to emphasize tactile layering while preserving architectural details.
Avoid visual clutter; let material rhythm guide the eye.
Paint Techniques to Highlight Mouldings
After layering textures, you can stress mouldings with targeted paint techniques that accent their profile without overpowering the room. You’ll balance contrast and cohesion by selecting a base shade that harmonizes with walls, then apply precision accents to reveal depth and form.
Use textured finishes sparingly on the crown line or door casings to keep surfaces tactile without overwhelming sightlines. Decorative stenciling can introduce subtle patterning that guides the eye along moulded profiles, reinforcing architectural details.
For durability, seal with a matte or eggshell, avoiding glare that dulls relief. Precision masking ensures clean edges and consistent application, essential for repeatable results across spaces.
- Use light-to-dark contrast on key mouldings
- Reserve textured finishes for focal profiles
- Employ decorative stenciling to echo architectural lines
Smart Tech That Respects Craftsmanship
Smart tech should enhance rather than erase craftsmanship, so select devices and systems that align with traditional finishes, tactile textures, and visible handiwork. You’ll want discreet installations that respect timber, brick, plaster, and stone without revealing retrofit clutter.
Prioritize scalable, retrofitable controls, like recessed dimmers, hidden sensors, and low-profile hubs, so wiring remains unobtrusive. Choose smart technology that preserves manual interfaces—tactile wall switches, physical thermostats, and wired audio zones—while enabling essence-preserving automation.
Opt for energy management that complements craft, such as zoned heating tied to bespoke radiators or underfloor boards, avoiding oversized modules.
Guarantee compatibility with existing hardware through reverse-engineered protocols or patient integration. Document provenance, maintain service access, and emphasize craftsmanship preservation in warranties and user guides, so modern comforts coexist with heritage values.
Colour Schemes Inspired by British Heritage

Colour schemes rooted in British heritage translate well from restored craftsmanship to modern interiors. You’ll shift historical context into everyday spaces by selecting palettes that echo regional materials, weathered timber, and traditional plasterwork. Think muted base tones, with restrained pops drawn from heraldic reds, chalky greens, and slate blues. You balance contrast to preserve legibility for furniture and architectural details, ensuring cohesion across rooms.
Cultural influences appear in textile patterns, rug motifs, and tile arrangements, while paint finishes mimic aged patina without appearing damp or dated. Maintain luminance with warm whites and subtle stone grays to keep rooms airy.
Practical checks: test color samples in natural light, document surface reflections, and pass between rooms for a coherent narrative.
- Neutral base with heritage accents
- Texture-driven color zoning
- Material-mimicking finishes for authentic depth
Gardens and Thresholds: Extending the Home
Thresholds between indoors and outdoors are functional zones, so plan them like rooms: define access points, control microclimates, and guarantee seamless sightlines.
In garden transformation projects, you’ll coordinate level changes, drainage, and fencing to avoid trip hazards while preserving sight continuity from living spaces.
Prioritize threshold design that supports frequent traffic and weather exposure, using durable materials, low-slip finishes, and concealed fasteners.
Use operable doors or retracting walls to extend usable area seasonally, and integrate step-free passages where possible.
Plantings should frame vistas without obstructing access, with permeable surfaces to manage runoff.
Consider built-in seating, planters, and lighting that reinforce function after dark.
Document elevations and hinge clearances early to prevent retrofits, ensuring reliable integration with existing footprint.
Budgeting Practicalities for Period-Home Renovation
Budgeting for a period-home renovation demands a clear, itemized plan that tracks costs from the outset and stays flexible as the project evolves. You’ll align scope with budget, estimate contingencies, and document assumptions to avoid scope creep.
Prioritise cost planning for elements with long lead times or regulatory constraints, and track changes in real time. Use value engineering to identify cost effective solutions without compromising character or performance.
Maintain a transparent cost ledger, verify unit costs, and schedule invoices to preserve cash flow. Regularly review accumulated spend against milestones to trigger adjustments before overruns occur.
- Establish a baseline budget with fixed and variable components, plus a contingency buffer.
- Compare procurement options for materials and trades to optimise cost planning.
- Implement a phased timeline to manage cash flow and minimise risk.
Real-Life Case Studies: Before and After

Real-life case studies illuminate how design decisions translate into measurable outcomes. You’ll see exact before-and-after measurements, from square footage reallocation to airflow improvements.
In each project, you assess the baseline constraints—structural limits, ceiling heights, and thermal bridging—and then document the implemented changes with data: wall thickness, glazing U-values, and shading strategies.
A typical example highlights layout shifts that enhance circulation, switchgear placement for safer operation, and finishes chosen for durability in high-traffic zones.
For garden design, note progressions from unmanaged borders to defined perennial borders that reduce maintenance time and boost property appeal.
Energy efficiency emerges through improved insulation, airtightness testing, and controlled ventilation.
Compile post-occupancy feedback alongside KPIs to validate performance gains and inform future decisions.
Frequently Asked Questions
How Do I Assess the True Value of Period Features Before Modernising?
You should approach period feature valuation by documenting condition, provenance, and market demand, then conduct historic element appraisal against baseline standards; compare restoration costs, potential tax incentives, and functional impact to inform decisions before modernising.
What Budget Gaps Commonly Appear in Period-Home Renovations?
Budget gaps commonly arise from underestimating structural, wiring, and damp remediation, plus unforeseen regulatory requirements; plan for contingency. You should refine budget planning, identify renovation challenges early, and reserve 10–20% for scope creep and permits.
Are There Legal Restrictions for Alterations to Historic UK Homes?
Yes, you must check heritage regulations and secure Planning permissions before alterations, or you’ll bite off more than you can chew. In detail, the rules specify listed status, conservation areas, and consent conditions for practical, compliant renovations.
How Can I Preserve Craftmanship While Upgrading Safety Codes?
You preserve craftsmanship while upgrading safety codes by integrating discreet, code-compliant materials that respect original joinery, document every alteration, and collaborate with heritage specialists; prioritize passive safety upgrades, like improved ventilation and fire retardant finishes, ensuring ongoing craftsmanship preservation.
What Maintenance Routine Extends the Life of Heritage Interiors?
A steady maintenance routine preserves heritage interiors; like a London clock tower’s mechanism, you oil joints and test interlocks quarterly. You perform regular inspections, document wear, and apply restoration techniques, ensuring heritage conservation values and functional longevity.
Conclusion
You’re the captain steering a centuries-old vessel through a modern harbor. As you chart the course, layered lighting becomes your compass, the warm palette your hull’s glow, and coordinated flooring the sturdy deck. Open-plan decks expose hidden timbers without muting their story. Heritage-inspired colors attend to each quirk, while thresholds and gardens extend your reach. Budgeted pragmatism keeps the voyage steady. In the end, your home becomes a well-wrought ship: classic, capable, and ready for new tides.


