
To clean and oil wood cabinets without drying or cracking, start with a pH-balanced cleaner or mild soap, and never soak the wood. Wipe with the grain using a dampened microfiber cloth, then dry promptly. Lightly sand any gloss, wipe away dust, and test a small area first. Choose a penetrating oil (mineral or tung) in thin coats, wipe off excess, and buff after each layer. Maintain a regular schedule; you’ll uncover more tips as you proceed.
Assess Your Cabinet Finish: Sheen, Porosity, and Cracks

Assess your cabinet finish by evaluating sheen, porosity, and cracks to determine the right cleaning and oiling approach. You’ll start by noting cabinet sheen to gauge light reflectivity and wear patterns, then test surface porosity to see how quickly a cleaner or oil is absorbed.
If sheen is high and uniform, you may require milder cleaners and lighter oiling; if sheen is dulled or uneven, plan for deeper cleaning followed by more thorough oiling.
Inspect for cracks as indicators of moisture loss or wood movement, and address them after confirming finish compatibility. Track porosity in representative panels to set oiling ratios consistently. Record observations so you apply the same method across all surfaces.
This approach preserves cabinet integrity, minimizes risk, and supports even aging.
What Protects Wood Cabinets: Suitable Cleaners and Safe Practices
To protect wood cabinets, choose cleaners and practices that remove grime without compromising the finish or wood fibers. You’ll pick pH-balanced cleaners, mild soap solutions, or dedicated wood-cleaning formulas, avoiding ammonia, bleach, or harsh solvents that can strip wood grain and lift protective coatings.
Dampen a soft microfiber cloth or use a well-wrung sponge; never soak the surface. Wipe with the grain, then dry promptly to prevent water intrusion.
For oily residues, use minimal solvent on a cloth test, then blend in with a clean section.
Apply protective coatings only after cleaning and drying, per product directions.
Maintain routine cleaning to preserve color and texture. These steps safeguard wood grain and extend finish life without introducing damage.
Prep the Surface for Cleaning and Oiling
Start by clearing and inspecting the cabinet surfaces, noting any staining, residue, or peeling finish.
Next, use a gentle cleaning prep technique—soft cloth, mild cleaner, and light scrubbing—to remove grime without harming the wood.
Finally, dry thoroughly and evaluate the surface for smoothness and adhesion, prepping any rough areas for coating or oiling.
Surface Preparation Steps
Before you clean or oil, you must prepare the surface to guarantee even product adhesion and lasting results. Start by inspecting the cabinet surfaces for loose finish, swelling, or cracks, and repair as needed.
Lightly sand with fine-grit paper or a non-abrasive pad to remove gloss and create a micro-roughness that improves bonding. Wipe away dust with a clean tack cloth, then test a small inconspicuous area for finish compatibility.
If the finish sheen is uneven, consider a brief scuff with a gray scouring pad and rewipe. Mask adjacent areas to protect hinges and hardware.
Make certain the surface is dry, clean, and free of residue before applying cleaners or oils. Maintain consistent pressure to preserve wood grain while preparing the surface for treatment.
Cleaning Prep Techniques
Cleaning prep techniques begin with guaranteeing the surface is dry, clean, and free of residue before any cleaner or oil is applied. You start by removing cabinet hardware for unobstructed access and to prevent tool damage.
Inspect wood grain patterns for irregularities, and note high-traffic spots that may need targeted cleaning. Dust with a microfiber cloth, then wipe with a damp, lint-free pad to lift grease without saturating the surface.
Avoid household sprays that can leave residues; opt for a mild, pH-balanced cleaner. Rinse promptly with a damp cloth and dry thoroughly.
Test any solution in an inconspicuous area first. Reassemble only after the surface is completely dry.
This prep reduces blotching, ensures even absorption, and protects wood from moisture during cleaning and oiling.
Pick the Right Oil for Wood Cabinets

You’ll choose oils that suit your cabinet’s porosity and finish, pairing penetrating options with compatible sheen.
Consider the best oils for cabinets first, then match them to your wood’s openness and existing topcoat.
This sets the stage for lasting protection without altering texture or color.
Best Oils For Cabinets
Choosing the right oil for wood cabinets hinges on your wood type and finish goals. For bare wood, avoid waxy finishes; use pure mineral oil or tung oil to penetrate without forming a film.
For a durable, satin look, consider polymerized linseed or tung oil blends that cure and resist moisture.
If you’re restoring color, a wiping varnish or Danish oil enhances grain without masking it.
Apply thin coats, wipe excess, and allow proper drying between passes.
Always test on a hidden area to confirm color and penetration.
When you reattach cabinet hardware, ensure the surface is fully dry to prevent staining.
Remember, wood grain should remain distinct, and oiling won’t substitute proper sealing.
Choose oils that suit your finish goals and maintenance routine.
Porosity And Finish Match
Porosity governs how a wood cabinet accepts and holds finish, so match your oil to how open or closed the grain is. You’ll choose oils that align with wood grain behavior: open-pored woods soak up finish faster, while tight pores demand slower, more controlled application.
A finish match means selecting an oil that prevents blotching, ensures even penetration, and preserves the surface sheen without masking texture. For porous species, apply thin coats, wipe excess, and allow thorough curing to avoid film buildup.
For dense woods, consider slightly longer dwell times and a softer cloth to prevent streaks. Always test on a small area to confirm tone and penetration. This approach minimizes drying and cracking, delivering durable, uniform protection.
Wood grain compatibility guides your finish match and longevity.
Test a Small Area Before Full Application
Before applying anything to the entire cabinet, test a small, inconspicuous area to confirm results. You’ll assess testing procedures by applying a mild cleaner or oil to a hidden patch, then wait the recommended time.
Observe for changes in color, sheen, or feel, and note any sticky or tacky residues. If the test area dries evenly and exhibits no adverse effects, you can proceed with confidence.
Check finish compatibility by comparing the test patch to the adjacent surface under similar lighting; ensure there’s no dulling, whitening, or lifting.
Document outcomes and any timing differences, so you can repeat the same steps consistently. If results vary, adjust product type or dilution before broader application to prevent uneven appearance or damage.
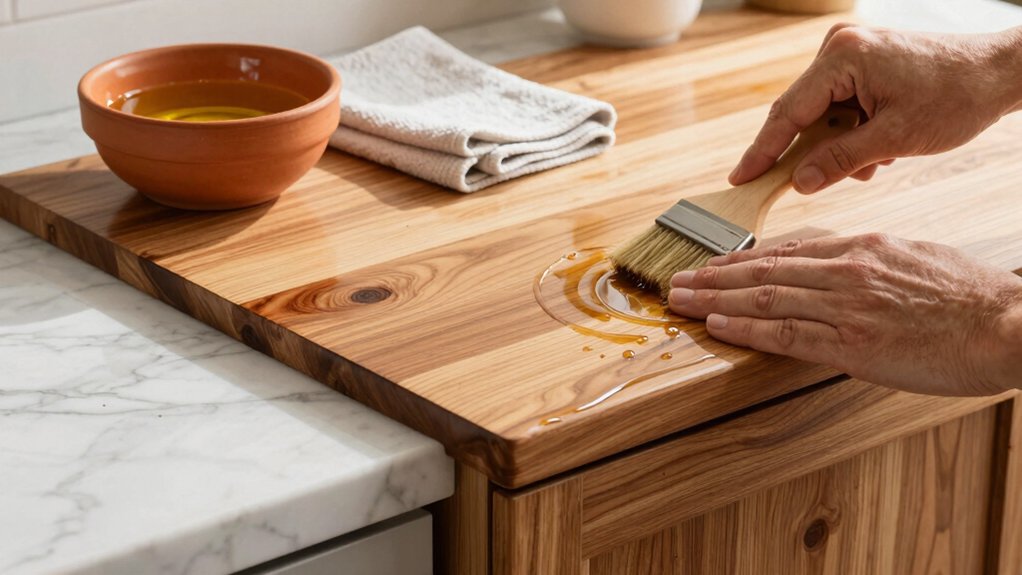
Apply Oil Without a Greasy Residue
To apply oil without a greasy residue, use a light-coated approach: work in small sections, apply only a thin film, and wipe off any excess promptly. You’ll lean into efficient oil application by using a lint-free cloth or foam brush, never soaking the wood.
Begin at the top and move downward, matching grain direction for even absorption. If you notice pooling, immediately remove it with a clean cloth, avoiding streaks. Allow a brief settling time between passes, then buff lightly to remove high spots.
For residue prevention, avoid over-application on flat panels and recessed grooves; dab instead of drenching. Store tins upright and seal tightly to prevent skinning. This disciplined method minimizes tackiness, extends cabinet life, and keeps finishes uniform.
Schedule: How Often to Clean and Oil for Preventive Drying

Establish a regular cleaning and oiling cadence to prevent drying and preserve cabinet integrity. You should set a practical schedule based on use, climate, and finish type.
For most homes, clean every 4–6 weeks and oil every 6–12 months, adjusting for higher humidity or heavy usage. Consistency matters more than frequency, so choose days you’ll remember and stay with them.
Align tasks with cabinet hardware removal and reinstallation to minimize grease transfer, and always wipe surfaces dry before oiling. Prioritize zones near doors and drawers, where handling accelerates wear on wood grain patterns.
Use a clean microfiber cloth for application and a different one for buffing, avoiding cross-contamination with other cleaners.
Document dates on a calendar to track maintenance and prevent neglect.
Troubleshoot Dried, Cracked, or Sticky Finishes
If you notice a dried, cracked, or sticky finish on your wood cabinets, start by confirming the type of finish you’re dealing with—oil-based, water-based, varnish, or shellac—as the repair approach varies.
- Identify head-on: sheen level and wood grain texture guide the restoration plan.
- Test a small area to confirm adhesion and response before full restoration.
- Remove loose flakes gently, then clean with a finish-compatible solution to reveal true condition.
- Refinish with compatible product, matching finish sheen and preserving wood grain.
This approach prevents new cracks and uneven gloss, ensuring durable protection and a cohesive look.
Maintenance and Quick Care Audits
Regular maintenance keeps cabinets looking uniform and extends their life; a quick care audit helps you spot issues before they escalate. You should schedule brief, routine checks: wipe surfaces, test hinges, and inspect fasteners for looseness.
Focus on cabinet hardware—drawer slides, handles, and hinges—tighten where needed and replace worn components promptly to prevent misalignment and wear patterns. Note any sticking doors or corners catching on frames, and address with lubricant or light sanding as appropriate.
Compare finish areas periodically for gloss loss, shiny hotspots, or edge wear, and document findings. When you perform a quick audit, decide if you should refinish, retouch, or seal exposed wood.
For long-term results, consider paint vs. stain decisions during updates to maintain consistent appearance.
Frequently Asked Questions
Can Environmental Humidity Affect Oil Performance on Cabinets?
Yes, humidity affects oil performance. Higher humidity reduces absorption, speeds curing inconsistencies, and invites mold; lower humidity slows drying. You’ll notice humidity effects on finish durability, while moisture impact concentrates repairs and maintenance needs. Stay steady, manage environment, reapply as needed.
Which Oils Are Best for Painted Versus Stained Finishes?
Painted finishes respond best to penetrating oils sparingly—lightly, as-needed, with quick buffing. For stained finishes, opt for deeper penetrating oils. You’ll protect sheen, durability, and color, while avoiding gloss buildup on painted and stained finishes alike.
How to Identify VOCS in Cleaners Used on Wood?
VOC detection starts with reading labels and using a VOC meter when possible; observe cleaner ingredients, noting solvents, aldehydes, and fragrances. You’ll identify risky components, choose low-VOC options, and ventilate well to minimize exposure.
Do Varnishes Require Different Oiling Schedules?
Yes, varnishes require different oiling schedules. Varnish maintenance depends on wear and environment, so adjust oiling frequency accordingly, shortening or lengthening intervals as needed to maintain sheen and protection while preventing drying cracks.
Can Food-Safe Oils Cure Odor in Cabinets?
Beating around the bush won’t help: food-safe oils can reduce cabinet odor, but you must allow proper oil absorption and curing time. Food safe oils won’t instantly cure odors; expect gradual improvement as oil cures.
Conclusion
Regular maintenance keeps cabinets from drying and cracking. You’ll notice how the right cleaner, careful prep, and the perfect oil work together to protect sheen, porosity, and cracks. Coincidentally, when you schedule routine cleanings, you’ll also see fewer sticky residues and less cracking—almost as if prevention and protection converge. Follow the steps, test first, and apply oil evenly, avoiding buildup. Stay consistent, trust the process, and your wood will feel resilient, not fragile, with every use.


