
To install sliding shelves in existing kitchen cabinets, start by clearing the cabinet, removing shelves, and cleaning the interior to guarantee smooth operation. Measure width, height, and depth precisely, and verify interior clearance for the rails. Choose a compatible sliding system, mount rails level and plumb, then install tracks with even spacing. Add shelves and secure fasteners, checking for levelness and smooth movement. Recheck overall clearance and finish with a safety check, and you’ll gain efficient storage as you proceed. You’ll uncover more steps as you continue.
Why Sliding Shelves Make Cabinets More Efficient
Sliding shelves improve cabinet efficiency by maximizing usable space and simplifying item retrieval. You gain straightforward access to stored items, reducing overreach and disorganization.
This design minimizes dead zones and uneven loading, supporting consistent loading patterns that preserve shelf integrity. With sliding mechanisms, you maintain cabinet organization as items don’t topple or hide behind others.
You can view contents at a glance, enabling proactive inventory checks and faster meal preparation. Space optimization occurs through vertical stacking and full-extension travel, which exposes items previously hidden in back corners.
You experience improved ergonomics, fewer searches, and enhanced safety. The result is reliable, repeatable performance that scales with cabinet size, reinforcing systematic storage practices while preserving structure and accessibility for daily use.
What You’Ll Gain From Sliding Shelves
With sliding shelves, you gain immediate, practical benefits that streamline kitchen workflows. You’ll experience improved access, reduced reach fatigue, and clearer sightlines for stored items, enabling faster retrieval and fewer misplacements. The system supports consistent loading and unloading, minimizing door-swing interference and preserving cabinet geometry.
- Enhanced cabinet organization: distinct zones and labeled tiers promote orderly placement of frequently used items, reducing rummaging time.
- Storage optimization: extended usable space, better vertical utilization, and uniform shelf spacing maximize capacity without overhauling existing structures.
- Maintenance efficiency: smoother slides, lower wear on cabinet faces, and easier cleaning cycles sustain performance over time.
These gains translate to measurable workflow gains, predictable item placement, and longer cabinet life.
Prepare Your Cabinet Space for Sliding Shelves
First, measure the cabinet interior to confirm available width, height, and depth for the sliding shelves.
Then, clear debris and any obstructions to guarantee smooth operation, and evaluate space to accommodate the chosen sliding mechanism.
Finally, select a sliding mechanism that fits your dimensions and load requirements, using the measurements and clearances to guide your choice.
Measure Cabinet Interior
Before you install sliding shelves, measure the cabinet interior to define the available space and make certain of compatibility. Accurate measurements prevent overhangs and binding, ensuring smooth operation. Focus on crosswise width, depth from front to back, and vertical clearance above the base cleats.
Confirm that interior walls, hinges, and shelves won’t conflict with mounting hardware. Record precise dimensions, then compare against your chosen hardware specifications to confirm fit.
Consider cabinet materials and potential expansion or contraction with humidity, which can affect shelf movement. Also evaluate shelf aesthetics against existing finishes to maintain a cohesive look.
- Measure width, depth, and height with a steel ruler or calipers for accuracy.
- Note obstructions (bins, dividers, plinths) and allowable clearance.
- Verify hardware compatibility with selected slide rails and mounting points.
Clear Debris And Space
Clear debris and free space in the cabinet to guarantee smooth slider operation. You should empty the cabinet, remove shelves, and inspect corners for obstruction. Sweep out dust, loose debris, and any small fasteners that could snag a sliding rail.
Measure interior clearances again to ensure compatibility with the intended slide length, and verify that hinge doors won’t collide with the sliding path. Wipe all surfaces with a lint-free cloth to prevent grit transfer.
Create a clean baseline to avoid binding, ensure level mounting, and prevent uneven wear. Organize remaining contents to promote organized storage and reduce clutter during use.
Allocate empty space that allows full travel of the slides, then rebutton or re-secure components only after confirming clearance.
Choose Sliding Mechanism
Choosing the right sliding mechanism hinges on cabinet depth, weight, and intended use; select a system that supports the load and fits the interior clearances established earlier. You must align mounting options with your cabinet geometry and guarantee smooth operation without binding. Material selection influences durability, finish compatibility, and tracking performance under load.
- Assess mounting options for full-extension versus partial-extension rails and confirm screw spacing matches existing holes.
- Match material selection to cabinet components, considering corrosion resistance, load rating, and slide longevity.
- Verify compatible hardware for detents, stops, and anti-tip measures to prevent shelf drift and ensure safe use.
Measure Carefully: Key Cabinet Dimensions
Accurate measurements are essential to guarantee the sliding shelves fit and function smoothly. You’ll start by recording cabinet height from floor to underside of the upper lip, and verify uniformity across all compartments.
Next, measure the vertical clearance inside each cabinet, noting any obstructions like dividers or adjustable racks.
Determine shelf depth by comparing the deepest item you plan to store with the available interior space, ensuring the shelf won’t interfere with doors or hinges.
Capture width at multiple points—top, middle, bottom—to catch any outliers.
Use a steel tape for precision and record results in a concise diagram or table.
Finally, translate measurements into your hardware plan, aligning track length, mounting points, and supported load with the cabinet’s actual dimensions.
Choose the Right Sliding Shelf System for Your Cabinets
To select the right sliding shelf system, start by matching rail length and shelf depth to the measured cabinet interior, guaranteeing smooth movement without interference with doors or hinges. Next, evaluate load ratings, guaranteeing you can support intended items and maintain stability over time.
Finally, consider compatibility with your cabinet’s interior finish and mounting method to minimize cosmetic intrusion and maximize durability.
1) Rail length, shelf depth, and mounting type must align with interior dimensions and hinge clearance for unhindered operation.
2) Weight capacity and glide quality govern long-term performance; choose stainless or reinforced components for high-demand uses.
3) Drawer organization integration and cabinet lighting compatibility ensure workflow efficiency and visibility.
Choose systems that balance space utilization, reliability, and visibility for maximum efficiency.
Gather Tools and Materials You’ll Need
Gather the right tools and materials before you start, so the install goes smoothly and you avoid mid-project trips to the hardware store. Begin with a complete list tailored to your cabinet dimensions and slide system.
Tools: measuring tape, square, pencil, level, drill/driver, bits for wood and metal, and mounting screws matching your slides.
Materials: sliding shelves, full-extension slides, anti-tip brackets if required, kick plates, shims, and cabinet supports.
Verify hardware compatibility with your chosen system and cabinet construction, including screw length and thread type.
Confirm clearances for shelf height, door overlap, and drawer stops.
Organize components by function to maintain cabinet organization during install.
Inspect for warped panels or misaligned frames, and plan replacements if needed to prevent misfits later.
Label fasteners and keep spare parts on hand.
Remove Obstructions and Clear Cabinet Space
You should clear cabinet space by removing items and freeing access to the shelf areas. Thoroughly remove obstructions, checking for loose hardware, spills, and damaged liners that could hinder slide operation.
This setup guarantees a precise base for installing the sliding shelves and prevents future interference.
Clear Cabinet Space
Clearing cabinet space starts with identifying and removing any obstructions that block access to the shelf area. You’ll methodically assess interior dimensions, ensuring clear paths for slide-out drawers and future shelving. This is a precise preparatory step, not decorative, yet it supports pantry organization and kitchen aesthetics by enabling accurate alignment and operation.
- Remove items stored in the cabinet’s interior perimeter, rehoming them to open zones or adjacent cabinets.
- Inspect for protruding hardware or shelf lips; address by leveling or relocating to maximize usable width.
- Clean surfaces and floor, then measure available clearance to confirm compatibility with sliding components.
Remove Obstructions Thoroughly
To remove obstructions thoroughly, start by clearing every item from the cabinet floor and interior perimeter, ensuring unobstructed access to the back corners and shelf lips.
Inspect interior walls for protrusions, dividers, and hardware that could impede sliding shelf movement.
Identify and segregate items by weight, size, and frequency of use, preserving essential contents in labeled containers.
Prioritize obstruction removal around mounting frames, hinges, and electrical or plumbing clearances to avoid future conflicts.
Verify hardware compatibility with the new slide system before disassembly, noting any screws, brackets, or tracks that must be relocated.
Remove or relocate obstructions to create a clean work plane, then recheck for hidden impediments.
Document changes for maintenance and confirm the cabinet’s internal clearance meets the required spec after installation.
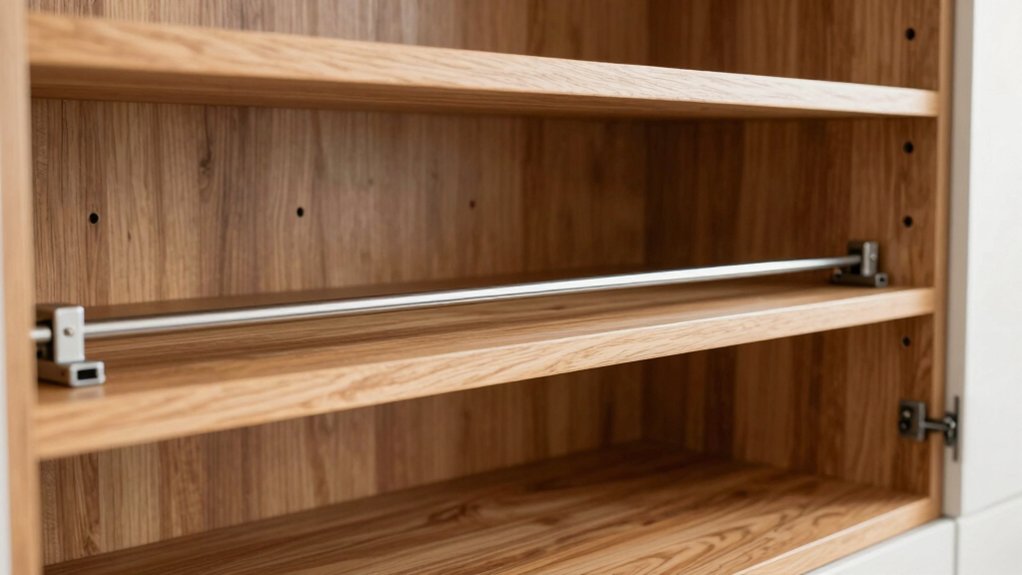
Install Drawer Guides and Tracks for Sliding Shelves
Installing drawer guides and tracks is a precise prerequisite for smooth sliding shelves. You’ll establish consistent support by selecting compatible, high-quality components and confirming cabinet dimensions before installation.
Accurate drawer installation and precise track alignment ensure reliable operation and load distribution. Follow manufacturer instructions for fastener spacing, screw length, and projection to prevent binding or wobble.
- Verify cabinet depth, width, and height, then mount rails level with plumb alignment using a tare block or shim as needed.
- Install slides or tracks with even spacing, ensuring smooth movement across the full travel, and tighten hardware to the recommended torque without overdriving.
- Check track alignment across the cabinet with a straightedge, adjust as necessary, and test drawer functionality before finalizing.
This guarantees dependable, consistent drawer performance.
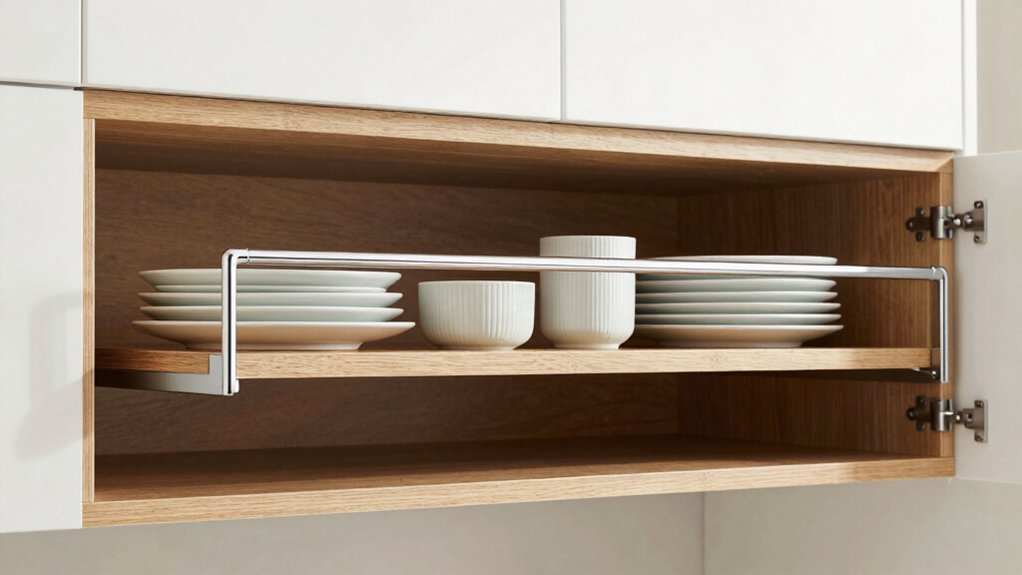
Install Shelves and Secure Fasteners; Align for Smooth Operation
After you’ve set up the slides and tracks, proceed to install the shelves and secure them firmly while ensuring smooth operation. Position each shelf on its selected rack, then fasten with appropriate screws through predrilled holes, avoiding overtightening that could warp material.
Verify levelness with a torpedo or spirit level; adjust shims if necessary to prevent binding. Align adjacent shelves for consistent gap spacing, ensuring uniform support across full width. Check that shelf materials seat evenly on support pegs or lips, distributing load without tilting.
Tighten all fasteners in a cross pattern to prevent twisting under load. Recheck movement by sliding fully in and out; address any binding at corners or edges. This step supports cabinet organization and maintains reliable performance over time.
Safety, Weight Limits, and Maintenance
Because shelves will bear weight and movement, you must observe explicit safety, weight, and maintenance guidelines to prevent damage or injury. You clarify installation parameters by verifying hardware load capacity, ensuring mounts, tracks, and fasteners meet rated specifications, and inspecting for signs of wear after setup.
Regular maintenance includes checking for loosened screws, bent rails, and deteriorated mounting brackets, and addressing issues before use. Incorporate fire safety considerations by keeping heat sources and moisture away from sliding components and ensuring clearances to reduce risk of ignition or warping.
Adhere to manufacturer guidance on load limits and operation cycles to avoid overload.
1) Confirm load capacity for each shelf and bracket.
2) Inspect hardware quarterly and replace worn parts.
3) Practice fire safety and proper ventilation during use.
Frequently Asked Questions
Can I Reuse Existing Hardware With New Sliding Shelves?
Yes, you can, but check hardware compatibility and weight capacity first. If compatible, you’ll reuse existing hardware, ensuring smooth shelf adjustment; adjust rails precisely, confirm fasteners align, and test load distribution before loading the shelves.
How Do I Fix Binding or Sticking Shelves?
You should inspect for binding sources and apply shelf lubrication to the contact surfaces, then perform rail adjustment to align drawer slides, ensuring smooth operation; test, repeat as needed, and verify weight limits haven’t been exceeded for reliable performance.
Do Sliding Shelves Require Cabinet Door Removal?
Do cabinet doors need removal for sliding shelf installation? Often yes, but not always. You can proceed if clearances allow; otherwise remove doors, hinge screws, and frame stops. Remember cabinet door removal simplifies precise alignment and operation.
What Is the Typical Lifespan of Sliding Shelf Hardware?
The typical lifespan of sliding shelf hardware lasts 5–15 years, depending on usage. You should inspect tracks and wheels regularly, lubricate moving parts, and replace worn components promptly for peak hardware durability and shelf maintenance.
How Do I Troubleshoot Sagging Shelves or Rails?
To troubleshoot sagging shelves or rails, inspect shelf support and tighten loose fittings, replace damaged brackets, and adjust rail alignment. Confirm rails glide smoothly; perform rail adjustment to restore even distribution and prevent future sagging.
Conclusion
You’ve learned the essentials to install sliding shelves confidently, without the headaches. By planning carefully, selecting the right system, and precise alignment, you’ll minimize surprises and maximize cabinet efficiency. If something feels off, pause and reassess—you’re not failing, you’re ensuring long-term reliability. Keep tolerances tight and fasteners secure; smooth operation hinges on thoughtful preparation. In short, progress today yields quietly improved organization tomorrow, with a modest nod to future maintenance and safe loading.


